Alma Import Profiles
Last updated: 2/27/2020
Relevant Documentation
There are several types of import profiles in Alma. Different import profiles may be appropriate for different types of materials.
Creating a Repository Import Profile
Repository import profiles are the most common import profile type you will create in Alma. They can be used to load and update local electronic collections, and to load batches of records
Go to Resources > Import > Manage Import Profiles
A list of all import profiles you have access to will appear. In addition to those created for your institution, there are also import profiles that come from the Network Zone and the Community Zone.
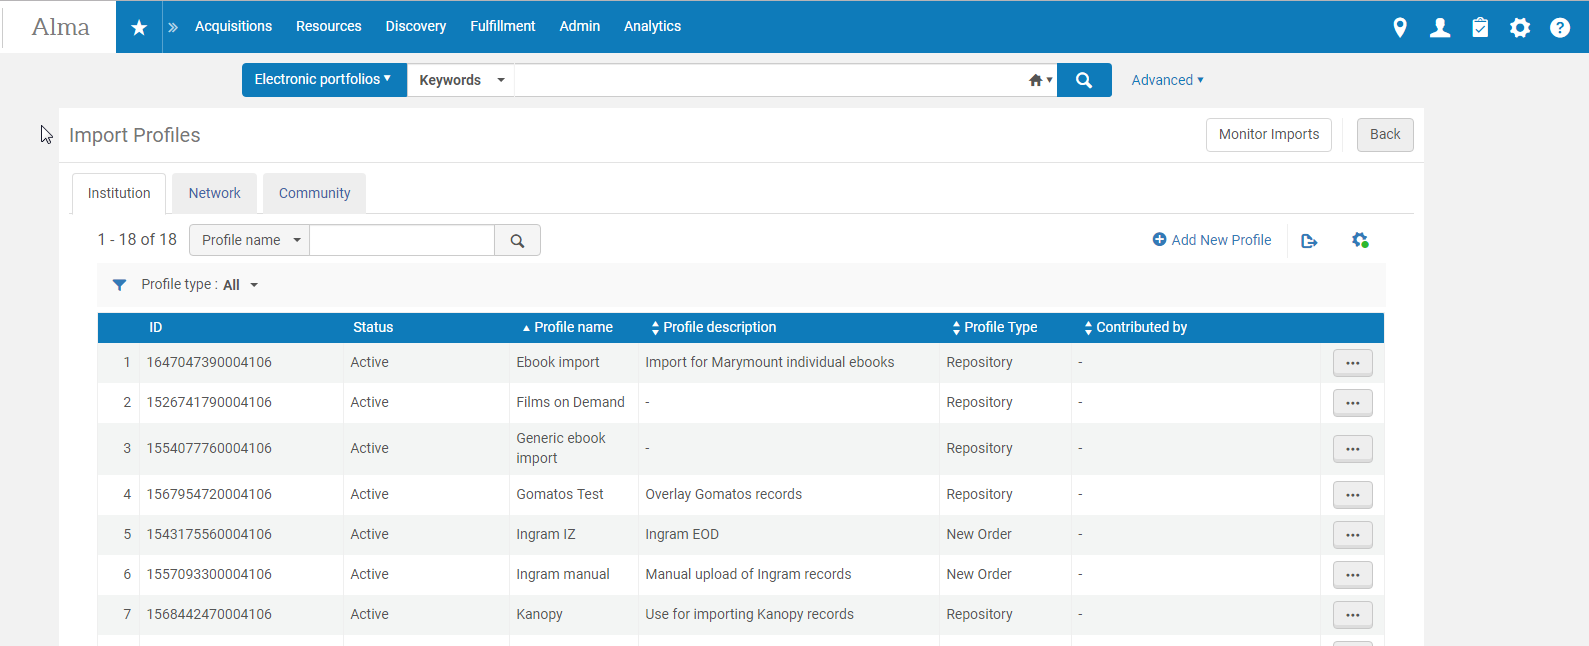
Click Add New Profile to add a new import profile
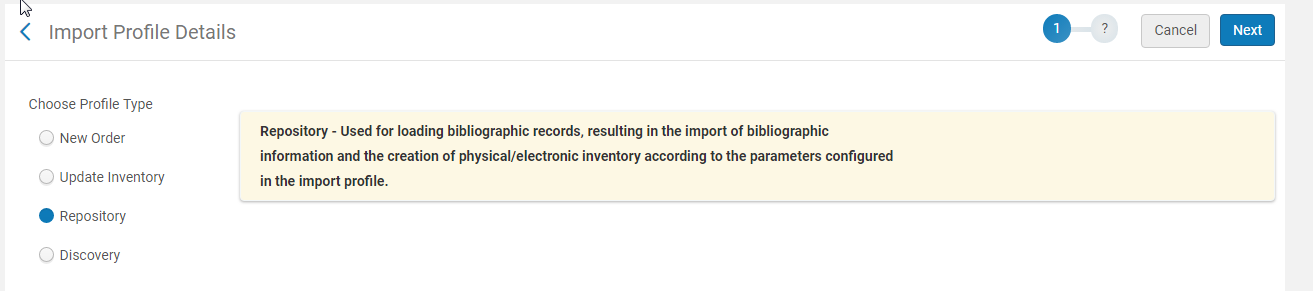
The first page will ask you to choose a Profile Type. In this case, choose Repository.
The next screen asks you to name the profile and give a description.
Fill in the originating system (if no match is found use “other”).
Choose the import protocol you will be using. In this case, we will choose Upload File/s. The other options are FTP and OAI.
Physical source format for MARC records is Binary
Source format is MARC21 Bibliographic
If you know the file name pattern you can enter it, but this is more important for import profiles that use FTP.
Be sure to uncheck Use Network Zone.
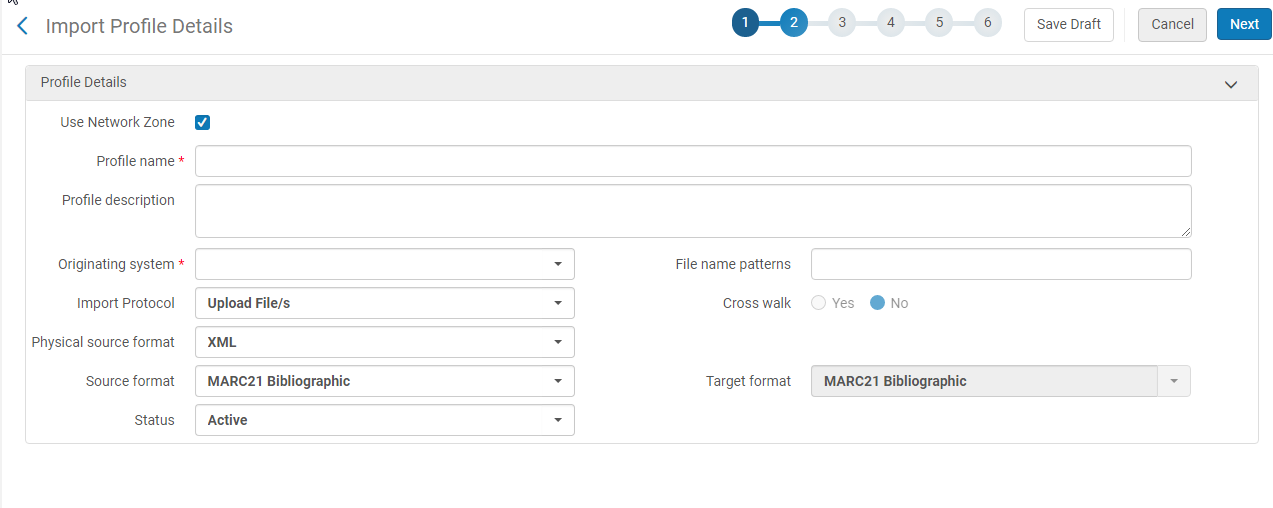
Once you have completed all the necessary fields, click Next
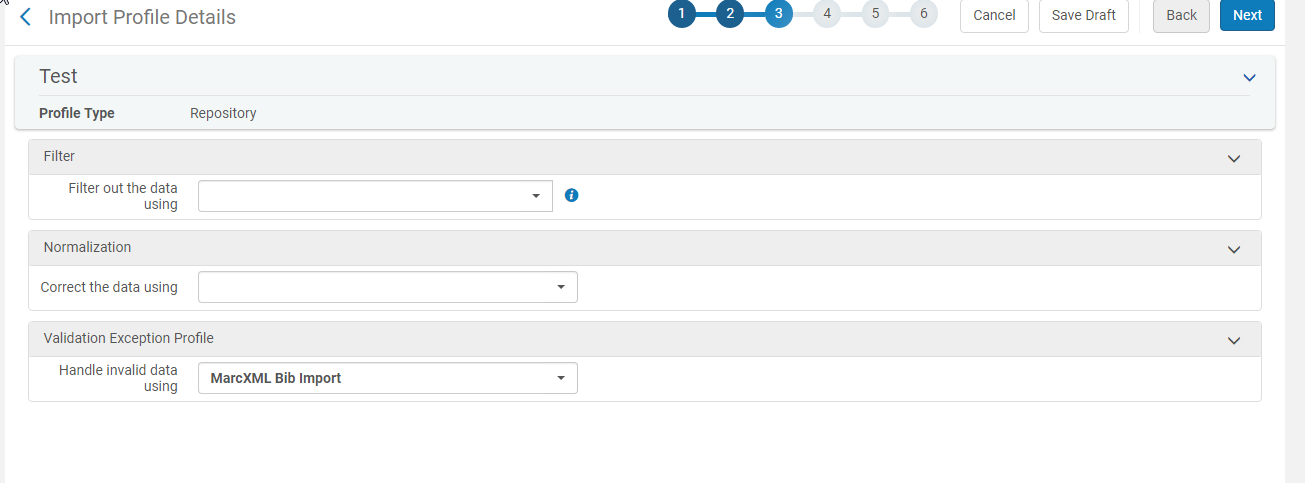
The next page asks if you’d like to correct or filter the data in any way. Generally these can be left blank or as is unless you wish to specify one of the rules below.
If you have created an indication rule you would like to use to filter out certain records from your set, you can add it using the Filter drop-down.
If you’d like to correct your data using a normalization rule you’ve created, you can choose that here as well.
Finally, if you have a specific validation profile you’d like to see used, you can also choose that here. Generally MarcXML Bib Import is fine.
Click next when completed.
The next page asks you to detail your match profile for records. This is important because it eliminates duplicates.
Under Match Profile choose whether or not you will be importing mixed serial or non-serial items. Generally the answer to this is No.
Choose the Match Method, generally 035 (Other System Identifier), then enter the system identifier prefix (such as OCoLC).
Under Match Actions
Choose whether you would like to handle problems with matches manually or automatically.
Choose how you would like records handled upon a match being found. Generally Do Not Import or Merge are preferable.
Check the box to match the record only with the same inventory
Choose a merge method, if using Merge. Note: If this is a Network Zone import profile, always choose the Consortium NZ Overlay all fields but local...rule
Keep all other options blank.
Under Automatic Multi-Match Handling
Check Prefer record with the same inventory type (electronic/physical)
Check Skip and do not import unresolved records
Under Handle Record Redirection
Choose Delete under canceled record
Choose Merge Method overlay all fields but local
Under No Match
Choose Import.
Click Next
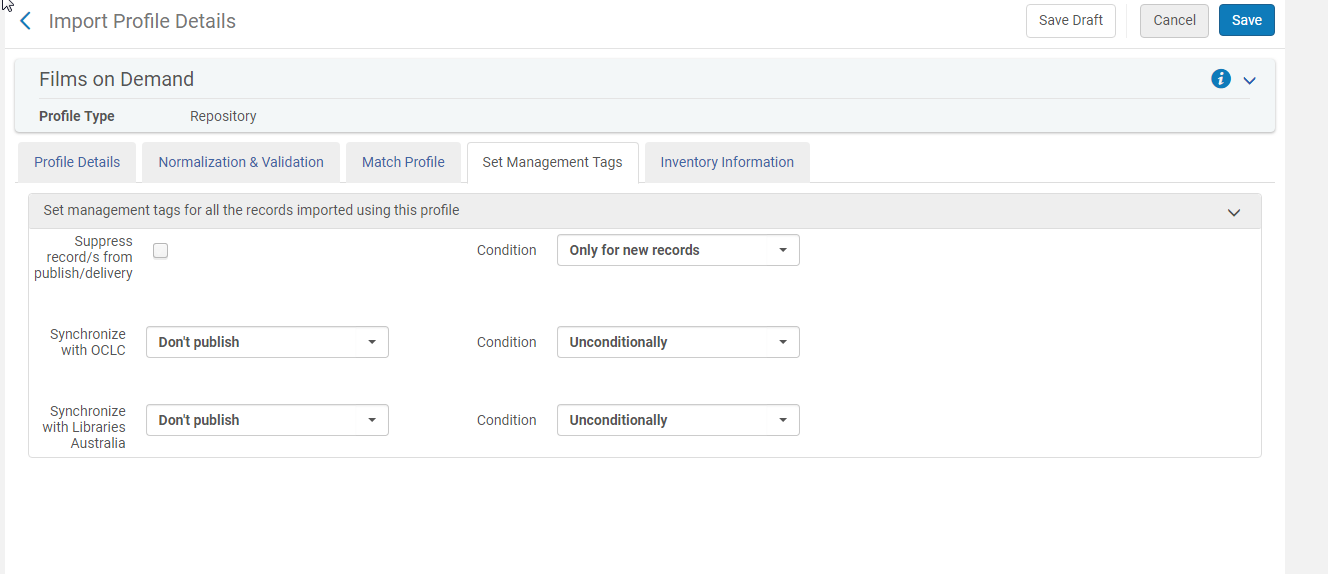
On the Set Management Tags page, you can choose whether or not you would like to publish to OCLC or suppress records from discovery. Leave these as is. Click Next.
In the Set Management Tags section, leave all conditions at default. Click Next.
On the Inventory Information page you will choose the type of information you are dealing with and where the records should go
Under Inventory Operations choose the type of records you will be importing. It is generally considered a best practice to choose either Electronic or Physical rather than Mixed. The type of inventory you choose will determine the mapping that appears below.
For electronic inventory
Choose whether or not the portfolio is standalone or part of an electronic collection.
Choose the corresponding electronic collection. Service is generally Full Text.
Choose the appropriate Material Type.
Choose whether you are importing a single record or multiple. Multiple is more common.
Under Extract portfolio information from field, choose the MARC field where the URL information is stored in the bib record. Generally this is the 856 field.
Add the subfield. The information is contained in the Extract access URL from subfield. This is usually $u or $x.
Add any authentication notes necessary
Choose a default library and check Activate resource.
Click Save. Your import profile should now be ready to run. It is recommended to test the profile using a small number of records before running it on a large batch.
EOD Import Profiles
Embedded Order Data (EOD) profiles allow you to import records with order data which is used to create attached PO lines. Sometimes, these are overlaid by full records at a later point.
-
Creating an EOD Import Profile follows the Repository Import Profile creation until Inventory information is entered. There is an additional tab for PO line information, and a section for fund mapping on the Mapping tab on an EOD profile that need to be completed before it can be run.
-
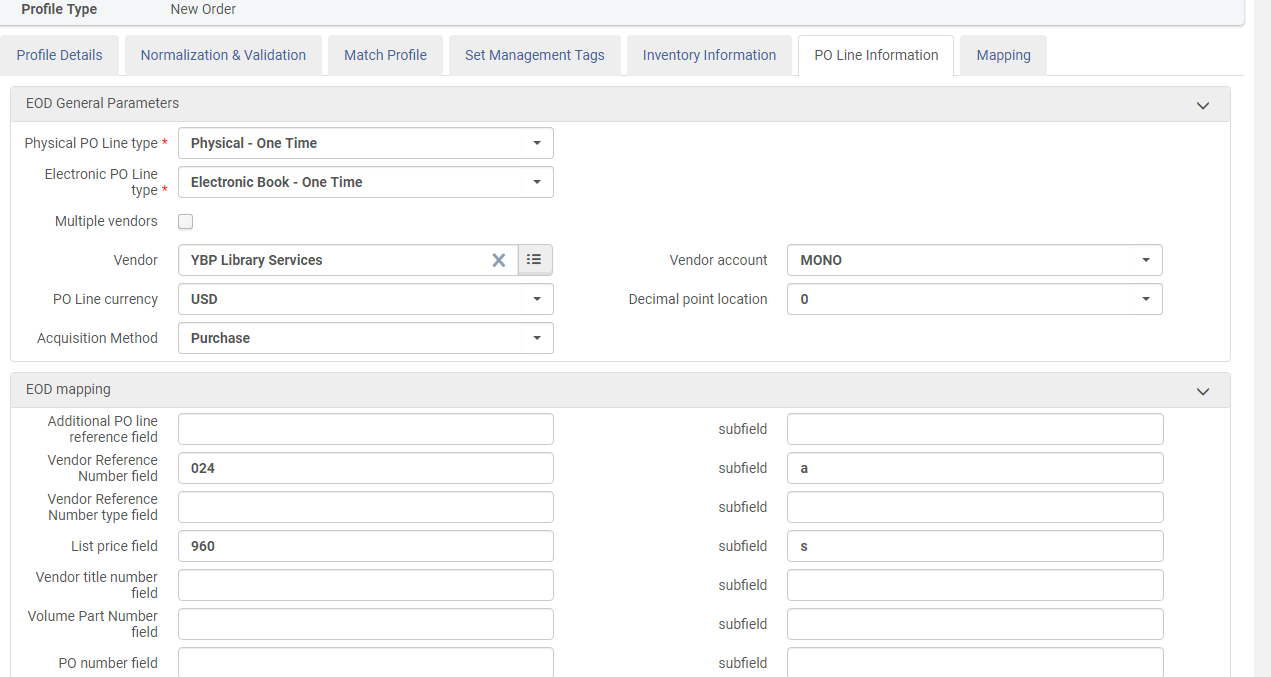
On the PO line information tab
-
Choose the PO line type
-
Fill in the vendor (or vendors) and the vendor account (Note: the vendor account must be in your list of vendors in Alma)
-
Choose the currency, and the acquisition method (usually purchase or purchase at vendor system)
-
Under EOD mapping fill in the fields in which the order information is stored in the MARC record. This information can usually be found or established in vendor documentation.
-
Choose the default PO line owner library, and choose to Map the owner.
-
If necessary, go to the mapping tab and map. You must use the existing fund code from Alma and ensure it matches the fund code from the vendor EOD profile.
-
Funds can also be added at the point of invoicing, if necessary.

-
Click save when completed.
Update Inventory Import Profiles
When EOD information is added, or if you are overlaying or merging records with new ones, you can use an Update Inventory Import Profile.
-
Follow the instructions for Profile details for Repository and Normalization and Validation. You may choose to remove Vendor data at this time since the order record has already been created.
-
In the Match Profile tab
-
Pay special attention to the match profile to ensure the match method is correct. In most cases you will be matching by PO line, but 035 (other system number) is also a reliable match-point for overlays or merges that are not for EOD records.
-
Under Match Actions choose whether you’d like to merge or overlay the records.
-
If choosing to merge, use the Consortium NZ Overlay all fields but local...merge method.
-
Under Automatic Multi-Match Handling check Prefer record with the same inventory type (electronic/physical)
-
Under Merge Records and Combine Inventory for Multi-Match
-
Disable Merge and Combine
-
In the Mapping Tab
-
Choose the fields from the incoming records to map. Location fields, number of items, and material type are the most important.
-
Under Holdings Record Mapping check update holdings call number
-
Leave Receive item unchecked.
-
Under the PO Line Information tab be sure to enter the vendor reference number field and subfield if you are matching by PO line.
-
The mapping tab may be left blank.
-
Save the import profile.
Manually Running an Import Profile
-
Prepare your records for import using MarcEdit or a similar program. Ensure the mapped fields and subfields in the import profile match the fields in the records.
-
Navigate to Resources > Import > Manage Import profiles. Select Run under the row actions list (...), then select file to upload your record file.
-
Once the records are uploaded click Run.
-
The job will run and you will be able to view the results and resolve any errors.
Setting up an Import Profile via FTP
Marymount has two import profiles set up using FTP. One is for GOBI and the other is for Ingram. The instructions will detail general set-up of FTP import profiles, as well as specifics for the GOBI and Ingram profiles at Marymount.
Basic Set-up
- Choose the appropriate import profile type (EOD, repository, overlay, etc.)
- On the Profile Details tab
- Uncheck Use Network Zone
- Create a profile name and add a description, if desired.
- Choose the originating system (if no system is listed, choose Other)
- Enter the file name patterns.
- You can find the file name patterns by opening the file from the FTP server and looking at the file. Use the * as a wildcard, and add in the file extension. For example: *.mrc for MARC records for *.ord for order records.
- Import protocol will be FTP
- Choose the appropriate physical source format (usually binary), the appropriate encoding format (usually UTF-8), the source format should be MARC21 Bibliographic. You do not need to set the status as active yet.
- Under scheduling
- Choose which files you would like to import (generally New)
- Decide when you would like to schedule the job to run. Note: Keep the scheduler status inactive until you have tested the profile.
- Under FTP information
- Create a description for the FTP server
- Enter the server name, the port used (21 or 22), and the username and password.
- Designate the input directory
- You can leave the Max number of files and Max file size as the default of 1 and 1MB, respectively.
- Choose FTP server secured if the server is secure (not necessary)
- Test the connection. If you see files available and the get a message that the connection is successful, you can continue creating the import profile.