Requesting Special Collections Material in Alma
This document contains step-by-step instructions and other helpful information specific to using Alma Fulfillment in Special Collections
1. Requesting items in Alma
a. Decision Matrix
b. Steps for requesting books or boxes in Alma
2. Tracking requests once placed
3. Scan-in (when requested items are delivered or paged)
4. Steps for circulating books and boxes in Alma
5. Circulating items for classes
6. Returning items: keep on hold, place in transit, and reshelve 7. Create New User Accounts
8. Search for WRLC Users
Requesting items in Alma
Decision matrix for request types
Remote Reference Patron Physical Item Request
Staff member making request; add a note with the patron name
Place directly on hold shelf, print slip, shelve with staff holds
Class Instruction or event
Patron Physical Item Request
Special Collections Instruction account; add course
name/info/date of class in the notes field
Place directly on hold shelf, print slip, add class info and date (?) /staff name, shelve with instruction holds
Steps for requesting books or boxes in Alma
- The request begins from the item:
Search the item in Alma; typically the most efficient way to find a specific item (especially for boxes) is to search for Physical Items by Barcode (shown below)
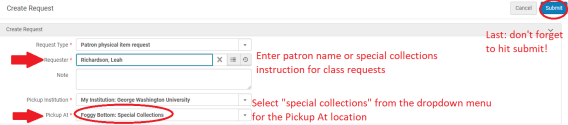
- Once you identify the correct item click “request” and select “Patron Physical Item Request” as the request type from the dropdown menu (shown below)
- Enter the name of the “Requestor” (see the matrix at the top of this section for specifics about who the requestor should be based on the request type); select “Special Collections” as the “Pickup At” location; click submit. (shown below)
Tracking requests once placed
There are a few ways you can check the status of items that have been requested.
1. Clipboard - Requested items that live on site and need to be paged will appear in our “pickup from shelf” list.
You can access this by clicking on the “clipboard” icon on the top right of your screen.
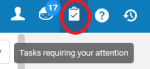
Select “Pickup from Shelf” to access the queue of outstanding requests to be paged. (Shown below)
You can print call slips directly from the Pickup from shelf queue. Print two: one for the item and one as a shelf marker to indicate that something has been removed from the shelf.
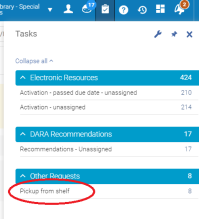
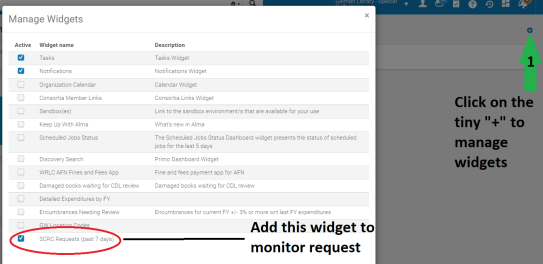
2. Widget - A widget that shows the status of the most recent two weeks of requests can be added to your Alma dashboard. It updates every 24 hours, not in real time.
To add this and other widgets, click on the tiny plus sign (+) found on the upper right side of the Alma home screen. A window with options for different widgets pops up. Select the ones you want and save.
Image below shows the widget for SCRC requests:
3. Monitor active requests (on site and remote storage, in real time)
Follow this path: Fulfillment > Monitor Requests & Item Processes
Refine the results by Pickup Location and select Special Collections and you can then refine this by material type and see just boxes or books.
4. Look up a specific patron to see their requests.
Follow this path in Alma: Fulfillment > Manage patron services
Search and locate the patron by name and click “ok”
In the next screen select the “requests” tab to see a list of requests for a specific patron.

Scan-in
Using the Scan in function will change the Alma status for the item from Requested to Hold Shelf signifying the book is on hold for the patron. This also triggers an automatic notification email to be sent to the patron, alerting them that their item is in the reading room and ready for use.
Before you scan-in items make sure your scan-in screen has the proper radio buttons checked (screen shot:)
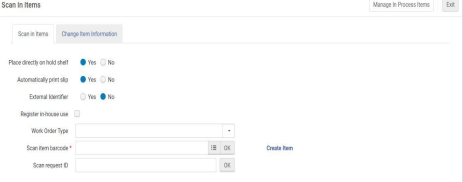
Basic steps to scan in items:
● Follow this path in Alma: Fulfillment>Scan In and then scan the barcode for each item that has been delivered or paged.
● A window will pop up on the right side of your screen. Any notes added to the request will be displayed here. Notes often include class information or the date of the patron’s scheduled visit, or information regarding a remote request.
● Print a call slip for each item that you scan in. Select “quick print” in the pop-up window that appears on the right of your screen after you scan in each barcode. This action will generate a PDF that you must then send to the printer. (image below)

● We print the call slip so we have the patron’s name on the item in order for boxes and books to be shelved correctly and quickly located once the patron is in the reading room. ● Boxes and books on hold for patrons should be shelved in 704x alphabetically by last name.
● Boxes for staff or remote reference can go on the shelves designated in 704x1 ● Boxes for class instruction are usually grouped together on a cart with a note on the cart indicating the class number, date of the class, and instructor’s name
Steps for circulating books and boxes in Alma
Circulating items in the reading room begins with the patron name/ID
Follow this path: Fulfillment > Manage Patron Services
● Search the patron name to locate their record; click “GO” when you find the correct user. (You can scan the barcode on a GWorld card to locate a GW user)

● Scan the barcode on the box that the patron would like to use; the box is now checked out to the user for reading room use.
Returning items: keep on hold, place in transit, and reshelve
There are several different options for routing books and boxes that have been circulated for a patron.
Here are the most common and the corresponding steps in Alma:
Patron
wants to/is:
Alma path Alma action Where to put the
item
notes
1 Subject to change based on space availability
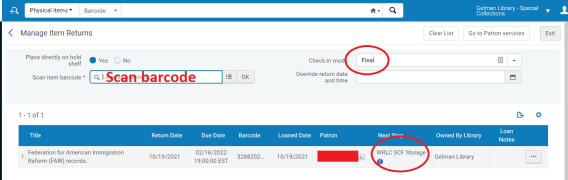
If there is another patron request for the same item, a window will pop up indicating the active request and the name of the patron when you scan a box or book for a final return.
Visual for Fulfillment > Return items
Circulating items for classes
Circulate items to the Special Collections Instruction account each time a class uses these items. If a class is meeting multiple times over the semester and using the same items, circulate the items at each class visit. This can be done by the staff person leading the session before or after each class. Essentially we circulate the box and then receive it back so it returns to the hold shelf in Alma.
As with researchers, circulation starts from the patron’s account.
Follow this path: Fulfillment > Manage Patron Services
In the field where you are prompted to scan the patron’s ID or search for a patron’s name enter “Special Collections Instruction”.
Scan the barcodes for all the items to be used that day.
The next step is to receive the item from the patron.
Follow this path: Fulfillment > Active Hold Shelf > Held by patron (tab)
Click on the “receive from patron” option (right) for each item or select each item using the radio button next to each item and select “receive from patron” at the top of the queue.
Create New User Accounts
New users are non-GW patrons who are also not affiliated with a WRLC school. WRLC users have accounts in Alma; search under “manage patron services” to confirm a WRLC-user account. (instruction in next section to search for WRLC patrons.) To create a new account
Follow this path: Fulfillment > Manage Patron Services
Select “register new user” on the upper right of your screen

Use the following fields for a new user account:
● First Name, Last Name
● User group = gw spec visitor
● Email address
Search for WRLC Users
If a WRLC user has previously checked out materials from GW libraries their account should appear in the standard patron search.
If not you can do a more in-depth search to locate their record.
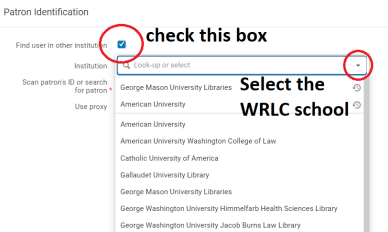
● Follow this path in Alma: Fulfillment > Manage Patron Services
● Check the box for “Find user in other institution”
● In the next field below “Institution” open the dropdown menu to select the WRLC institution from the list. (image below)
● Input the patron’s name in the next field “Scan patron’s ID or search for patron” ● Click “GO”
No comments to display
No comments to display