WRLC HQ
Documents and Information for staff at WRLC Headquarters
- Handle Server
- Letters managed in the NZ for Physical Item Requests
- Local Authority Headings Workflows
- Sandbox Configuration after refresh
- Update Rota Template Members
- Update the Resource Sharing Partners for the PSB
- Update sftp server directory for PSB use
- Update Webhook profiles
- Due Dates
- SCF Requests
- Delivery locations with Codes
- Physical item request that originated as an ILLiad physical item request
- Remote Storage Location Configuration
- Updating the Remote Storage Application configuration
- Troubleshooting Alma/Primo Service Desk tickets
- Affiliate Library Configuration
Handle Server
The WRLC handle server prefix is 1961.
The prefix is renewed each year in January.
The contact for renewal is hdladmin@cnri.reston.va.us. (Most recently this was Christy Short.)
The last renewal in January 2024 was $50.00.
TESTING:
- Test URLs
- https://hdl.handle.net (enter handle like 1961/muislandora:871 )
- https://hdl.wrlc.org/1961/14672
- https://hdl.handle.net/1961/muislandora:876
- Test command
- $ mysql -u root -p -e "show databases;"
Trouble shooting:
If the handle server doesn't restart on reboot, check the lock file.
If lock file was not removed on shutdown/crash, it will need to be removed before the handle server can restart.
Location: /opt/handle/svr1/txns/lock
-rw-r--r-- 1 root www-data 4 Mar 25 09:50 lock
kilduff@crhandle:/opt/handle/svr1/txns$
Remove lock file.
Note - migrated to cloud 4/8/2024
Letters managed in the NZ for Physical Item Requests
There are two letters managed in the network zone for our partners.
Pull Slip (Ful Resource Request Slip Letter)
The Pull Slip is managed for our partners to provide consistency for the displayed location codes. These codes are use to direct the physical items to the patron's selected pickup location.
Notes:
- The SCF's Pull Slip has further modifications to allow the letter to be used for ILLiad physical item requests that come to the SCF via the ILLiad Addon. Currently, only GW is using the ILLiad Addon for this purpose.
- The SCF's Pull Slip has further logic modifications to try to determine if a request created by the SCFapp is of request_type "MOVE_TO_TEMPORARY" or "RESOURCE_
SHARING_PHYSICAL_SHIPMENT". (We are hopeful that Ex Libris will provide this information if/when they update the SCFapp for integration with Rapido(GM).) - The SCF's Pull Slip is not managed in the Network Zone.
On Hold Shelf Letter
The On Hold Shelf Letter is managed in the Network Zone so that specific library instructions can be provided to the patron on when and how material can be picked up. The original format of the letter only provided instructions from the owning library. These instruction were not specific to the pickup location that the patron selected.
Local Authority Headings Workflows
The following are the workflows used by the WRLC Consortial Network Zone Manager to oversee, edit, and update the local authority records in the WRLC Network Zone environment.
Replacement Headings
Supplemental Headings
Community Zone Local Headings
-
Write normalization rule with title “WRLC CZ [New Heading] Local LCSH”
-
Create a logical set of all CZ records with the original LCSH
-
Run the normalization rule on the set. Save this as a recurring job (to run every 2 months on the 15th)
-
Consortial NZ Manager will review results of scheduled jobs every 2 months
Documentation
WRLC Local Subject Headings tracking spreadsheet : Replacement and Supplemental Heading Tracking
Testing document : Local Authority Records
Sandbox Configuration after refresh
The Premium Sandboxes are refreshed twice a year. This copies the latest configurations from production Alma into the PSB Network Zone and the 3 PSB IZs. Several configuration changes need to be made so that the AFN will work correctly.
Update Rota Template Members
After the refresh, the Rota Template has the full compliment of partners for Consortium Book Borrowing (CLS-Physical) template. Members that do not have an IZ Sandbox need to be removed for the Rota to work properly. Currently, the members should be AU, DC, and GW. Remove the others that do not have a PSB.
In the PSB Network Zone:
Fulfillment --> Resource Sharing --> Rota Templates --> Edit Consortium Book Borrowing (CLS-Physical)
- On the Member Tab, select and Remove the IZs that are not represented in the Sandbox.
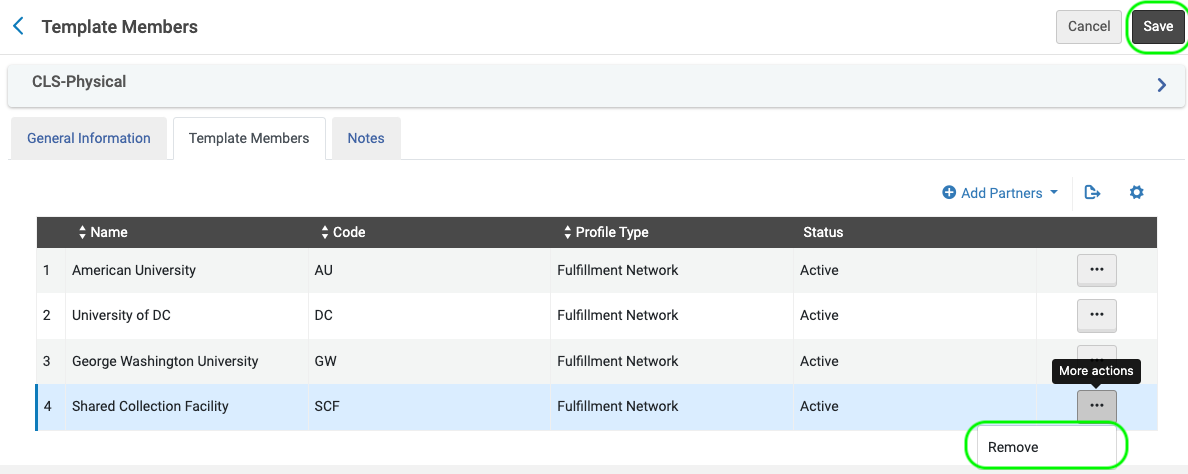
- Don't forget to Save.
Update the Resource Sharing Partners for the PSB
The Resource Sharing partners that are template members will need to have their URL parameter updated.
Fulfillment --> Resource Sharing --> Partners
- Find the partners that are in the updated Rota Template. Select edit.
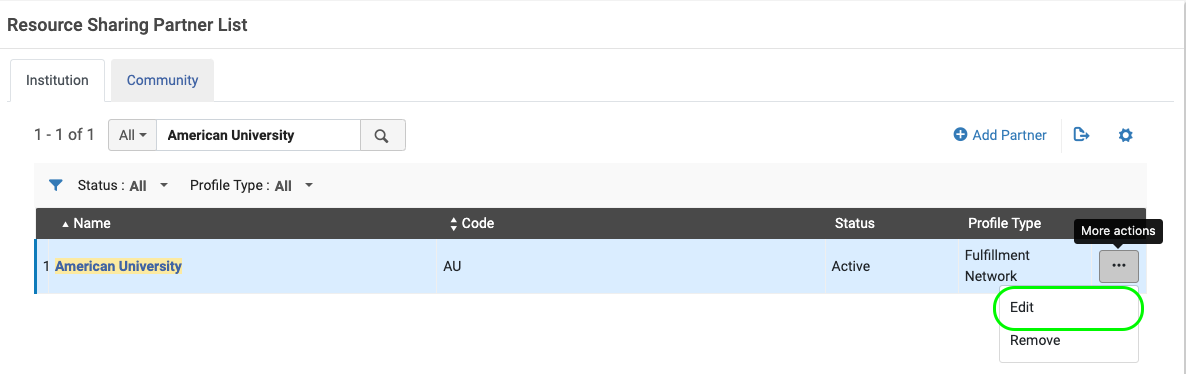
- Select the Parameters tab. Update the URL field. Don't forget to Save.
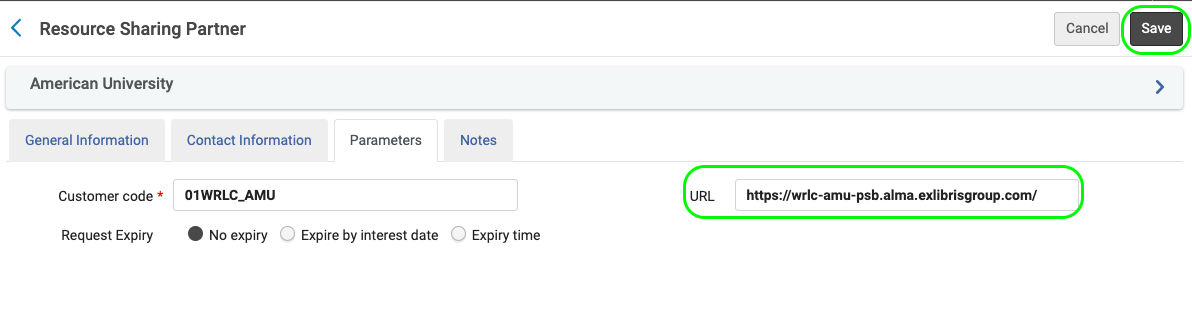
Currently, the URLs are:
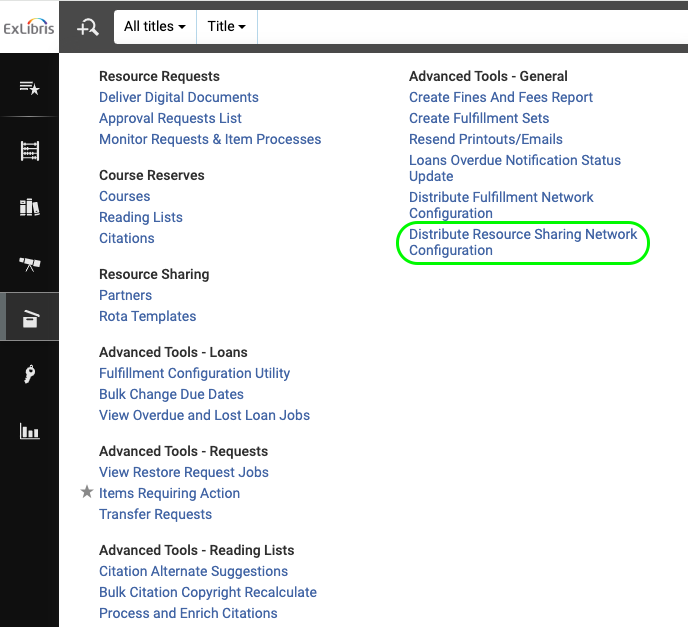
Once both the Rota Template members and the Resource Sharing Partner URL are updated you need to run the "Distribute Resource Sharing Network Configuration" job from the PSB Network Zone. This job distributes the changes that you just made to the template partner IZs
Fulfillment --> Advanced Tools - General --> Distribute Resource Sharing Network Configuration
Update sftp server directory for PSB use
Follow the instructions below for all of the Institution Zones in the sandbox:
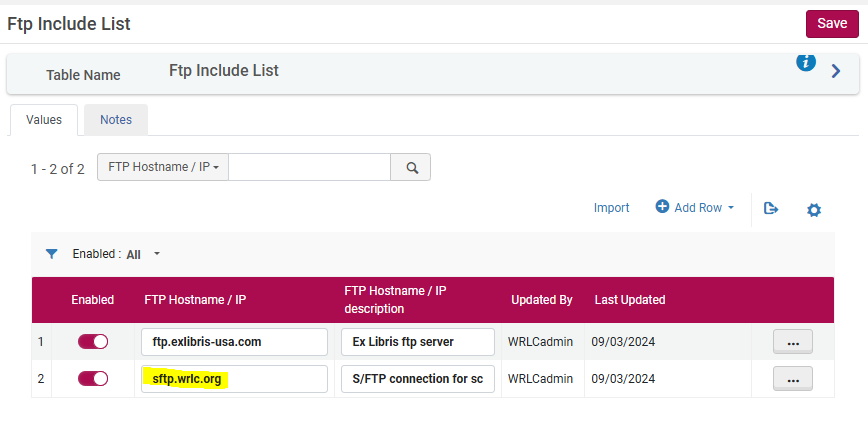
Configuration --> General --> External Systems --> Allowed S/FTP connections
Add the IP sftp.wrlc.org to the list of allowed connections in the sandbox
Configuration --> General --> External Systems --> S/FTP definitions
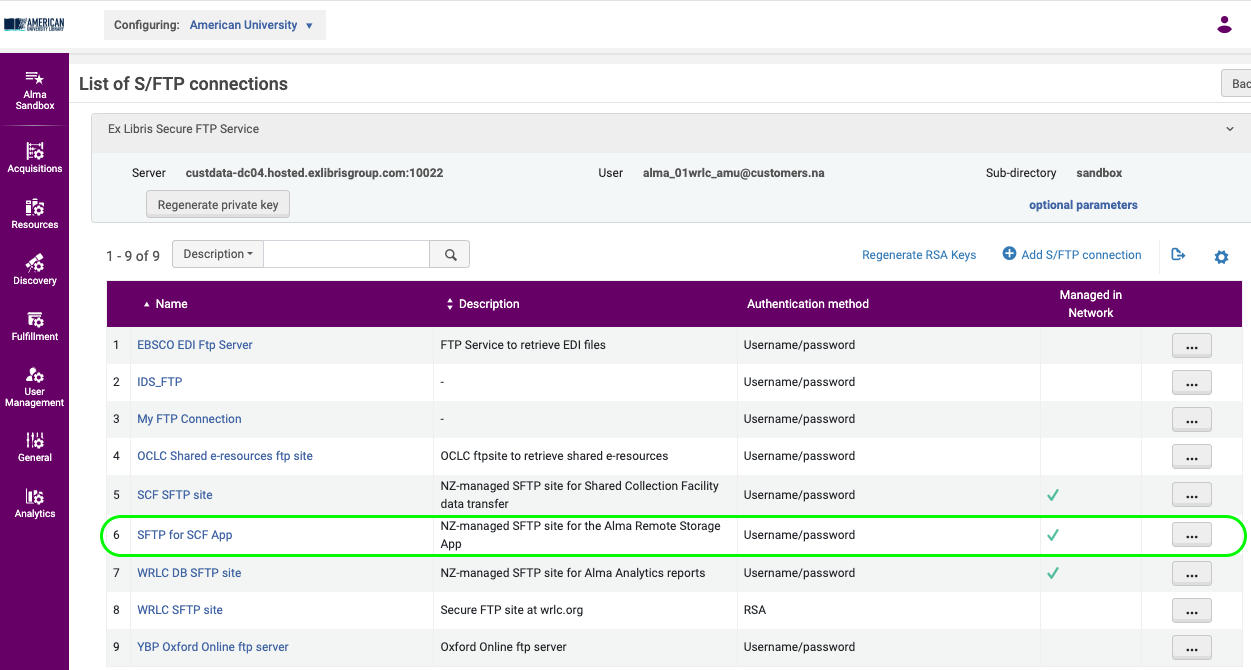
Find the "SFTP for SCF App" connection.
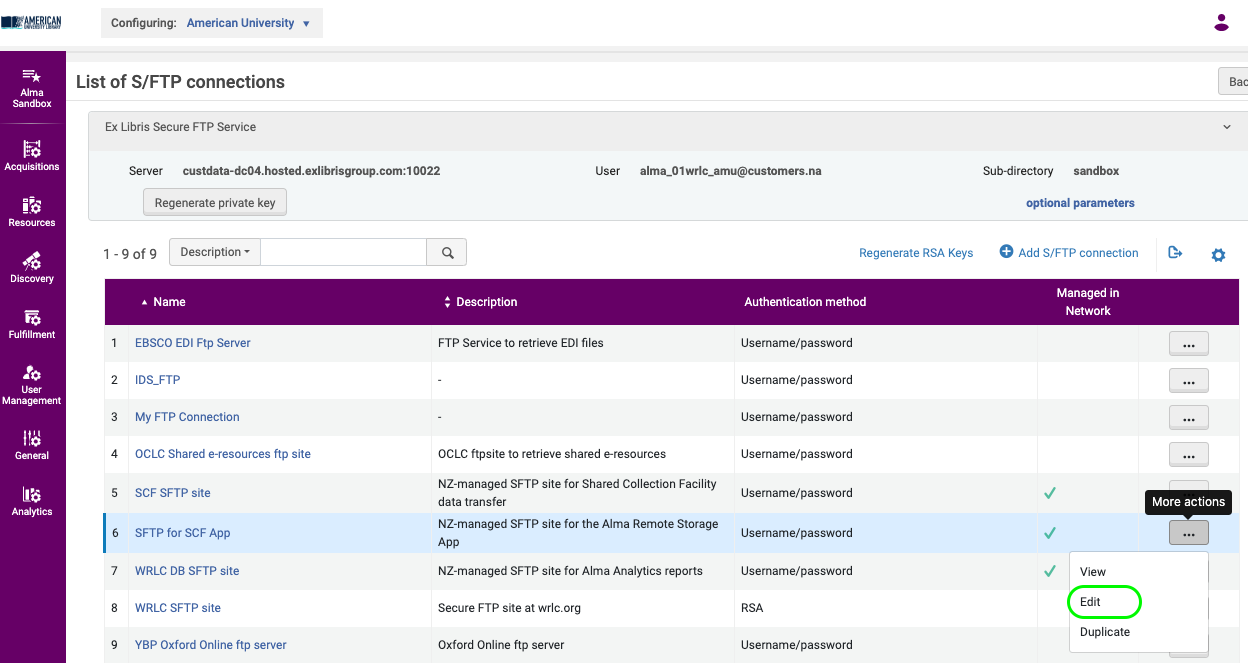
Select edit.
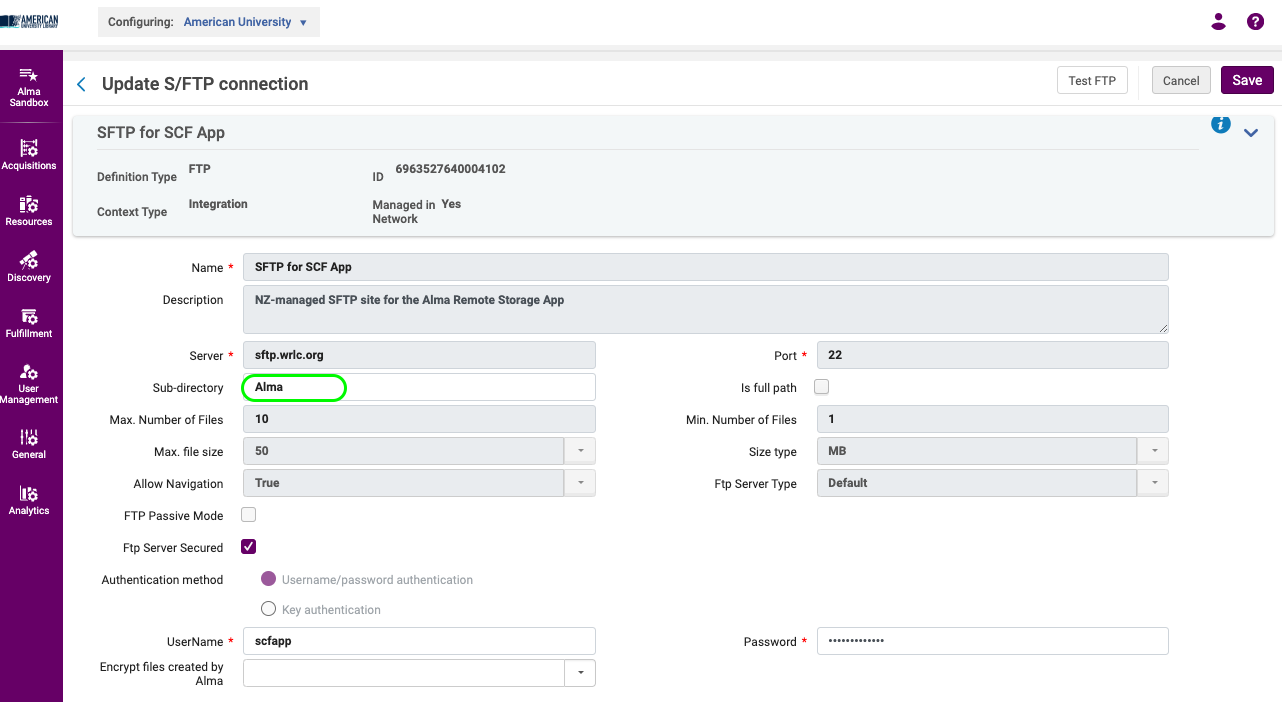
Locate the Sub-directrory used on the sftp.wrlc.org server.

Change the Sub-directory to "AlmaRSA-PSB". Save.
This is the directory the Sandbox should be using. You can test if the PSB can connect using the TestFTP button on the upper right of the screen.
For more info on these configurations, see Salesforce case #07222190
Update Webhook profiles
In the non-SCF Institution Zones, the SCF Job Finish Webhook profile needs to be update with the Webhook listener URL and activated so that both publishing and requesting functions of the SCFapp work.
In the SCF sandbox, the SCF Loans Webhooks profile needs to be updated and activated with the same URL.
Configuration --> General --> External Systems --> Integration Profiles --> Webhook profile
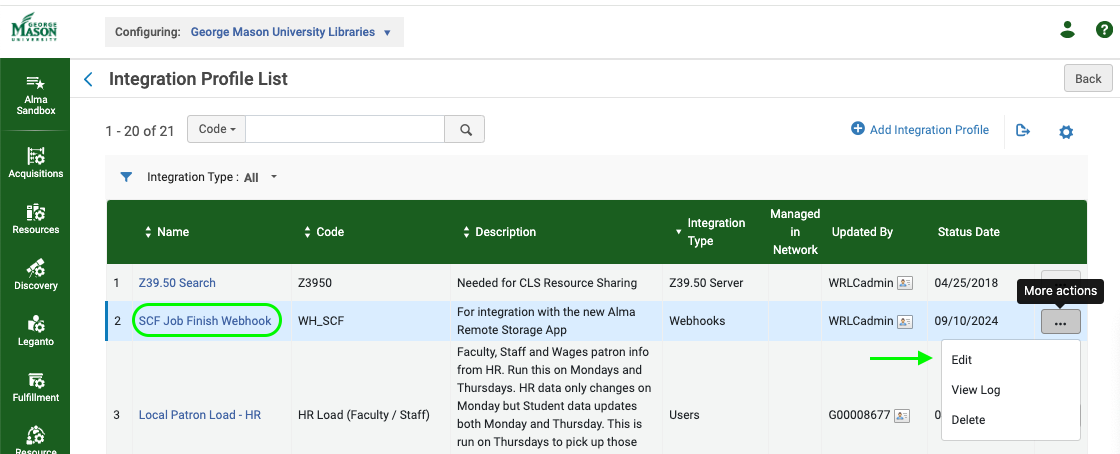
Select Edit.
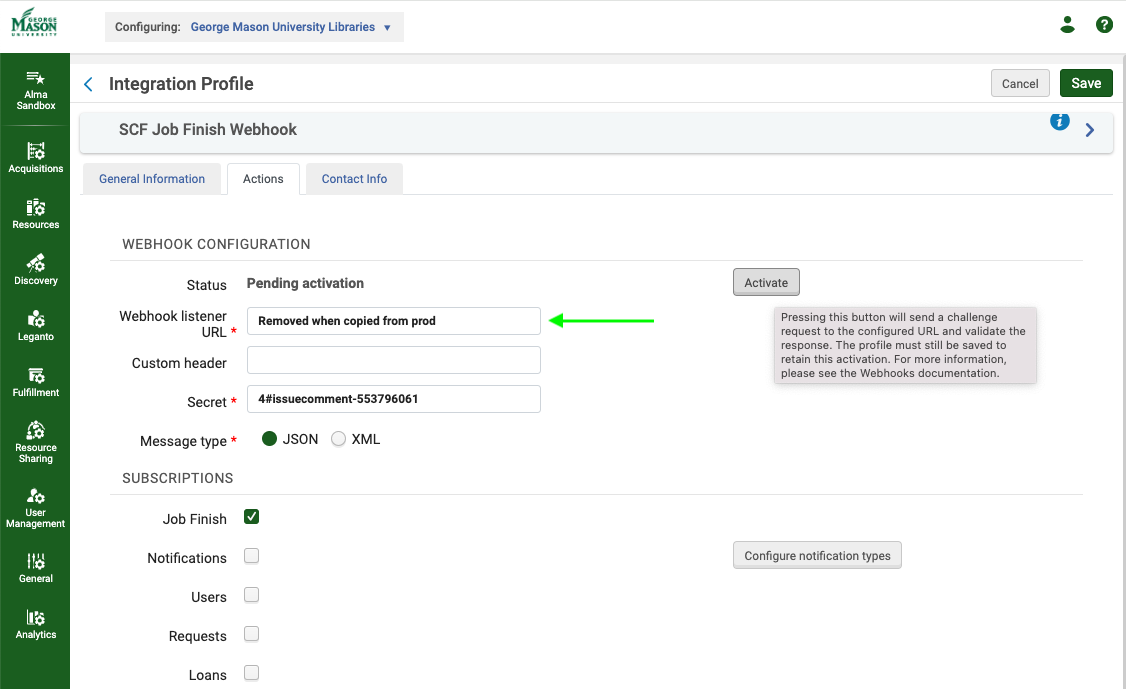
Add the Webhook listener URL :
Production IZs: https://almarsa.wrlc.org/
PSB: https://almarsa-psb.wrlc.org/webhook
Activate and Save.
You will see confirmation of activation if the URL is correct an the server responds.
For more info on these configurations, see Salesforce case #07222190
Due Dates
Update the Faculty Due Date
As with each IZ that participates in consortial lending needs to maintain the fixed due date on their calendars for patrons in "wrlc user" user group with the "WRLC Faculty" job category, so does the SCF IZ. This is done 3 time a year so that Faculty can have loans that last the semester. The dates are changed about 6 weeks prior to the expiration of the current due date.
The designated due dates are January 31st for the Fall semester, May 31st for the Spring semester, and September 30th for the Summer sessions.
The dates are changed on the following schedule:
- January 31 due date is set on about August 15th.
- May 31st due date is set on about December 15th.
- September 30th due date is set on about April 15th.
Bulk Due Date change for pseudo-patrons
Since there is no method to automatically renew items loaned to the scfapp pseudo-patrons, this must be done manually.
This should be done once the "Faculty due date" has been updated in the SCF. (This is done 3 times in a year.)
Procedure to Update the item due dates:
SCF Requests
All things related to SCF processing of physical item request from the SCFapp.
Delivery locations with Codes
Partners with Library Names, Pull Slip Codes and Courier Slip Code
| Institution Name (IZ) | Library name | Location Code (Pull Slip) | Courier Slip Code |
* Not configured as part of the CLS/AFN Fulfillment Network
Physical item request that originated as an ILLiad physical item request
ILLIad Physical Item Requests through Alma
The SCF will start to transition to filling ILLiad physical item requests through Alma. Currently these requests are made via email. These new requests can be identified as ILLiad requests using the pull slip. The pull slip for these requests will have an ILL number, return address, and delivery information where you would expect the Hold line, the patron’s name, and The Due Date line. See example below:

These requests would be pulled as any normal physical item request coming into the SCF IZ via Alma. Use the information on the “Mailing:” line to determine if an item should be mailed or sent to the owning library (some form of Yes for mailing, some form of No to send the item to the owning IZ.) If you are not certain, contact the owning library’s staff for clarification. For the most part, we would expect that not mailing the item would be the exception. In either case, you will scan the item in the SCF IZ to put it “In Transit”.
Mailing: Yes
If the item is to be sent to the requesting institution, use the “Please deliver to:” address for mailing. Be sure to include the pull slip with the item. You will also need to logon to the owning IZ with the SCFStaff account. You will need to scan the barcode (without the X) using the Default_Circ_Desk. This will place the item on the owning library’s “On Hold” shelf and notify the ILL Staff patron that the item is being sent.
Mailing: No
If the item is not to be mailed to the ILL borrower, then follow standard procedure. Send to the owning library via the courier.
These loaned items will be returned to the owning libraries and come back to the SCF via the courier.
Remote Storage Location Configuration
Configuring a Physical Location as a Remote Storage Location
This configuration enables requests for items in the location to be exported to the Remote Storage Application. These instructions assume you are creating a new location, but they can be used to configure an existing location as well.
Prerequisites
Prerequisites should already be configured in your IZ.
-
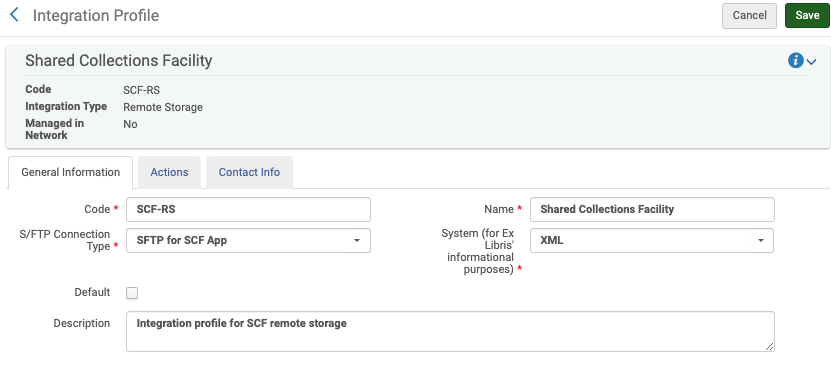
An integration profile of “remote storage” type that is connected to the S/FTP site for the remote storage app.
-
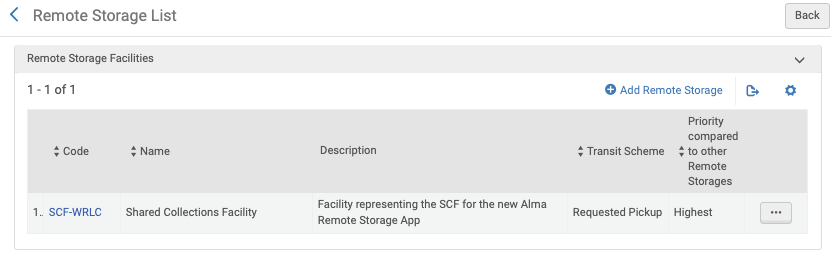
A Remote Storage Facility at the IZ level connected to the remote storage integration profile.
-
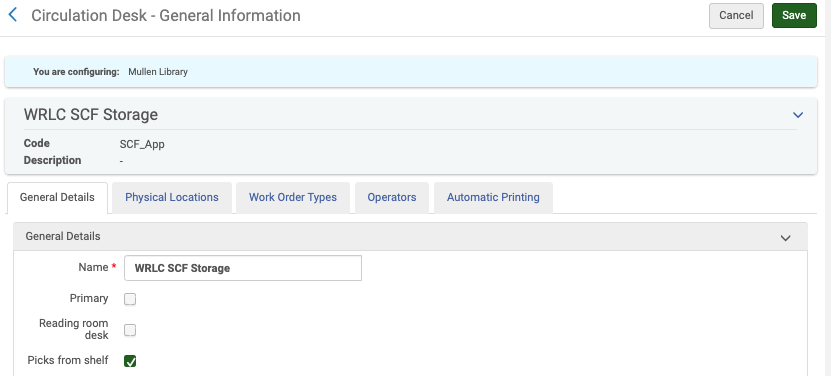
A circulation desk representing the WRLC SCF storage where items are reshelved.
Creating/Editing the Location
At the Library level, go to Alma Configuration > Fulfillment > Locations > Physical Locations and “+ Add Location”. Type should be “Remote Storage” and Remote Storage is “Shared Collections Facility”. Next, edit the location to add circulations desks using the “Attach Existing Circulation Desk” menu. Attach two desks: One is the circ desk that your operators who process items at this location are assigned to; it should not have the option to reshelve items in the remote storage locations. The other is the “WRLC SCF Storage” desk; it does have “Reshelve” checked.

Integration with the SCF Remote Storage App
In order for the Remote Storage App to recognize this location, it must be added to the app’s configuration file, so let WRLC know what the location’s code is.
If you want to publish new items added to this new location to accession them into the SCF, the location must be added to the logical set that is used by the Publishing Profile we set up for accessioning. Please coordinate this also with WRLC so we can be sure that it is done without causing the publishing job ID to change or to have existing items in the SCF re-published.
Updating the Remote Storage Application configuration
In the updated Azure web app version of the Remote Storage Application, configurations (including storage locations for all IZs) are stored on the sftp server at sftp.wrlc2k.wrlc.org in a file named conf.json.
The config.json file is found at:
Production IZs: /home/scfapp/Alma/conf.json
PSB: /home/scfapp/AlmaRSA-PSB/conf.json
You'll need to be at WRLC HQ or on the WRLC VPN to update conf.json.
To make updates to the config file, use an FTP client such as FileZilla to download conf.json to your local computer. Then make your desired changes and re-upload it to the same location via FTP.
Once the config file is updated on the server, it must be loaded into the Remote Storage Application by visiting the following the URL:
Production IZs: https://almarsa.wrlc.org/configuration
PSB: https://almarsa-psb.wrlc.org/configuration
You can then check the Remote Storage Application's log files to verify that the conf file loaded successfully.
This page will be updated with additional file information once the web app is deployed to production IZs.
Troubleshooting Alma/Primo Service Desk tickets
Helpful information on how to troubleshoot various types of Alma/Primo related WRLC Service Desk tickets
Troubleshooting Proxy Issues
Now that WRLC no longer oversees proxy servers for our institutions, the main goal in answering any proxy related Service Desk tickets is to see where the real issue lies. IF the problem is with Alma configuration, we can edit their Alma configs for them. IF the problem isn't with Alma, the institution will have to contact either their proxy service or the vendor for a resolution.
In order to see where the problem resides, it is helpful to get a sense of the scope of the issue.
Is it an issue with access to all e-resources in their catalog for all of their patrons?
If so, the issue most likely resides with their proxy provider and the institution will need to contact them for assistance.
Is the issue limited to a specific electronic collection or vendor?
Then check the configuration for the collection’s service in Alma. Search under Electronic Collection in Alma; then choose the ellipsis button, then Edit Service, then go to the Linking tab. Is the proxy enabled? If so, is it set to their default proxy service?
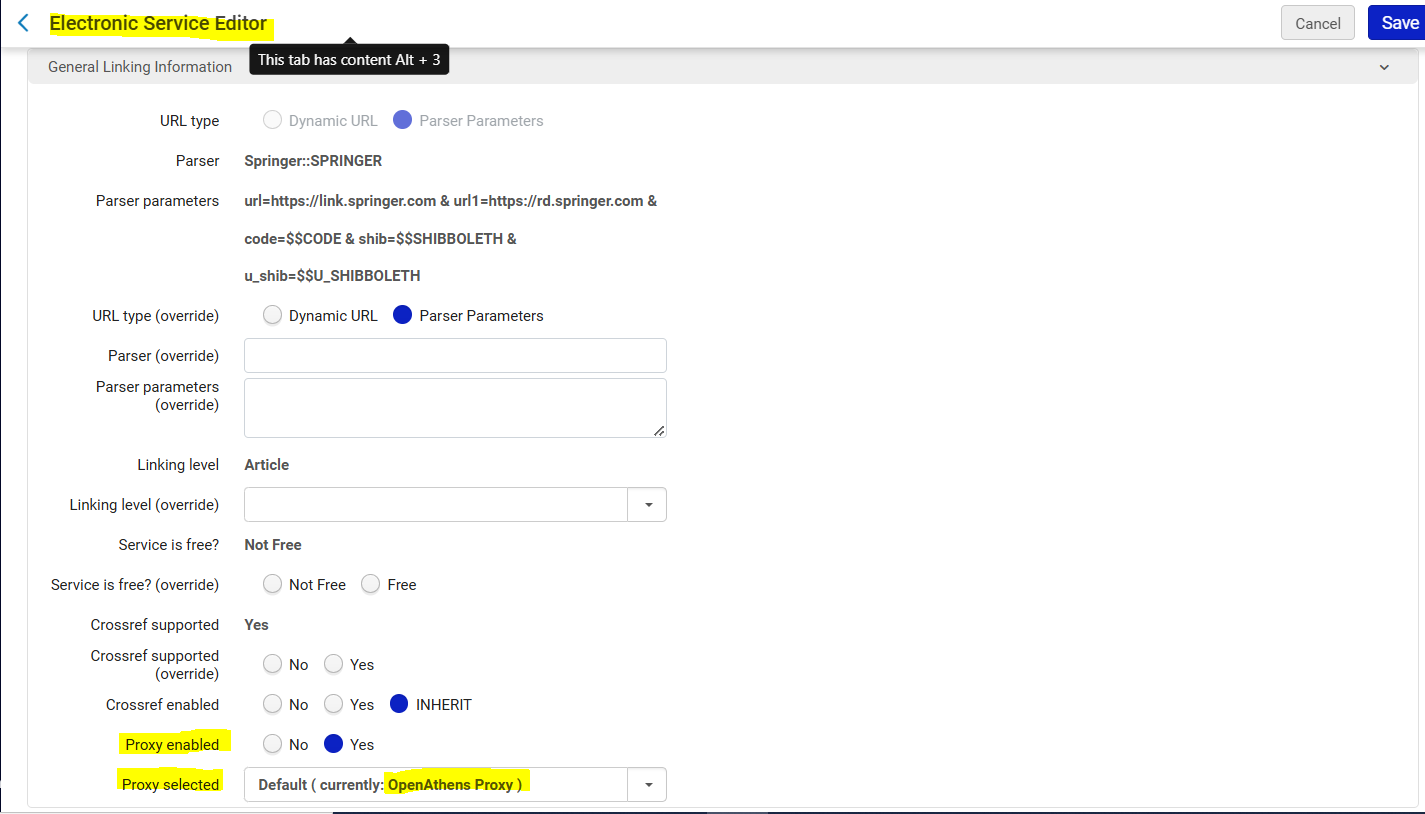
TAKE NOTE that collections from certain vendors require special configurations in Alma! A comprehensive list can be found in the Alma Knowledge Center
Is the issue only with a specific ebook or ejournal?
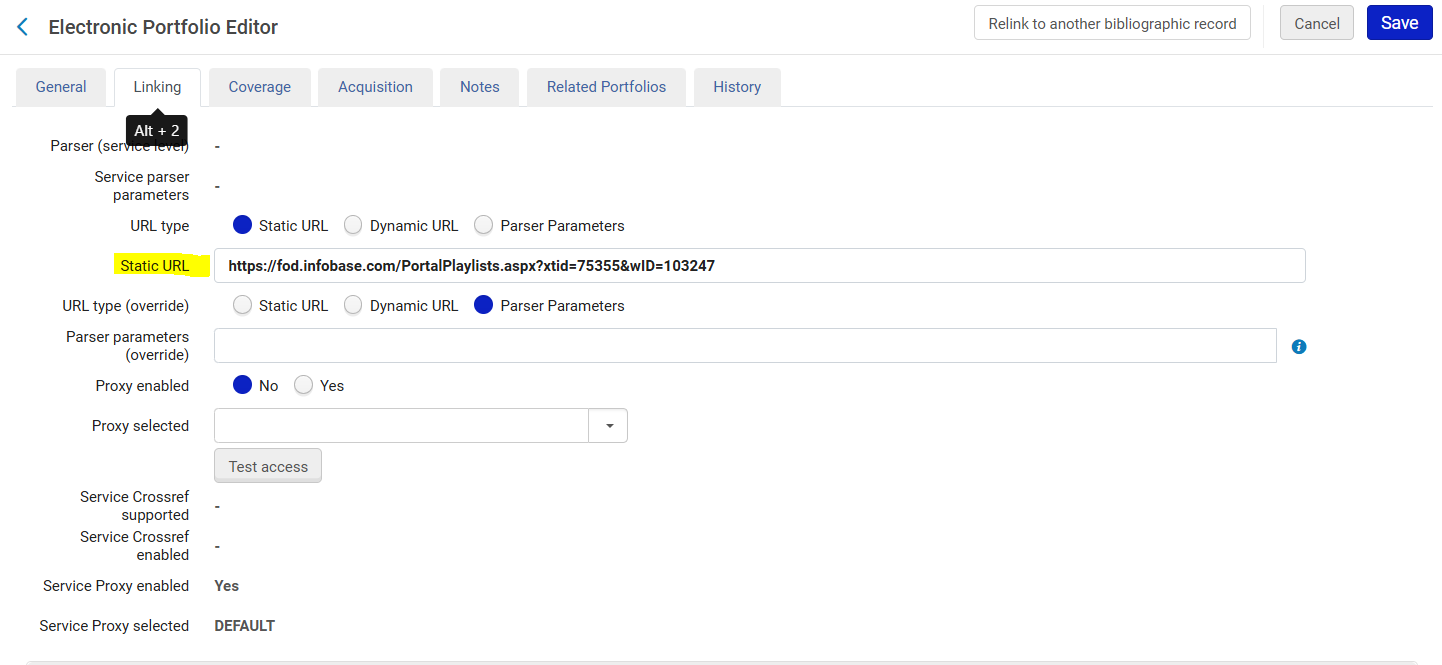
If so, search for the portfolio for the e-book or e-journal in Alma. Check the linking under the Linking tab.
If the portfolio is using service parser parameters, it should be applying the proxy that is configured for the collection as a whole. If that's the case, the issue doesn’t seem to be in Alma and they should contact their proxy service.
If the portfolio is using a static url, make sure that the URL doesn’t have an incorrect prefix
Affiliate Library Configuration
1. Create user group
- Configuration > User Management > User Details > User Groups
- + Add Row
- Choose a code and a description (preferably [Affiliate Library] Patron)
- Choose Add Row, and then Save the table

2. Apply user record group to a specific type
- Configuration > User Management > User Details > User Record Type/User Group
- + Add Row
- Choose the user group created in step #1, then choose a record type of Staff, Public, and Organization
- Choose Add Row, and then Save the table

3. Associate library location with Fulfillment Unit
- Configuration > Fulfillment > Physical Fulfillment > Fulfillment Units
- Edit the Fulfillment Unit Library Delivery Only
- Choose the Fulfillment Unit Locations tab
- Attach to the list the location(s) associated with the affiliate library
- Save the Fulfillment Unit
4. Associate user group with Fulfillment Unit
- Configuration > Fulfillment > Physical Fulfillment > Fulfillment Units
- Edit the Fulfillment Unit Library Delivery Only
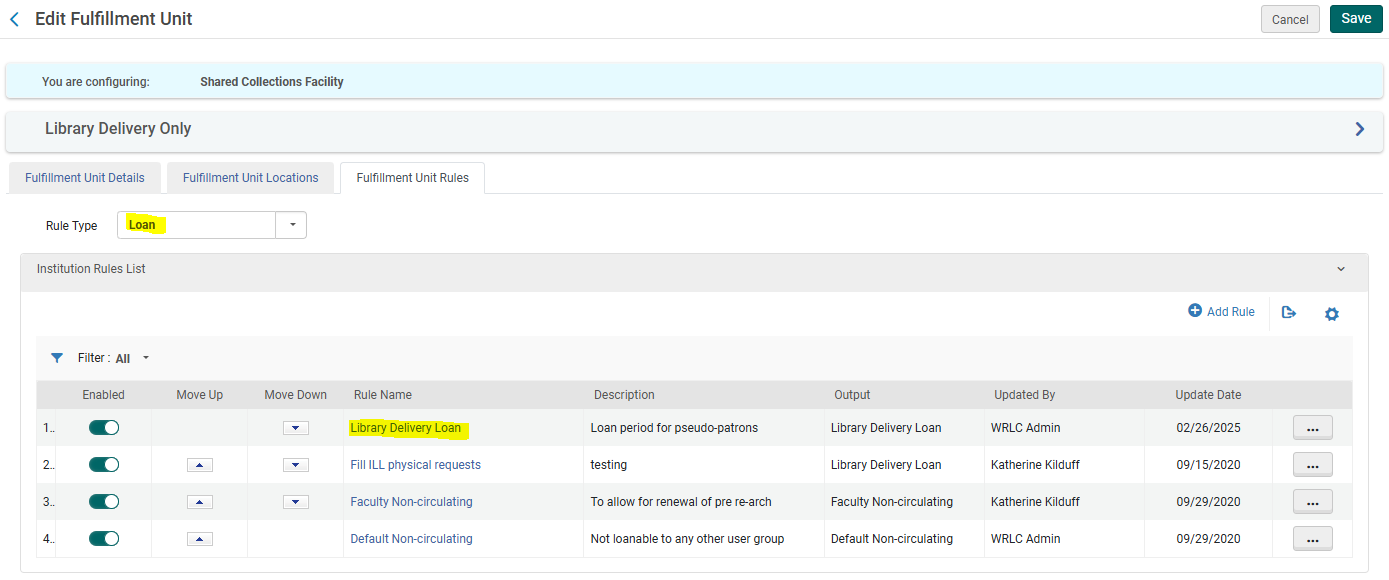
- Choose the Fulfillment Unit Rules tab
- Choose the Rule Type Loan from the drop down menu
- Edit the Library Delivery Loan rule
- Add the user group created in step #1 to the list of User Groups in the Input Parameters
- Save the Fulfillment Unit
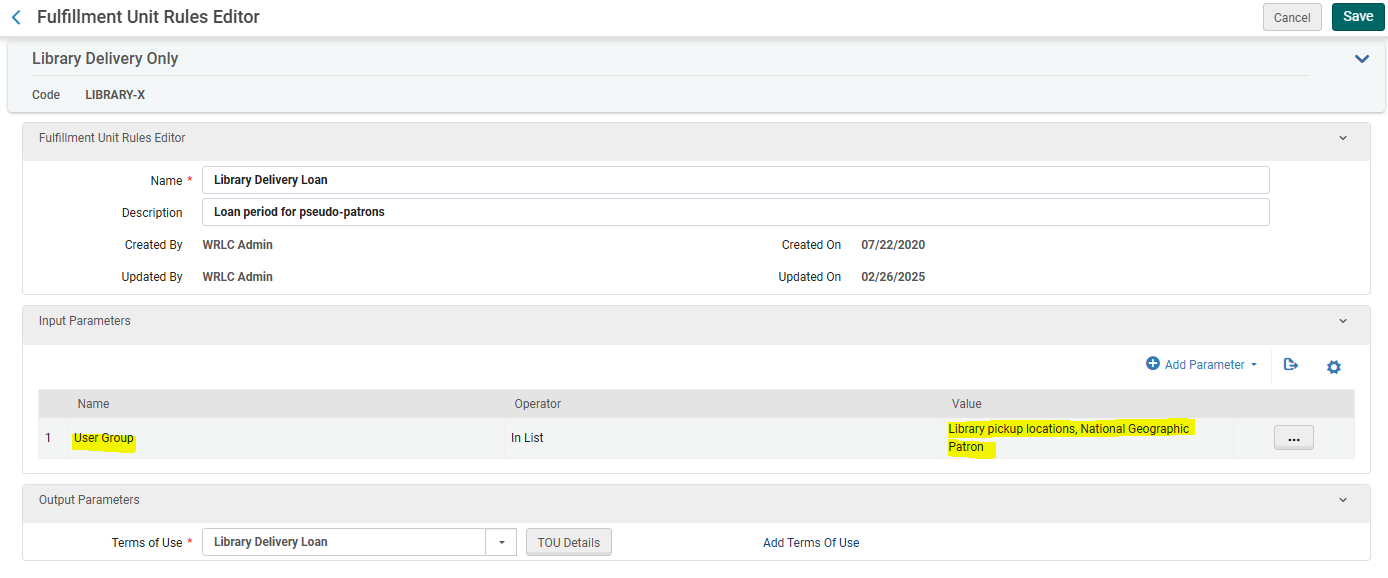
- Go back to the Fulfillment Unit Rules tab
- Now choose the Rule Type Request from the drop down menu
- Edit the Library Delivery Request rule
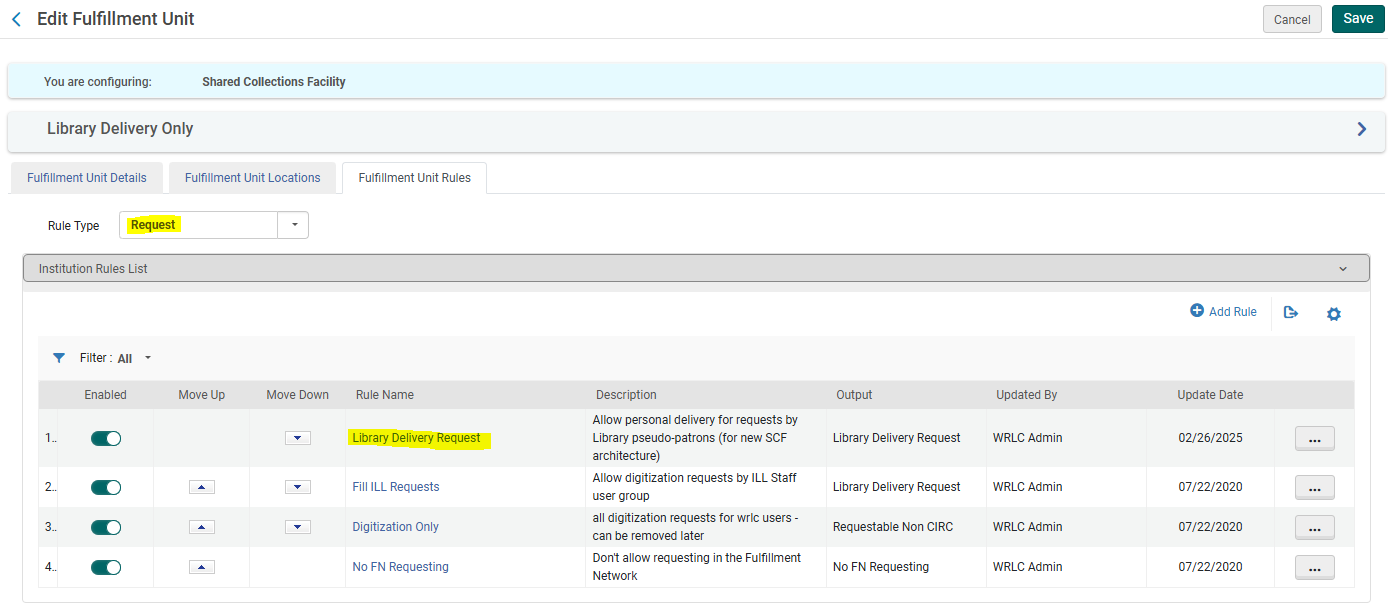
- Add the user group created in step #1 to the list of User Groups in the Input Parameters
- Save the Fulfillment Unit
5. Create a restricted search group for Primo VE
- Configuration > Discovery > Search Configuration > Restricted Search Groups
- + Add Restricted Search Group
- Choose a code, a name (preferably [Affiliate Library Name] Affiliate Library), and a description

- Add the Restricted Search Condition of:
- Search Index = Location
- Operator = Equals
- Value = all library locations associated with affiliate library

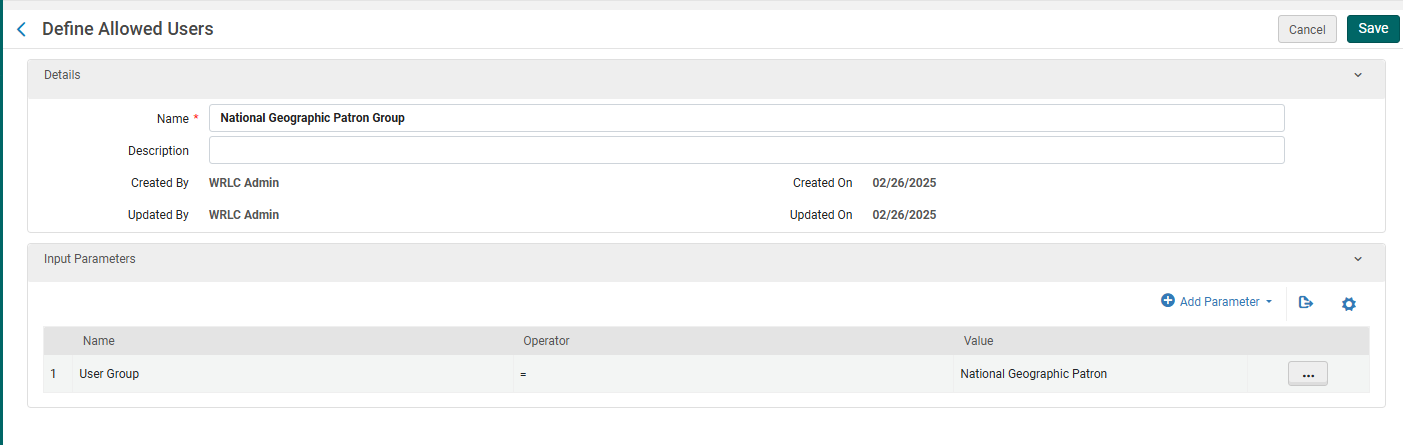
- Add the following Allowed Users:
- Patron Group Rule
- Name = [Affiliate Library] Patron Group
- Input Parameter
- Name = User Group
- Operator = "="
- Value = all user groups created in step #1
- Patron Group Rule
-
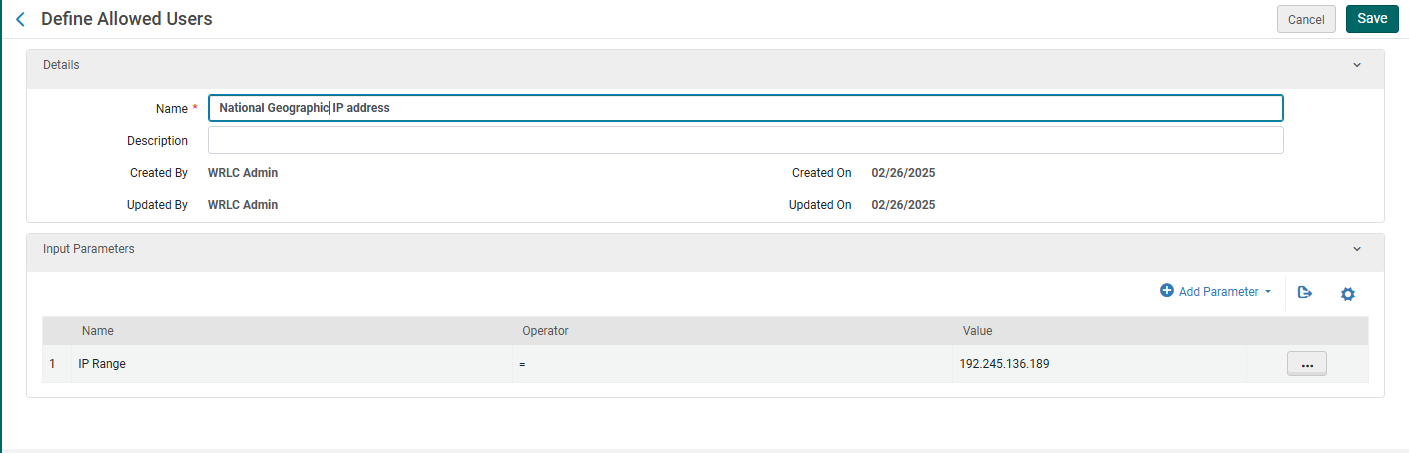
- IP Address Rule
- Name = [Affiliate Library] IP Address
- Input Parameter
- Name = IP Range
- Operator = "="
- Value = [IP range of affiliate library]
- IP Address Rule
- Save the Restricted Search Group Definition
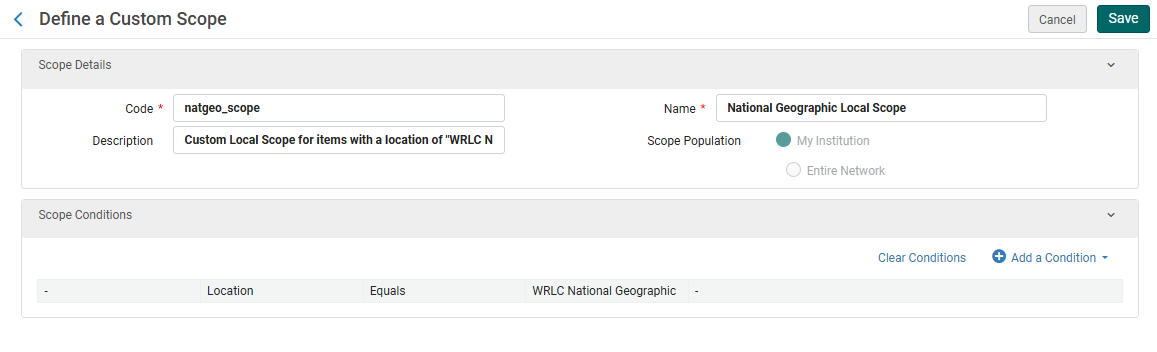
6. Create a custom local data search scope
- Configuration > Discovery > Search Configuration > Search Profiles
- Choose the Custom Local Data Scopes tab
- + Add a Custom Scope
- Choose a code and a name
- Then add the following Scope Condition:
- Search Index = Inventory > Location
- Operator = Equals
- Value = Location(s) associated with affiliate library
- Add Condition, then Save the Custom Scope
7. Create a search profile
- Configuration > Discovery > Search Configuration > Search Profiles
- Choose the Search Profiles tab
- + Add a Search Profile
- Choose a code and a display name
- Then add the following scope:
- Select Scope Type = Custom (Local Data)
- Select Custom Scope = the custom scope created in step #6
- Click Add and close, then Save the Custom Search Profile
8. Create a Primo VE view for affiliate library users
- Configuration > Discovery > Display Configuration > Configure Views
- + Add View
- Choose a code and a name
- Choose the following settings as you work through the configuration pages
- General tab > Discovery Network Settings section
- Display locations from member institutions = No
- Include member institution physical inventory in facets = Never
- General tab > Discovery Network Settings section

9. Create user profile(s)
- When creating user profiles for affiliate libraries, make sure the following fields have the correct values:
- General Information tab
- Primary ID = work email address
- User Group = user group created in step #1
- Password = create a temporary password for the user, checkmark Force password change on next login
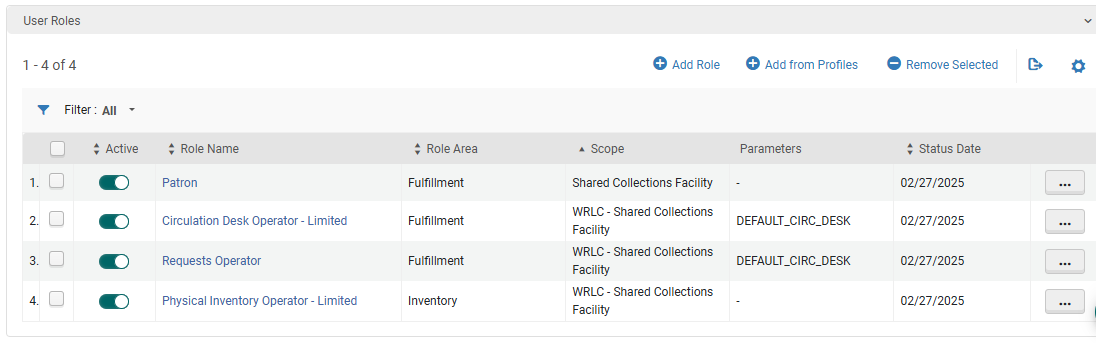
- User Roles (the following are necessary to allow for users to log into the SCF IZ and create requests through Alma)
- Patron
- Circulation Desk Operator - Limited
- Requests Operator
- Physical Inventory Operator - Limited
- General Information tab
-
- Contact Information tab
- Add address of affiliate library as the work address
- Contact Information tab
10. Update letter configuration for pull slip
- Configuration > General > Letters > Letters Configuration
- Search for the letter titled Ful Resource Request Slip Letter, choose Edit
- Edit the XSL around line 100 to include the following example
- Click Save Draft
- Click Save
<!--   Internal Alma request from affiliate institution [Insert affiliate library here}   -->
<xsl:when test="(notification_data/user_for_printing/user_group='[User Group Code]')">
<font size ="40px;">[Affiliate Library Name]</font>
</xsl:when>