SCF Procedures
- Accessioning Procedures for Books
- Processing Books (Part 1) - Using the SCF Processing website and Grima
- Processing Books (Part 2) - Using the SCF Processing website and Grima
- Processing New Books from AU via Courier
- Pre-Reshelving Procedures
- WRLC Storage Reshelving Procedures for BOOKS
- WRLC Storage Reshelving Procedures for ARCHIVAL MATERIALS
- Alma AFN & Email Requests
- SCF 50+ pages AFN digitization requests
- Simplified Digitization Workflow
- Library Abbreviations (Alma Pull Slip Locations and Green Courier Slip Locations)
- Runners Online Order
- Stamps.com
- OLD: Checking in return books :OLD
- Using Book Pavilion & Article Exchange for GM-ILL Article Requests
- Using Book Pavilion & Article Exchange for ILL Article Requests
- Using Book Pavilion & Email for Himmelfarb Requests
- Using Book Pavilion & Dropbox for RapidILL Requests (Georgetown)
- Oxford University Press Books
- Create & Scan in new AU volumes in AU IZ
- WRLC Storage Journal Deduplication Procedure
- Routing Slips
- Exporting Items from Alma
- Filling a Title Level Request
- WRLC Delivery Routes
- Barcodes: In Transit, SCF Hold Shelf, SCF Floor
- Clear loan status for processed items that were never scanned in
- Updating volume & year info for Himmelfarb volumes in SCF IZ
- WRLC Forklift Daily Checklist
- Check in archival materials (To be performed by the Shared Collections Supervisor only)
- Clear SCF Floor from Internal Note 3 for return archival materials (To be performed by the Shared Collections Supervisor only)
- Issues with checking in return books (to be performed by the Shared Collections Supervisor only)
- New books not in SCF IZ (To be performed by the Shared Collections Supervisor only)
- Checking In Return Books 2025
- Patron IDs for Patron Services
- WRLC Storage Reshelving Procedures for BOOKS 2025
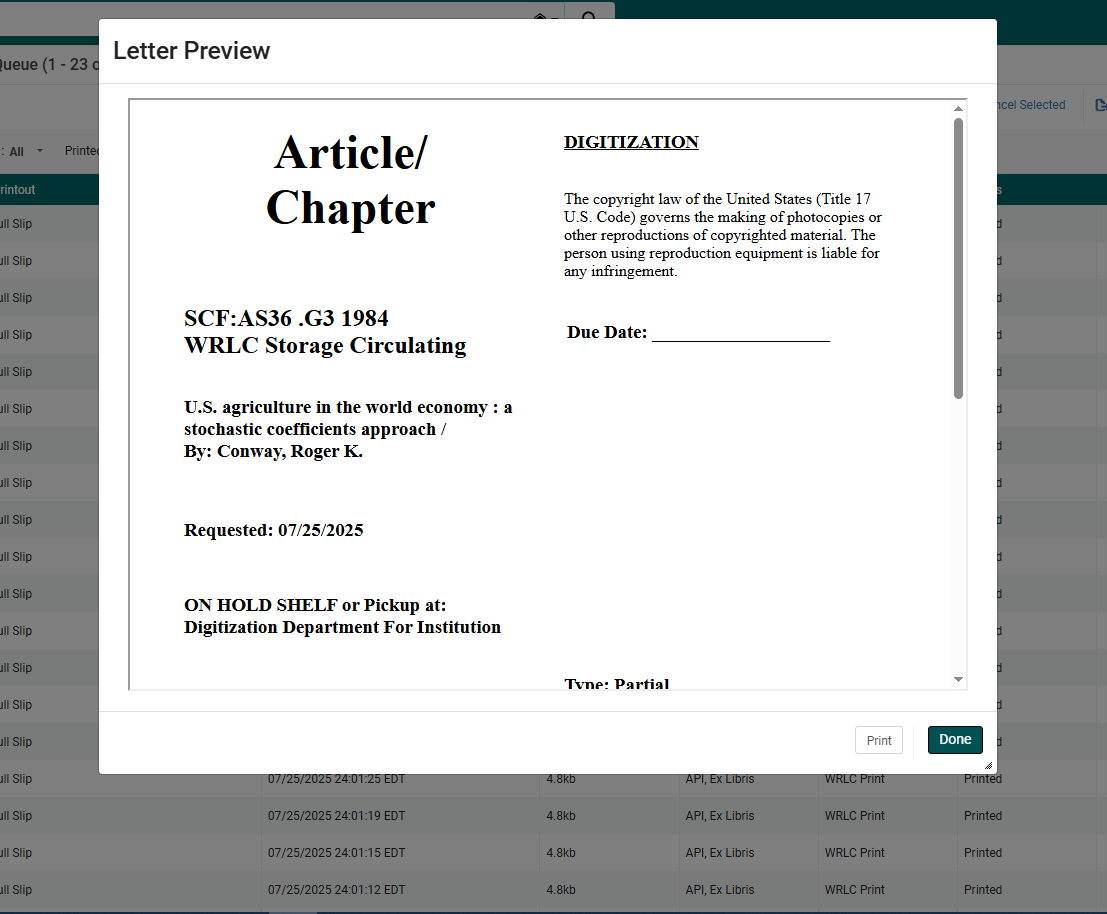
- Printouts Queue in Alma
Accessioning Procedures for Books
1. Receipt of materials
A. Shipping
Materials being shipped to WRLC for storage will be boxed and will be unboxed after receipt.
B. Delivery
Office Movers Express or Runners picks up materials from libraries that have boxes awaiting to be picked up.
C. Unpacking
-Materials will normally be unpacked on a first in, first out basis.
-In cases where materials cannot all be placed in the staging area, those materials staged in parts of the processing work area outside the staging area will be unpacked first.
-In cases where the priorities noted above need to be altered, WRLC’s Storage Facility Supervisor will indicate which materials are to receive priority in unpacking.
-Library materials will normally be transferred to acid-free trays for shelving in the storage facility, and will therefore be unboxed prior to processing.
-Materials will be removed from the delivery cartons and placed on book trucks.
-Materials will be sorted by size when being placed on the book trucks and or shelves in the processing area.
2. Preparation of storage trays
A. Tray design
-The WRLC Storage Facility is designed to achieve maximum density in the storage of library materials by using trays specifically designed to fit into the shelving scheme to hold the materials. Trays are modular in design; a standard size shelf can accept any size tray and be completely filled, with no space wasted.
-There are six sizes of trays. The sizes are: A, B, C, D, E and H. Five are open-sided trays intended for books, records, and similar materials. The sixth is an open-topped box intended for papers and other materials which are not self-supporting and cannot stand in the open-sided trays.
-The width of the trays determine the maximum width (when viewed from the front) of the materials that can be stored within them. The Maximum height of the materials is determined by the shelf size on which the tray is to be placed.
B. Assembling trays
-Trays will be assembled on an as needed basis. SCF staff will normally provide an estimate of the necessary quantities of each type, and will print labels for the required trays. The labels will include: shelf location (human readable); shelf location (barcode); tray size and shelf height. Staff assembling trays will use the tray size information on the labels to determine which type of tray each label is to be used with.
-Trays are designed so that they can be assembled by folding; no adhesive is required.
-Plastic handles need to be inserted in one end of each tray. For trays of size B, C, D, E and H washers will be inserted on the inner ends of the handles.
-Trays will have the three labels placed on the same end as the handle.
3. Sorting materials
A. Based on size
-Materials being shelved in trays will need to be sorted by size to maximize the use of storage space.
B. Using the template
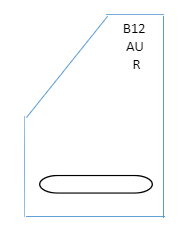
-Materials will be placed in trays based on their width and height, as viewed from the front. A template will be used to determine the proper size tray for each item.
-Items are placed on the template, and tray size is indicated by the lines they most closely fit within. If an item’s height or width exceeds a line by any margin at all, the next largest line will be used for determining tray size.
C. Tray labels
-Each tray will have a label indicating the tray size (used to determine maximum width of the item) and the shelf height (used to determine the maximum height). As the same tray size can be used on two or more different height shelves it is essential that both these parameters be taken into account in the sorting of materials.
-Tray size is indicated by the letter assigned to each tray design. For open-sided trays, the letters run from A for the smallest size to E for the largest. The template will match item width to tray size using these letters. (Tray H is an open topped box used for special type of material.)
-Shelf height is indicated on the template by a number representing the inches between shelves for the given height. Note that a 12” shelf does not have 12” of usable space (due to the shelf lip). The template should be followed exactly in determining the maximum height for items being placed in a given tray to prevent items being damaged due to contact with the shelf lip when sliding a tray on and off the shelf.
-When working with trays intended for a given shelf, start with the highest tray number (e.g. R05M11S07T12). The highest numbers will be placed at the back of the shelf and should be filled and shelved first.
Tray sizes and height in inches
• A09 A10 A11
• B11 B12
• C12 C13
• D13 D14
• E16 E18 E20
• H12 H14 H18

Processing Books (Part 1) - Using the SCF Processing website and Grima
Item Call Number (Part 1 of the processing) (Trays have no labels)
You will be using three different programs:
2) Grima
SCF Processing website:
-Username:
-Password:
Grima:
-Username:
-Password:
-Institution: SCF
AFTER YOU LOG IN, CLOSE THIS WINDOW SO YOU CAN GO BACK AND USE THE SCF PROCESSING WEBSITE TO DO THE NECESSARY STEPS.
Alma (SCF IZ):
-Username:
-Password:
In the SCF Processing website,
-Click on “Add Item Call Number” and it will take you to Grima
-Scan the tray barcode in the “Item Call Number” field
-Scan item barcode of all the books in the tray in the "Barcode" field
**If the record is not found, click in the “Barcode” field and try the next book**
Leave the books on table; do not put back in the tray
Check the book title to make sure it matches to what is shown on the monitor
When finished, put the books back in the tray then count them.
Go to Alma, SCF IZ:
Click on the magnifying glass with the + symbol

Make sure the total number is the same as the manual count of books.
Go to the SCF Processing website and click on “Tray/Shelf Location”.
Fill out the information:

Start the next tray
Processing Books (Part 2) - Using the SCF Processing website and Grima
Internal Note 1 (Part 2 of the processing) (Trays have labels)
You will be using three different programs:
2) Grima
SCF Processing website:
-Username:
-Password:
Grima:
-Username:
-Password:
-Institution: SCF
AFTER YOU LOG IN, CLOSE THIS WINDOW SO YOU CAN GO BACK AND USE THE SCF PROCESSING WEBSITE TO DO THE NECESSARY STEPS.
Alma (SCF IZ):
-Username:
-Password:
In the SCF Processing website,
-Click on “Add Internal Note 1” and it will take you to Grima
-Scan the tray barcode in the “Internal Note 1” field
-Scan item barcode of all the books in the tray in the "Barcode" field
(Leave the books on table; do not put back in the tray)
(Check the book title to make sure it matches to what is shown on the monitor)
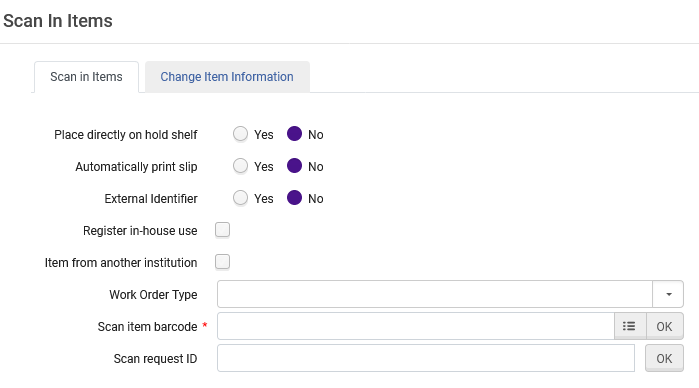
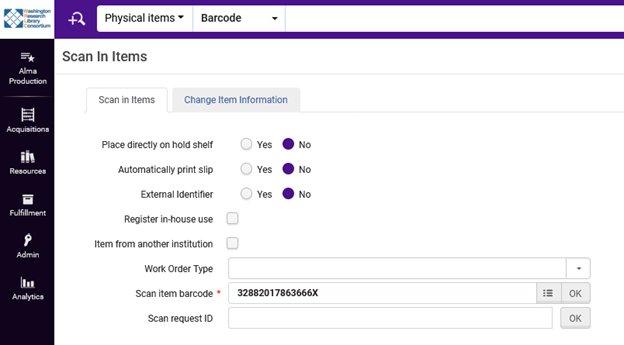
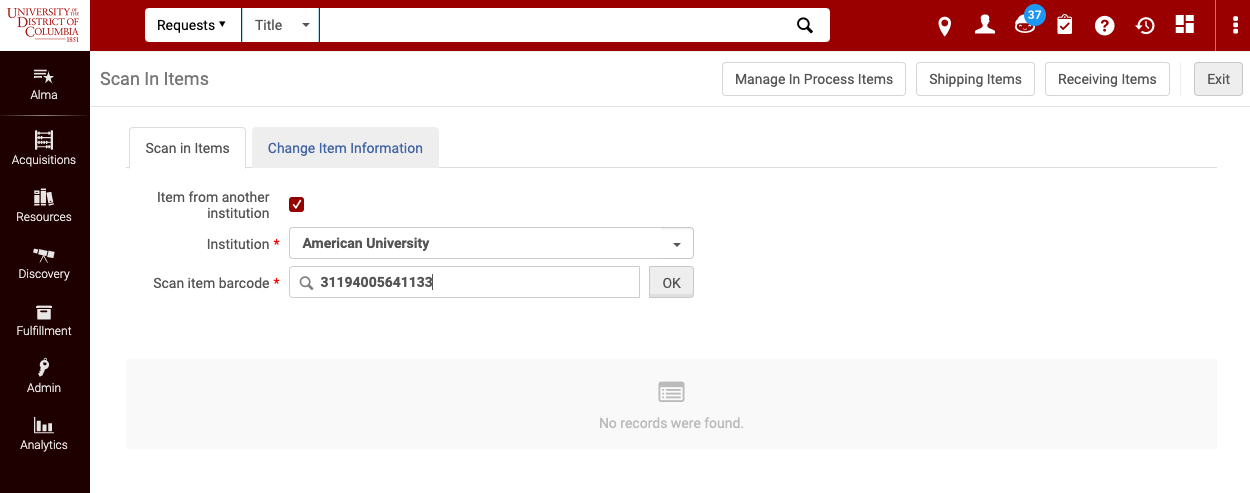
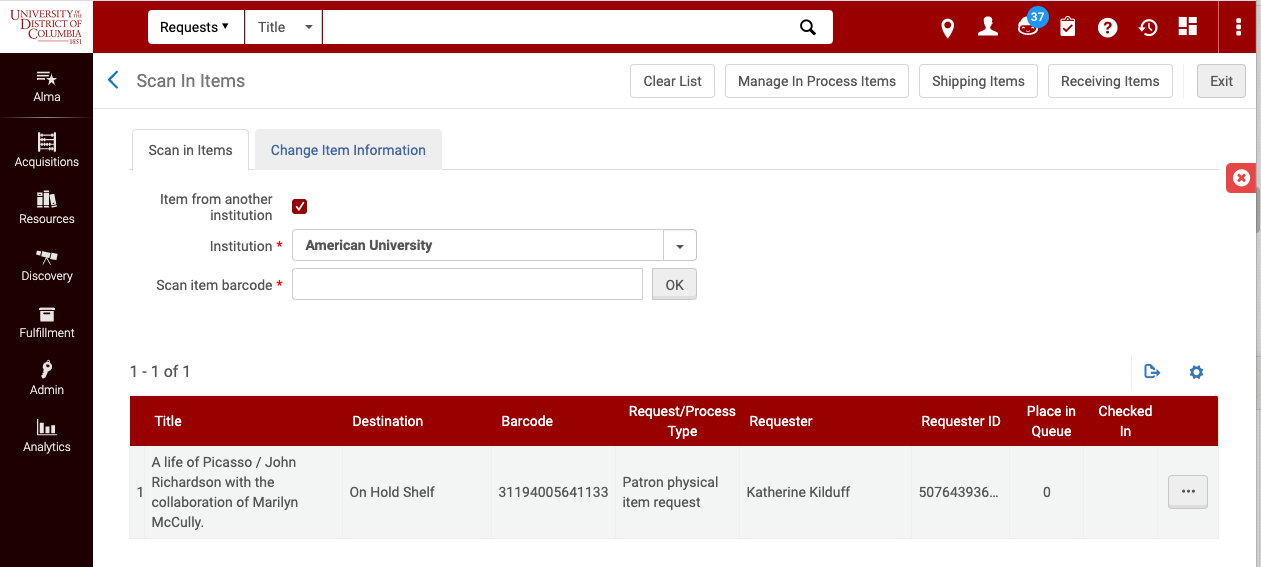
Go to Alma and scan in the books:
Fulfillment > Scan In Items
When finished, put the books back in the tray then count them.
Alma, SCF IZ:
Click on the magnifying glass with the + symbol
Make sure the total number is the same as the manual count of books.
Go to the SCF Processing website and click on “Cross Check”.
Fill out the information:

Start the next tray
Processing New Books from AU via Courier
We get new books from American via courier. They will have a slip that says, “WRLC: Route to Tammy, New to be added from AU”
After they arrive, scan in the books in SCF IZ then add the following message to internal note 1.

You can use the Grima tool, [AddInternalNote], to add the message
If a book is not found in SCF IZ, leave it on the red cart with the slip in it.
Remove the slips and give them to Tammy so they can be sent back to American.
Sort the books and place them in the trays in SCF 1, row 2, module 2 & 3, shelf 2. When starting a new tray, write down the size, library and “R” (ready) at the top right corner.
When shelf 2 in row 2, module 1 is full with the filled trays, transfer the trays to a large gray cart then bring the cart to Tammy so the books could be processed.
Pre-Reshelving Procedures
- Remove books from shelf (2 rows, ex. row 1 & 2) and place on the library cart.
- Put books in order
- Open the list template file (Word) found in:
S:\Storage Refiles\Alma\Books\List template Tammy
- Fill out the info for:
Date
Row
list created by
- Add the numbering feature to the list under “Row”
- Scan item barcode from each book using the handheld barcode scanner that scans barcodes with X.
- Save as to:
S:\Storage Refiles\Alma\Books\Row x & x
File name: list_today’s date (ex. list_7_12_16)
- Manually count items on cart and make sure the number matches to the list
- Print the list
- Use one scanner to scan books from one set of rows
WRLC Storage Reshelving Procedures for BOOKS
WRLC Storage Reshelving Procedures for BOOKS
1. Scanning Procedures
- Aim scanner and press the trigger to scan each barcode
-
-
-
Scan the tray location barcode on the tray then the item barcode on the book.
-
If more than one book need to go in the same tray, the tray location barcode will need to be scanned again.
-
-
-
2. Retrieving Items from Scanner
-
Plug the Opticon Scanner to the computer
-
Click on OPN Companion Application
-
Click on “get barcodes”
-
A txt file titled “Barcodes” will automatically appear on desktop listing the barcodes that were just scanned
-
Click on “delete barcodes” then “yes” to proceed *THIS IS VERY IMPORTANT!
-
Click on “close” then close the window
-
Open the “Barcodes” file and remove extra space at the end (be sure the cursor is at the end of the last barcode)
-
Save the file as text to:
S:\Storage Refiles\Alma\Books\Row x & x
File name is the date that list was created
Ex. notepad_7_12_16
-
Delete the “Barcodes” file *THIS IS VERY IMPORTANT!
3. Converting Scanned File to Alma to update Internal Note 3 status
-
Open the Word file of the items that were just reshelved
-
Convert the list of items into one column if necessary
-
Select all item barcode and remove the numbering then copy
-
Go to Alma Analytics, Access Analytics
-
Create, Analysis, Physical Items
-
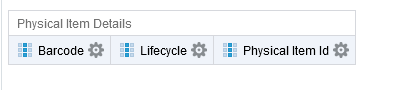
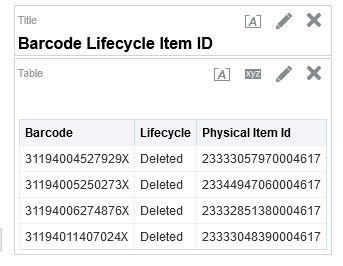
Open Physical Item Details:
-Barcode
-Internal Note 1
-Internal Note 2
-Internal Note 3
-Physical Item Id
-Lifecycle (very important!)
-
Click on the list after “Barcode” and select Filter
-
Click on the magnifying glass icon then the pencil icon
-
Paste the item barcodes in the box then click on “OK”, “OK”, “OK”
-
Click on the tab titled, “Results”
-
Go to the Lifecycle column and click on the up arrow (sort ascending)
-
Go to the Internal Note 3 column and look for any box that is blank or has a different status in it. If there is any, copy the item barcode and paste it into Alma. Then add “SCF Hold Shelf” to Internal Note 3.
- Make sure Internal Note 2 does not have any old transit status. If it does, give the book to Tammy.
-
Copy Item IDs for ONLY the active items. Do not copy Item IDs for deleted items.
-
Open Notepad and type “Item ID” at the top of the list (no quotes) then paste
-
Save the file as text to:
S:\Storage Refiles\Alma\Books\Upload
File name is the date that items will be uploaded
Ex. upload_row_25&26_11_28_18
-
Click on the file then click on rename to copy the file name
-
Go to SCF IZ in Alma
-Admin, Manage Sets, Add Set, Itemized, paste file name, Set content type: Physical items, select file, save
-Admin, Run a Job, in the description box, type “physical” then select “Change physical items”, next, paste the file name in the name box and select the file, next
-
Double check the total count and write down the number you saw in Alma after creating a set
-
Go to Internal note 3 and add a check to the box. The box should be clear since the status needs to be cleared off, next
-
Click on “Submit”
-
Go to the tab titled, “History” after the job is done. Check the status of the job to make sure that all of the items were updated by clicking on the box on the right side and select “Report”
This issue will happen once in a while: not all of the items will show up after creating a set. You can locate the "missing" item by doing the following steps:
1. Alma > Admin > Manage Sets > Find the set you just created > Content > Export > in Excel, click on the column with item barcodes then click on "Sort & Filter (Sort A to Z)" then select "Expand the selection" to put item barcodes in order
2. Word > open the file of the rows of books you just reshelved
- Convert to one column if needed to for easy copying & pasting
- Highlight barcodes
- Remove numbering
- Copy barcodes
3. In Excel, paste barcodes into the blank column prior to the column with item barcodes that were exported from Alma. Click on "Sort & Filter (Sort A to Z)" then select "Continue with the current the selection". Compare both columns by going through each line until you find the mismatched barcodes.
Various reasons why item barcodes do not show up:
- WRLC OUP book...no X at end (remove X and clear the SCF Hold Shelf message from IN 3 after confirming that the item has been reshelved)
- duplicate barcodes on the list (Word)
- item record not in SCF IZ anymore (will need to go back to the tray and pull the item then give it to Tammy)
- Himmelfarb volumes...item barcode has been changed (will need to go back to the tray and pull the item then give it to Tammy)
WRLC Storage Reshelving Procedures for ARCHIVAL MATERIALS
1. Scanning Procedures
-
Aim scanner and press the trigger to scan each barcode
-
Scan the shelf location barcode on the shelf then the item barcode on the box.
-
-
-
If more than one box need to go on the same shelf, the shelf location barcode will need to be scanned again.
-
2. Retrieving Items from Scanner
-
Plug the Opticon Scanner to the computer
-
Click on OPN Companion Application
-
Click on “get barcodes”
-
A txt file titled “Barcodes” will automatically appear on desktop listing the barcodes that were just scanned
-
Click on “delete barcodes” then “yes” to proceed *THIS IS VERY IMPORTANT!
-
Click on “close” then close the window
-
Open the “Barcodes” file and remove extra space at the end (be sure the cursor is at the end of the last barcode)
-
Save the file as text to:
S:\Storage Refiles\Alma\Boxes and Clamshells
File name is the date that list was created along with which department and your name
Example: 3_25_22_GTSC_Clark
-
Delete the “Barcodes” file *THIS IS VERY IMPORTANT!
Alma AFN & Email Requests
AFN Requests (books, articles and boxes)
AFN requests come through at 12 am & 12 pm daily and will be automatically printed.
Sign into the SCF IZ of Alma
Click on "Other Requests" then "Pickup from shelf" to view the material requests.
Separate box requests from book and article requests.
AFN box requests:
- GA Archives (Gallaudet Archives)
- GW Special Collections (George Washington Special Collections)
- GW Global Resources Center (George Washington Global Resources Center)
- GT Booth (Georgetown Special Collections)
Organize slips in order of row, module and shelf location so they are easier to pull.
AFN Book Requests
If a slip has Internal Note 3 of “SCF Hold Shelf”, grab the book off the hold shelf in the processing area and delete the note. Then scan the item in and place it on the table (steps are described later below).
It is optional to write the tray location on the book slips at the top right if it helps.
When pulling items check that the barcode and title match what is printed on the slip. If there is a discrepancy, give the item to Tammy.
For books going out via courier, fold the slip and place it in the book with the school code sticking out of the book.
Place a WRLC sticker on the book near the barcode. Exception:
- Georgetown owned books
- George Mason owned books
- George Washington Special Collections owned books.
In SCF IZ the books will need to be scanned in to place them in transit to the borrowing libraries.
Scan item barcode in the "Scan item barcode" field:
In the “Requester” field it should say Deliver to: (school code). If it doesn’t, click the three little dots then “attach request”. If “attach request” doesn’t show up, then manually place item in transit: Fulfillment > Manage Patron Services > Put in the school code and click on the school or library it is going to then scan the item barcode.
The only exception is for OUP (Oxford University Press) books owned by WRLC. These books do not have an X at the end of the barcode and when scanning them in, you have to remove the X at the end. After scanning in item barcode the “Requester” field will have the person’s name who requested the item.
If there is a request for a Gallaudet-owned DVD you will need to remove the case and place a print out of the item record that has the barcode and title information on it in the case. The device that is used to remove the case is by the computer used for ILL requests. Place the DVD in a bubble mailer and tape the slip request to the front of the bubble mailer.
If the item is media (CD, VHS, DVD, Cassette, Microfilm, Vinyl), place it in a bubble mailer and tape the slip request to the front of the bubble mailer.
Place books on table under the school they are going to and separate them out if they books are going to different libraries within the same school. For example, GT (Georgetown Lauinger) vs GT-L (Georgetown Law).
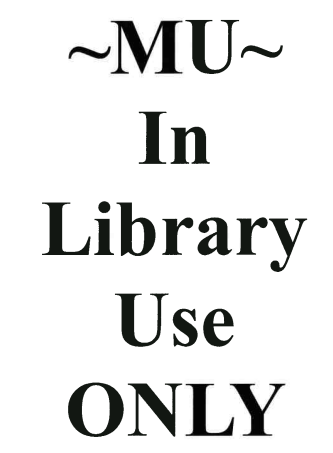
When an AFN book slip mentions "In Library Use Only" under a library code on the left side of the slip, we will need to add a book strap saying, "IN LIBRARY USE ONLY" to the volume before sending it over to the requesting library. The book strap can be located next to the printer.
AFN Article Requests
For article/digitization requests write the tray location in the upper right or left corner of the slip (just not the middle of the paper), then pull requested items.
When pulling items check that the barcode, title, volume and year match what is printed on the slip. If there is a discrepancy, give the item to Tammy.
If an article cannot be found, double check the citation online. If the citation is still correct, cancel the request and leave a note for the patron asking them to double check the citation.
If an article request is over 50 pages, there are steps to filling this request which can be found by clicking on this > SCF 50+ pages AFN digitization requests. Send the whole book to the school by attaching the "SCF Digitization Request" book strap to the front of the book. It is located next to the printer. Make a note in the Internal note 3 field:
- SCF in transit to AU for Digitization, today's date
- SCF in transit to CU for Digitization, today's date
- SCF in transit to GM for Digitization, today's date
- SCF in transit to GW for Digitization, today's date
- SCF in transit to GT for Digitization, today's date
Resources Sharing Requests
The pull slip will be printed and have * Physical Ship/RS - Check * at the top where a name would normally be.
The owning library should be the destination “big letter” library code on the pull slip.
Log into the owning IZ with the new SCFStaff account.
User Name: SCFStaff
Password: Res0urceSharing!
Search for the requested item under:
Fulfillment → Resource Requests → Monitor Requests & Item Processes
You will note that the Request Type is “Ship physically”.
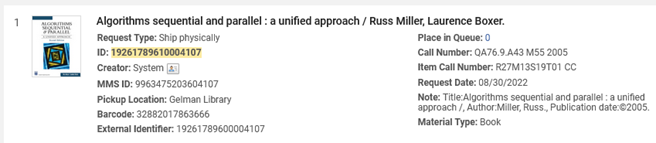
If this is the case, then you would follow the procedures below.
Summary
A new request slip will have:
1. Pull slip with * Physical Ship/RS - Check *
2. Owning library will be either AU, GW, or MU.
3. Request Type will be “Ship physically” in the owning library’s IZ.
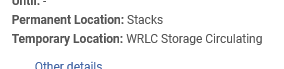
Once you have determined that this is the new type of request, you will need to check the temporary location of the item in the owning IZ. If a temporary location is present, add this information to the SCF item record under Internal note 3 in SCF IZ. If there is only a permanent location you do not need to record anything in the note.*
Add this message to Internal note 3:
When this item comes back, please update the temporary location in the owning IZ to xxx
Example:
In GW IZ:
In SCF IZ:

*GW is going to move all of the WRLC locations from temporary to permanent. We are not sure when this project will be completed but when a book comes back here and if you do not see a WRLC location in the temporary location in GW IZ, let me know so I can check. AU already has all of the WRLC locations in the permanent location for the SCF items. MU still is still using the temporary location with the WRLC locations.
Pull the item and scan in as normal in SCF IZ.
Item is now “In Transit” to owning library

Next you will go back to the owning IZ with the login of SCFStaff account
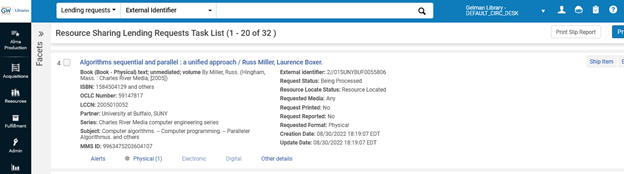
Go to Fulfillment → Resource Sharing → Lending Requests
Find the title of the item that you are working on.
Select “Ship Item”.
Make sure that “Automatically print slip” is set to YES. Enter barcode WITHOUT the “X”.
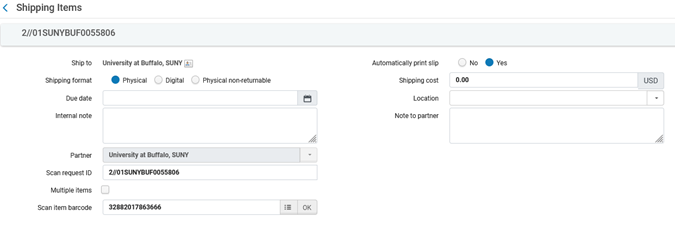
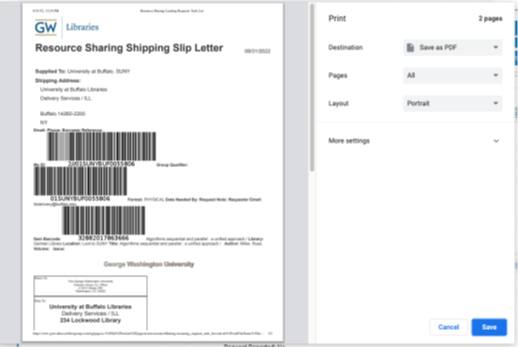
You should get a popup window with the shipping slip. You may have to select the Destination (Save as PDF). Save (button on bottom). Then you can print it locally. The shipping slip will be included in the book being sent.
The item is now “Shipped Physically” (next to Request Status) in Alma.
If the slip did not pop-up, you will need to check the item you are working on and “Print Slip” manually (upper right corner).
Pack item for shipping like the ILL requests to be mailed out. Be sure to include the shipping slip in the package with the item. You can use the address from the shipping slip as the destination when creating a label using the Stamps.com software.
Common issues with AFN requests (books & articles)
1) No barcode or location printed on slip.
- Either look up the Request ID and then do a “View Title in Search” and get the barcode and location this way
- Or go to the Pick From Shelf, locate the request and do a “View Title in Search”
Then try to attach the item to the request...the instructions can be found here: Filling a Title Level Request
If it does not work, manually place the item in transit: Fulfillment > Manage Patron Services > Put in the school code and click on the school or library it is going to then scan the item barcode.
2) Physical Item Request that has article information in the description and no barcode or location printed on the slip.
- Cancel request and let the patron know they need to resubmit the request as an article/digitization request.
3) Item not in tray
- Double check, ask another SCF Specialist to double check
- If item still can’t be located, let Tammy know.
4) Bad cites and missing pages
- If the citation is bad or the pages are missing, we will need to cancel the request with a note explaining the reason why the request is being canceled.
AFN Box Requests
Box requests:
- GA Archives (Gallaudet Archives)
- GW Special Collections (George Washington Special Collections)
- GW Global Resources Center (George Washington Global Resources Center)
- GT Booth (Georgetown Special Collections)
Organize slips in order of row and shelf location so they are easier to pull. You can also organize the slips by schools.
Put boxes on large gray cart(s) and put boxes belonging to the same university together.
After the boxes are pulled, another SCF Specialist will need to double check them to ensure that correct ones are pulled.
Put routing slips on top of the boxes. There are specific colors for two departments:
- George Washington Special Collections - blue
- Georgetown Special Collections - yellow
In the SCF IZ of Alma, the boxes will need to be scanned in to place them in transit to the owning libraries.
Scan item barcode in the "Scan item barcode" field:
Place slips (either paper clipped or stapled) on the pile next to the printer.
Fill out Runners delivery orders online for the following departments:
- Georgetown Special Collections
- George Washington Special Collections
- George Washington-Global Resources Center
Move the large gray cart(s) over to the exit in front of the microfilm cabinets so the special delivery driver from Runners can pick them up in the morning. This is for the following departments:
- Georgetown Special Collections
- George Washington Special Collections
- George Washington-Global Resources Center
Place the following department boxes on the table with the books for the regular courier to pick up:
- Gallaudet Archives
Email Requests
- Email: requests@wrlc.org
- Password: 901*Commerce
Types of requests that come through email
- Interlibrary Loan (ILL) requests
- Article requests
- Box requests
Interlibrary Loan and Article Requests
Search in Alma for the location (if no location is given) and make sure the volume and year match what is on the request. If it doesn't, check the volume and year listed.
Search using whatever information the request provides:
Barcode, Journal or Book tile, ISSN, or ISBN


Write the tray location in the upper right or left corner of the page.
Organize slips in order of row and shelf location so they are easier to pull.
Once article requests have been pulled, place them on the table next to the scanner.
If an article request is over 50 pages, send it to the school by attaching the printed request slip inside the book. To check out a book being mail go to Fulfillment > Manage Patron Services in Alma
Put in the school code and click on the school or library it is going to then scan the item barcode.
- American - AU ILL
- Catholic - CU ILL
- George Mason - GM
- George Washington - ILL Staff, Gelman
- Georgetown - GT ILL
- Marymount - MU ILL
If an article can not be located, reply to the original email letting them know that the article could not be found and if they could get a different citation.
If an article is in a foreign language and you are unsure about which article is correct, check with Tammy first before sending it to the requesting school and let them know you are sending it to them because you are unsure what is correct.
ILL Requests ONLY (Mail Outs)
Check the shipping address on the printed forms. WRLC does not ship outside the US. If a book is going to be delivered outside the US, send the item to the school and reply to the original email letting them know you are sending the item to them.
To check out a book being mail go to Fulfillment > Manage Patron Services in Alma
Put in the school code and click on the school or library it is going to then scan the item barcode.
- American - AU ILL
- Catholic - CU ILL
- George Washington - ILL Staff, Gelman
- Georgetown - GT ILL
Once items are ready to be mailed, make a draft reply to the original emails that says “Mailed” and go over to the ILL station and use Stamps.com to prepare the shipping labels.
Microform Requests (microfilm, microfiche, etc.)
Microform items that are not in Alma will be requested through emails. We have microform cabinets scattered around the SCF's processing area and microfilm reels in module 2.
Retrieve the microform items and fill out the details on the microform log form that is posted on cabinet 1 in the processing area. Send the microform items in a bubbled mailer or a box.
When the microform items come back from a library, go to the form and write down the return date.
Common issues with ILL and article requests
1) Item is too large to mail out - we may need to use two bubble mailer and combine them together. If it is still too large, send it to the school and let them know we are unable to mail it out due to its size.
2) Mailing anything to the University of Maryland. Use the website version of stamps (the app version doesn’t like UMD’s address).
3) Media items (CD, VHS, DVD, Cassette) check with the owning library first to make sure it’s okay to send out. Some schools don’t want their media mailed out.
4) If you are having a difficult time locating anything ask a SCF Specialist before going to Tammy.
5) Bad cites and missing pages: if the citation is bad or the pages are missing, we will need to reply to the email we have received letting the library know why we are unable to fill the request.
Email Box Requests
Email box requests will come from:
- American Archives
- Catholic Archives
- NSA (National Security Archive-located at GW)
- Gallaudet Archives
- George Mason
- George Washington Special Collections (occasionally)
- George Washington Global Resources Center (occasionally)
- Georgetown Special Collections (occasionally)
- Marymount Archives
- Washington College of Law
Print out the email (use the stamp next to the printer on the print out) and get the locations for the boxes. Usually this means looking up the collection title and then finding the box in the list of items.
Put boxes on large gray cart(s) and put boxes belonging to the same university together.
After the boxes are pulled, another SCF Specialist will need to double check them to ensure that correct ones are pulled.
Put routing slips on top of the boxes. There are specific colors for two departments:
- George Washington Special Collections - blue
- Georgetown Special Collections - yellow
Make a notepad of the barcodes and save it in the common drive: Common (S:) > SCF Boxes for outgoing materials> open the folder of the appropriate department > type the file name: today's date
Print the notepad and staple it to the printed request.
Use Patrons Service in Alma to check out the materials:
- American Archives: Deliver To: AU
- Catholic Archives: Deliver To: CU
- George Mason Special Collections: Deliver To: GM
- Marymount Archives: Deliver To: MU
- National Security Archives: Deliver to NSA
- UDC Jazz Archives: Deliver to DC
- Washington College of Law: Deliver To: AULAW
Email Runners and let them know that the driver will need to make a special stop for Catholic University Archives with the box break down and place boxes on the table with the books for the regular courier to pick up.
Fill out Runners delivery orders online for the following departments:
- American Archives
- Georgetown Special Collections
- George Washington Special Collections
- George Washington-Global Resources Center
Move the large gray cart(s) over to the exit in front of the microfilm cabinets so the special delivery driver from Runners can pick them up in the morning. This is for the following departments:
- American Archives
- Georgetown Special Collections
- George Washington Special Collections
- George Washington-Global Resources Center
Place the following department boxes on the table with the books for the regular courier to pick up:
- Catholic Archives
- Gallaudet Archives
- National Security Archive
- George Mason Special Collections
- Marymount Special Collections
- Washington College of Law
For American Archives boxes, they need to be strapped and should have new straps to any boxes without them.
SCF 50+ pages AFN digitization requests
SCF 50+ pages AFN digitization requests
1) SCF receives an AFN article request that is over 50 pages long
2) SCF staff will send the item to the requesting library for further processing and include the AFN slip & "SCF Digitization Request" slip which will be "belted" so it could stay on the book. Do not scan in the item!
3) SCF staff will also add an Alma note to Internal Note 3; for example: "SCF in transit to GW for Digitization, 9/29/2022"
4) The item gets sent to the requesting library
5) The requesting libraries' staff physically completes the patron's digitization request by uploading the file:
For ILLiad requests, the library staff will scan and upload the file, as per usual
For Alma digitization requests will likely be forwarded to the patron via email
6) On the requesting library's end the item will not be returned or scanned into Alma for the return to the SCF
7) Library staff will only need to flag it with the WRLC green flag, as per usual, and it will be correctly identified here, at the SCF for re-shelving
8) When the item comes back to SCF, SCF staff will upload the dummy document* the same way they would do with the AFN digitization requests that are less than 50 pages to close corresponding digitization request in Alma (Simplified Digitization Workflow)
9) SCF staff will return item
10) SCF Staff add a message of "SCF Hold Shelf" to Internal Note 3 of the item record
11) Item is placed on the hold shelf in the processing area
*Dummy document to upload:
Hello,
This request has been processed by the library staff at your institution.
If you have any questions or concerns, please contact the Circulation Desk at your home library.
Thank you
Simplified Digitization Workflow
Simplified Digitization Workflow
Request comes in: Fulfillment → Resource Requests → Pick from Shelf

Pull the item. Scan the requested pages.
Select “Deliver Digital Documents” from Fulfillment → Resource Requests
Enter the Request ID on the Document Delivery screen.

Browse for the scanned document or just drop it in the area provided.
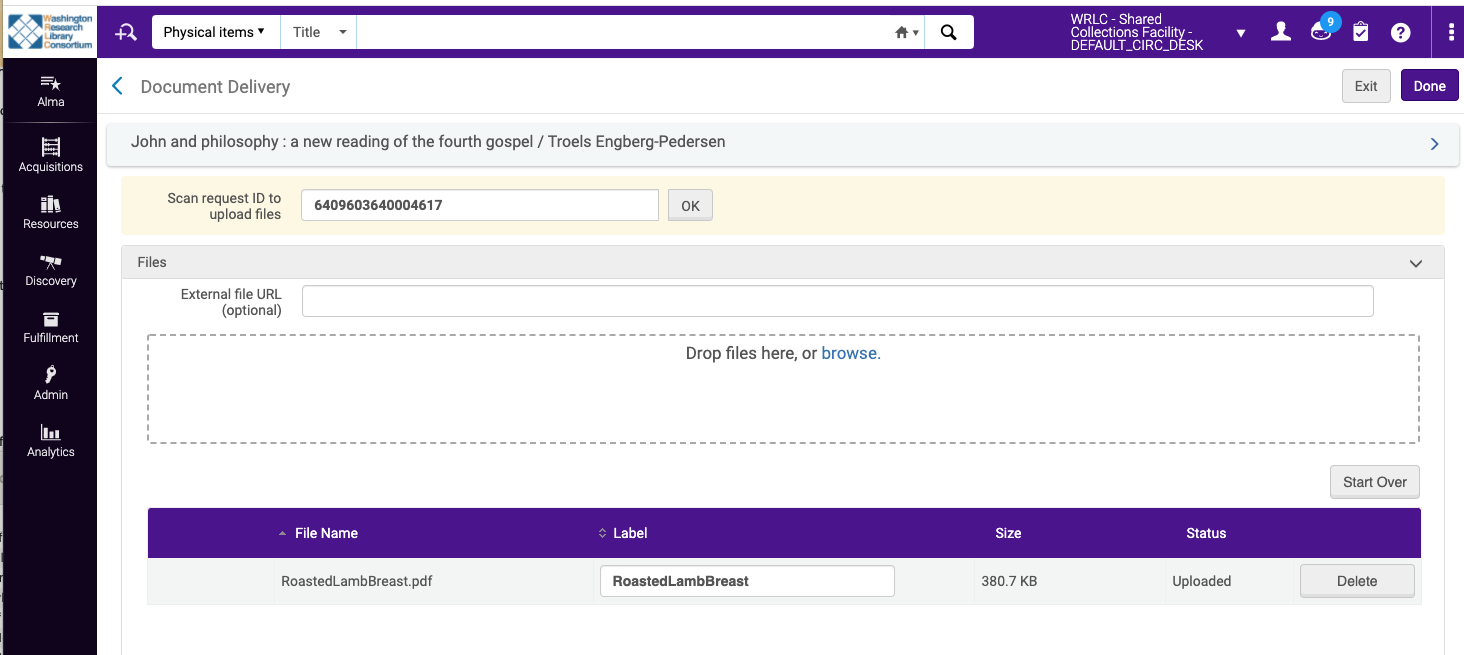
Select Done.
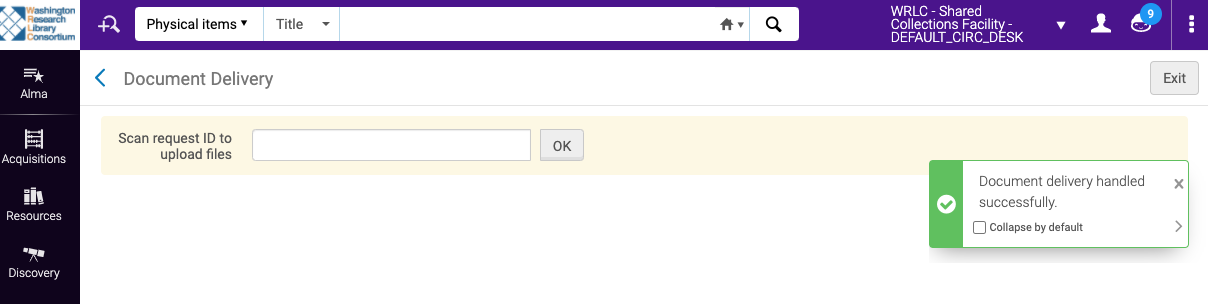
The item has been successfully uploaded and sent to the requestor.
Tammy:
To get Request ID:

Library Abbreviations (Alma Pull Slip Locations and Green Courier Slip Locations)
American (Bender Library)
- AU
American Law/Washington College of Law (Pence Law Library)
- AULL
- AU-L
- AU LAW
- AU-WCL
Catholic (Mullen Library)
- CU
Catholic Law (DuFour Law Library)
- CUL
- CU-L
- CU LAW
University of the District of Columbia (Learning Resources Division)
- DC
- UDC
University of the District of Columbia Law
- DCL
Gallaudet (Merrill Learning Center > Jordan Student Academic Center)
- GA
George Mason (Fenwick Library)
- GM
George Mason Square Library
- GMA
- GM-A
George Mason Law Library
- GML
- GM-L
George Mason Prince William Campus Library
- GMP
- GM-PW
Georgetown Bioethics Resrarch Library
- GT-Bioethics
Georgetown Blommer Library
- GTB
Georgetown (Lauinger Library)
- GT
- GT-OD
Georgetown School of Continuing Studies Library
- GT-SCS
Georgetown Woodstock Theological Library
- GT-WTL
Georgetown Law (Williams Law Library)
- GTL
- GT Law
George Washington (Gelman Library)
- GW
George Washington University Global Resources Center (Gelman Library)
- GW-GRC
George Washington Law (Jacob Burns Law Library)
- GW-JB
- JB
National Security Archive at George Washington's Gelman Library
- GW-NSA
George Washington Northern Virginia Campus Library
- GWN
- GW-NVCL
George Washington University Special Collections (Gelman Library)
- GW-SC
George Washington University's Himmelfarb Health Sciences Library
- HI
George Washington University's Mount Vernon College (Eckles Library)
- GWE
- MTV
George Washington Online-Only Community
- GWOC
Howard University (Founders Library)
- HU
Howard University Divinity Library
- HU-D
Howard University's Louis Stokes Health Sciences Library
- HU-HS
Howard (Vernon E. Jordan, Jr. Law Library)
- HU LAW
- HUWC
Marymount (Reinsch Library)
- MU
Marymount University Ballston Campus
- MUB
- MU-B
Marymount University Loudoun Campus
- MU-L
Trinity (Sister Helen Sheehan Library)
- TR
Runners Online Order
https://www.runnersinc.net/clientportal
User Name: tammy
Password: 901Commerce*
Click on “New Order”

Company* (on the RIGHT):
Type a for American University Archives
Type ge for George Washington, Gelman Library, Special Coll. & Global Resources Center
Type ge for Georgetown University Bioethics Research Library
Type ge for Georgetown University Special Collections
Type georget for Georgetown University, Woodstock Theological Library
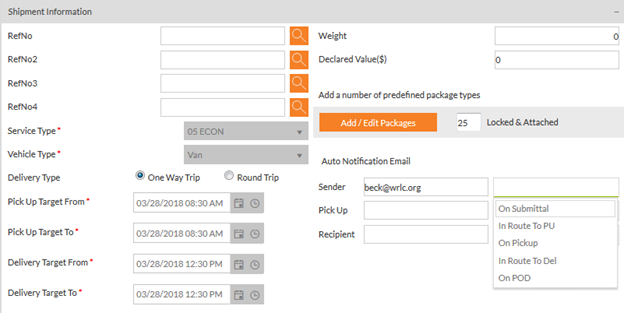
Service Type*: 05 ECON
Vehicle Type*: Van
Delivery Type: One-way trip or Round Trip
Pick Up Target From*: it will always show the next day*
Pick Up Target To*: it will always show the next day*
Delivery Target From*: it will always show the next day*
Delivery Target to*: it will always show the next day*
*Please make sure that the next day is the correct date of when we will be open.
Ex. WRLC is closed on Saturdays, enter the date for the following Monday.
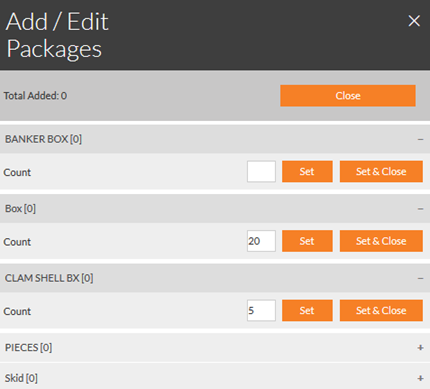
Add/Edit Packages
Add the amount of boxes according to their sizes
Auto Notification Email
Sender: beck@wrlc.org
- On Submittal
- On Pickup
- On POD
For American University Archives, two contacts:
Sender: beck@wrlc.org
- On Submittal
- On Pickup
- On POD
Recipient: lnellis@american.edu
- On Submittal
- On Pickup
- On POD
Continue
Submit Order
Print Labels
Stamps.com
Stamps.com
Username: WRLC
Password: 901Commerce
OLD: Checking in return books :OLD
Courier will drop off return materials at the end of the day. Those books and boxes should have the green "WRLC" slips inside the books or on the boxes/packages. If you see the slip with a different library abbreviation on it, put the item on the outgoing table for the courier to pick up.
You will be using the SCF IZ and will need to use the X barcode scanner
Use “Return Items”
Scan item barcode and check the patron column to determine which course of action to take.
If you see, “Deliver To: xxx” in the "Patron" column, write down the tray location on the slip and add “SCF Hold Shelf” to internal note 3. If you see any circulation message in this field, it is okay to clear it unless it has Tammy’s name in it or any important message.
If you see patron’s name, something else (ILL) or it is blank, you will need to give it to Tammy so she could use owning IZ to check in book (she has to change the configuration in Alma every time.)
When Tammy finishes checking in books in the owning IZs, she will put a slip that says “READY TO CHECK IN THE SCF IZ” into the books. Books now can be checked into the SCF IZ.
Check the other fields to make sure there is no other transit status. If you do see it, clear it as well.
*Leave the library code alone*
Example, au, in the screenshot
If you see this message in the SCF IZ when using “Return Items”:

You can cancel the request then use “Return Items” again.
For Georgetown Books
Use BOTH SCF IZ and GT IZ and use “Return Items”. There is no need to give any GT books to Tammy unless there is some kind of issue.

For Oxford University Press (OUP) Books owned by WRLC
Use SCF IZ...you will not see any patron names in the "Patron" column when you return them in. You can go ahead and add a slip to each book then put the books on the shelf. We store all OUP books in the last shelving module facing back of the processing area. It is labeled as "OUP Books".
Using Book Pavilion & Article Exchange for GM-ILL Article Requests
Book Pavilion
-Check the destination folder and select C:\Requests-GMILL if needed
-Put ILL # in the “File Name Prefix” field
-Put the request form on the scanner and click on “Preview” to scan then adjust the dotted lines to fit the paper
-Scan the request form… if it is upside-down, click on the blue X to cancel then scan again
-Click on “Preview” to scan the first page of article and adjust the dotted lines to fit the page*
(if the book is small enough, ok to scan 2 pages at once)
- If scanning two pages, change to “no rotation”
-Scan the first page…if it is upside-down, click on the blue X to cancel then scan again the scan the rest of pages
-Click on “Transfer”
*If a book or pages are too fragile or the binding is too tight to scan:
- First option: Try using the CZUR scanner and see if it works. If not then proceed with the second option.
- Second option: add a "SCF Digitization Request" book strap to the book and add a message to the strap. Insert the request form in the book then send it to the requesting library. Also, add a transit message to Internal Note 3 (for example: SCF in transit to GM ILL, 3/13/2024).
Article Exchange
-Use OCLC Article Exchange in Firefox
-Log onto AE if necessary
Password: Aug04cat
-“Select a file to drop” message will appear
-Click on “Browse” to get the file then a window will open with the files (C:\Requests-GMILL)
-Double-click the appropriate file (each filename will have “1” at the end…ignore it)
-Click on “Drop file”
-The message saying “Your drop was successful!” should appear
-Move the mouse pointer (finger) to “email a notification” and right-click and select, “open link in new window”
-It will lead to Gmail and open a message…add the following information
To: illloan@gmu.edu
Subject: ILL # xxxxxxx
-Send the email then close the window
- Fold the request form and put it back in the book
Using Book Pavilion & Article Exchange for ILL Article Requests
Book Pavilion

-Check the destination folder and select C:\Requests-ILL if needed
-Put ILL # in the “File Name Prefix” field
-Put the request form on the scanner and click on “Preview” to scan then adjust the dotted lines to fit the paper
-Scan the request form… if it is upside-down, click on the blue X to cancel then scan again
-Click on “Preview” to scan the first page of article and adjust the dotted lines to fit the page*
(if the book is small enough, ok to scan 2 pages at once)
- If scanning two pages, change to “no rotation”
-Scan the first page…if it is upside-down, click on the blue X to cancel then scan again the scan the rest of pages
-Click on “Transfer”
*If a book or pages are too fragile or the binding is too tight to scan:
- First option: Try using the CZUR scanner and see if it works. If not then proceed with the second option.
- Second option: add a "SCF Digitization Request" book strap to the book and add a message to the strap. Insert the request form in the book then send it to the requesting library. Also, add a transit message to Internal Note 3 (for example: SCF in transit to GW ILL, 3/13/2024).
Article Exchange
-Use OCLC Article Exchange in Firefox
-Log onto AE if necessary
Password: Aug04cat
-“Select a file to drop” message will appear
-Click on “Browse” to get the file then a window will open with the files (C:\Requests-ILL)
-Double-click the appropriate file (each filename will have “1” at the end…ignore it)
-Click on “Drop file”
-The message saying “Your drop was successful!” should appear
-Move the mouse pointer (finger) to “email a notification” and right-click and select, “open link in new window”
-It will lead to Gmail and open a message…add the following information
To: Borrowing library’s email address
CC: Lending library’s email address (select AU, CU, GW or GT)
Subject: ILL # xxxxxxx
-Send the email then close the window
- Fold the request form and put it back in the book
Using Book Pavilion & Email for Himmelfarb Requests
Book Pavilion
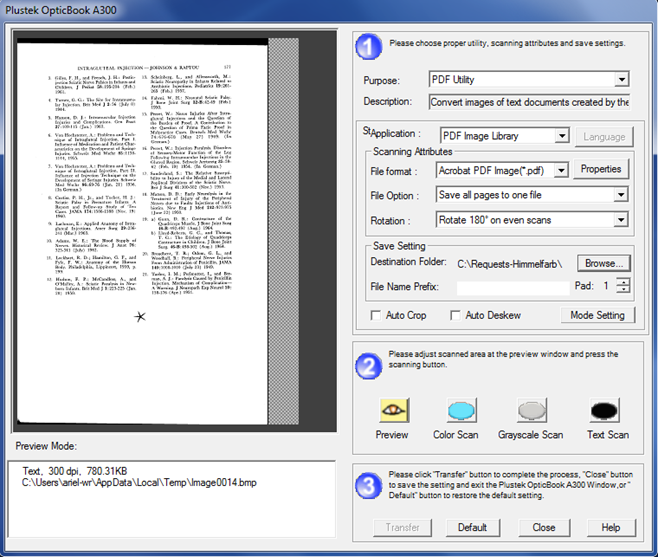
-Check the destination folder and select C:\Requests-Himmelfarb if needed
-Put today’s date and # (sequence of documents scanned) in the “File Name Prefix” field (ex. 8.12.14.1)
-Put the request form on the scanner and click on “Preview” to scan then adjust the dotted lines to fit the paper
-Scan the request form… if it is upside-down, click on the blue X to cancel then scan again
-Click on “Preview” to scan the first page of article and adjust the dotted lines to fit the page*
(if the book is small enough, ok to scan 2 pages at once)
- If scanning two pages, change to “no rotation”
-Scan the first page…if it is upside-down, click on the blue X to cancel then scan again the scan the rest of pages
-Click on “Transfer”
*If a book or pages are too fragile or the binding is too tight to scan:
- First option: Try using the CZUR scanner and see if it works. If not then proceed with the second option.
- Second option: add a "SCF Digitization Request" book strap to the book and add a message to the strap. Insert the request form in the book then send it to the requesting library. Also, add a transit message to Internal Note 3 (for example: SCF in transit to HI, 3/13/2024).
-Locate the request email
-Click on reply and attach the PDF file (get it from C:\Requests-Himmelfarb)-the filename will have “1” at the end, ignore it
-Type a message saying that the article has been attached and include your name
-Send the email
-Fold the request form and put it back in the book
Using Book Pavilion & Dropbox for RapidILL Requests (Georgetown)
Book Pavilion
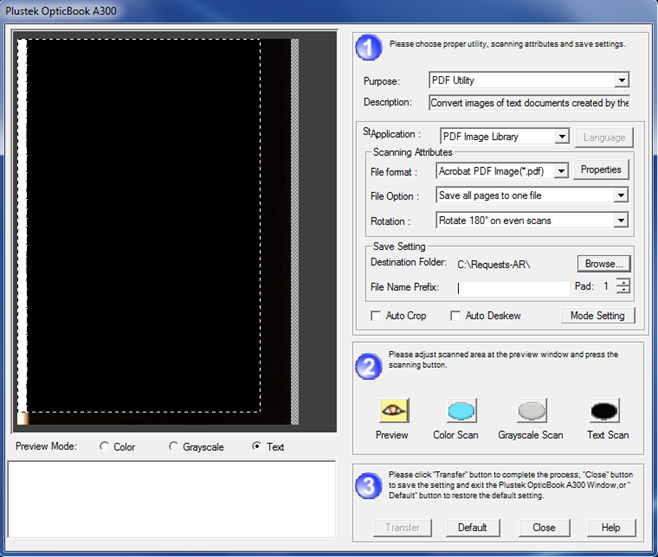
-Check the destination folder and select C:\Requests-AR if needed
-In the “File Name Prefix” field, name the file DGUxxxxxx, where the x stands for the transaction number on the request slip (ex. DGU383635)
-Put the request form on the scanner and click on “Preview” to scan then adjust the dotted lines to fit the paper
-Scan the request form… if it is upside-down, click on the blue X to cancel then scan again
-Click on “Preview” to scan the first page of article and adjust the dotted lines to fit the page*
(if the book is small enough, ok to scan 2 pages at once)
- If scanning two pages, change to “no rotation”
-Scan the first page…if it is upside-down, click on the blue X to cancel then scan again the scan the rest of pages
-Click on “Transfer”
*If a book or pages are too fragile or the binding is too tight to scan:
- First option: Try using the CZUR scanner and see if it works. If not then proceed with the second option.
- Second option: add a "SCF Digitization Request" book strap to the book and add a message to the strap. Insert the request form in the book then send it to the requesting library. Also, add a transit message to Internal Note 3 (for example: SCF in transit to GT ILL, 3/13/2024).
Dropbox
-Open the AR folder in Windows Explorer
-Find the AR request to send (the filename will have “1” at the end)
-Rename the filename by deleting the “1” at the end
-Drag and drop the file to ‘OCS ArticleReach-Shortcut’
-The file should disappear from ‘OCS ArticleReach-Shortcut’ folder in seconds (will see the deleted message at bottom)
-Fold the request form and put it back in the book
Oxford University Press Books
* Unpack books and check against list (boxes and packaging paper can be recycled)
* Scan barcodes using Notepad; email the file to Tammy
*Update item records using either Alma or Grima:
Alma (a large set of books)
* Create a set using the Notepad file
* Add “At WRLC waiting to be processed” to Internal Note 1 and “Property of Washington Research Library Consortium” to provenance code at the same time using the change physical job
Grima (a small set of books)
* Add “At WRLC waiting to be processed” to internal note 1 using the Grima tool:
https://grima.wrlc.org/AddInternalNote/AddInternalNote.php
* Add “Property of Washington Research Library Consortium” to provenance code using the Grima tool:
https://grima.wrlc.org/AddProvenance/AddProvenance.php
Be sure to select “Property of Washington Research Library Consortium” every time you scan a book. It still defaults to AU. It will be fixed eventually.
Create & Scan in new AU volumes in AU IZ
-Unpack the volumes; save the tissues and envelope with rubber bands in it then put them together in a box. They will need to be sent back to AU
-Put a barcode (“American University Library”) on the back page of each volume at the bottom
-Login in AU IZ with the WRLCadmin username
-Get the ISSN from the volume and write it down on the bottom right of the slip that came with the volume then enter the ISSN in Alma:

-If ISSN is not found, type the journal title:

-Find the appropriate record then click on “Holdings”
-Find the holdings that says “Shared Collections Facility-General” location and click on “View Items” in the box on the right
-Click on “Add Item”
-Fields to fill
- Material type: Issue
- Item policy: Periodical
- Barcode: Scan item barcode (be sure it has NO “X” at the end)
Search by item barcode then go to the “ENUM/CHRON” tab to fill out more fields:
- Enumeration A: enter volume number without “v.”
- Enumeration B: enter number without "n", "no.", etc.
- Enumeration C: enter the issue #
- Enumeration D: enter a message such as supplement, index, incomplete, page #, etc.
- Chronology I: enter the year
- Chronology J: enter the month
- Chronology K: enter the day
-Click on “Save” then double check the description field
-When finished creating items, scan them in to place the items in transit so they can be added to the SCF IZ the next day.
Guide:
Item Record Description Policies, Templates and Examples
Enumeration A: volume, band, tome number (do not type ‘v.’)
Enumeration B: number, heft (on the spine it would show as ‘no.’, ‘nos’, etc.; do not type letters)
Enumeration C: issue number
Enumeration D: supplement, index, incomplete, page # or other message
Chronology I: year
Chronology J: month or season
Chronology K: day
WRLC Storage Journal Deduplication Procedure
WRLC Storage Journal Deduplication Procedure
1. Rationale
2. Identifying duplicate volumes
A duplicate periodical volume is one which contains precisely the same content as a volume already in storage. All of the content of a volume sent for processing must be included in the stored copy for that volume to be considered a duplicate. Where a volume in storage has some of the content of an incoming volume, but not all, the incoming volume is not considered a duplicate.
Examples:
|
Incoming volume |
Stored volume |
|
|
v.65 1970 |
v.65 1970 |
Duplicate; same content |
|
v.65 no.1-2 1970 |
v.65 no.1-2 1970 |
Duplicate; same content |
|
v.65 1970 |
v.64-65 1969-70 |
Duplicate; all content in stored copy |
|
v.65-66 1970-71 |
v.65 1970 v.66 1971 |
Duplicate; all content in stored copies |
|
v.65 1970 |
v.65 no.1-2 (1970) v.65 no. 2-4 (1970) |
Possible duplicate; set aside for review (no.1-4 may be complete, but don’t know how many numbers are in a volume) |
|
v.65 1970 |
v.65 no.2-4 (1970) |
Not a duplicate; stored volume is incomplete |
|
v.65 1970 |
v.65 1970 (inc.) |
Not a duplicate; stored volume is incomplete |
|
v.65-66 1970-71 |
v.65 1970 |
Not a duplicate; all content not in stored copy |
|
v.65 & index |
v.65 1970 |
Not a duplicate; all content not in stored copy |
|
v.65 & supplement |
v.65 1970 |
Not a duplicate; all content not in stored copy |
Incoming volume: new items that need to be processed.
Stored Volume: items already in storage.
3. Procedures
A. Periodicals will be run through the deduplication process on unpacking, before sorting by size (there will be no need to sort duplicate volumes by size as they will not be processed into the storage facility).
B. For each periodical, a list of the volumes already in storage will be pulled up using the Journal Volume Overlap reports. The list will be scanned to determine if a volume in storage matches the volume in hand. The report is generated by scanning the volume’s barcode number (normally found inside the back cover; in same cases it will be on the outside of the cover).
1. Go to web page, Journal Volume Overlap - Barcode
2. Scan volume barcode
3. Check the “Volume” column of the report to see if the same volume is listed (as per the guidelines in section 2 above). The report will be sorted by volume number.
a. The sort is a computer sort rather than a numerical sort; all volumes beginning with 1 precede all volumes beginning with 2, etc. So the order will appear as:
1, 10, 11, 12, 13, 14, 15, 16, 17, 18, 19, 2, 20, 21, 22…..
1, 10, 101, 2, 20, 201, 3, 30, 301…..
4. If the same volume is listed on the report as the volume in hand, the volume is a duplicate and should be placed on the “Discards” cart to be disposed.
Note: If the only volume listed on the report is from the same library as the volume in hand, then it is probably not a duplicate. Compare the barcode on the item to the barcode on the volume. If they match, the volume is not a duplicate. If they do not match, the volume is a duplicate.
5. If the volume in hand is not listed on the report, then it is not a duplicate and should be placed on the “accessions” cart to be processed into storage.
6. If there is any doubt (as in the fourth example in section 2) the volume should be placed on the “Review” cart so a supervisor can make the determination.
Routing Slips
Routing slips are located at S:\SCF Route Slips
When more slips are needed, you can print them then put them in the folders above the outgoing materials table.
Exporting Items from Alma
There are two ways to export the shelf data: directly from the Alma display and from Analytics.
1) Alma display:

Select "Excel (current view)
Wait for Excel to finish downloading the data then open the file.
The columns that are needed are:
- Title
- Barcode
- Item Call Number
- Description
Delete the rest of the columns then save the file to S:\SCF Shelves for Archival Materials\YOUR NAME.
- File name is RxxMxxSxx (ex. R11M11S04).
Do the steps for each shelf location.
One of the cons of using Alma display is having to delete columns in Excel, however, you can customize the column display to reduce the amount of columns to delete after exporting the data.
2) Analytics:
Click on "Analytics"
Click on "Access Analytics" under "Create Analysis"
When Analytics opens, click on Create > Analysis > Physical Items
Bibliographic Details > Title (Complete)
Physical Item Details > Barcode > Item Call Number > Lifecycle
Click on the wheel with spoke next to Item Call Number and select Filter
Go to the Operator field and select “begins with”
Go to the Value field and enter shelf locations as many as you want by using the RMS format:
R11M11S04;R11M12S02;R11M12S04 (semicolon is required, no space & the letter must be in caps)
Click on OK then on Results
Export the results

Select "Excel"

Wait for Excel to finish downloading the data then open the file.
Highlight all column by clicking on the green arrow:
Format > AutoFit Column Width
Click column D (Lifecycle), Sort & Filter > Sort Z to A > Expand the selection
Delete the rows with “Deleted” in column D. Then Delete column D.
Click column C, Sort & Filter > Sort Z to A > Expand the selection
Highlight 8 boxes (20 for clamshells, 40 for thin clamshells and so on) then cut.
File > New > Blank workbook then paste
Highlight all column by clicking on the green arrow then Format > AutoFit Column Width
Save the file to S:\SCF Shelves for Archival Materials\YOUR NAME.
- File name is RxxMxxSxx (ex. R11M11S04).
Do the next 8, 20, etc. boxes until it’s gone. Export more shelf data if needed and do the same steps.
Filling a Title Level Request
Once in a while we will receive an AFN slip with no barcode or tray location on it, we can attempt attaching the item to the request.
Requested Item:
Identified correct volume, barcode. Scan In to fill:
Result of scanning in. Item is recognized as an item to fill a request:
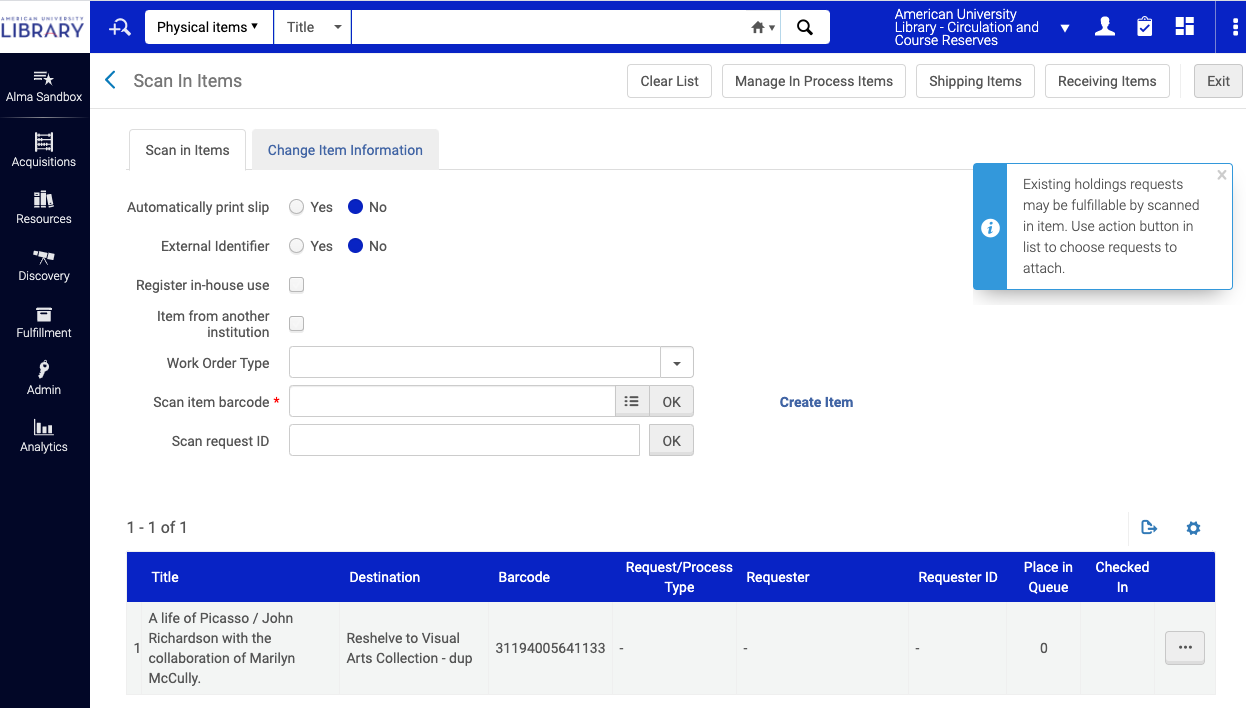
Select action “Attach to request”:
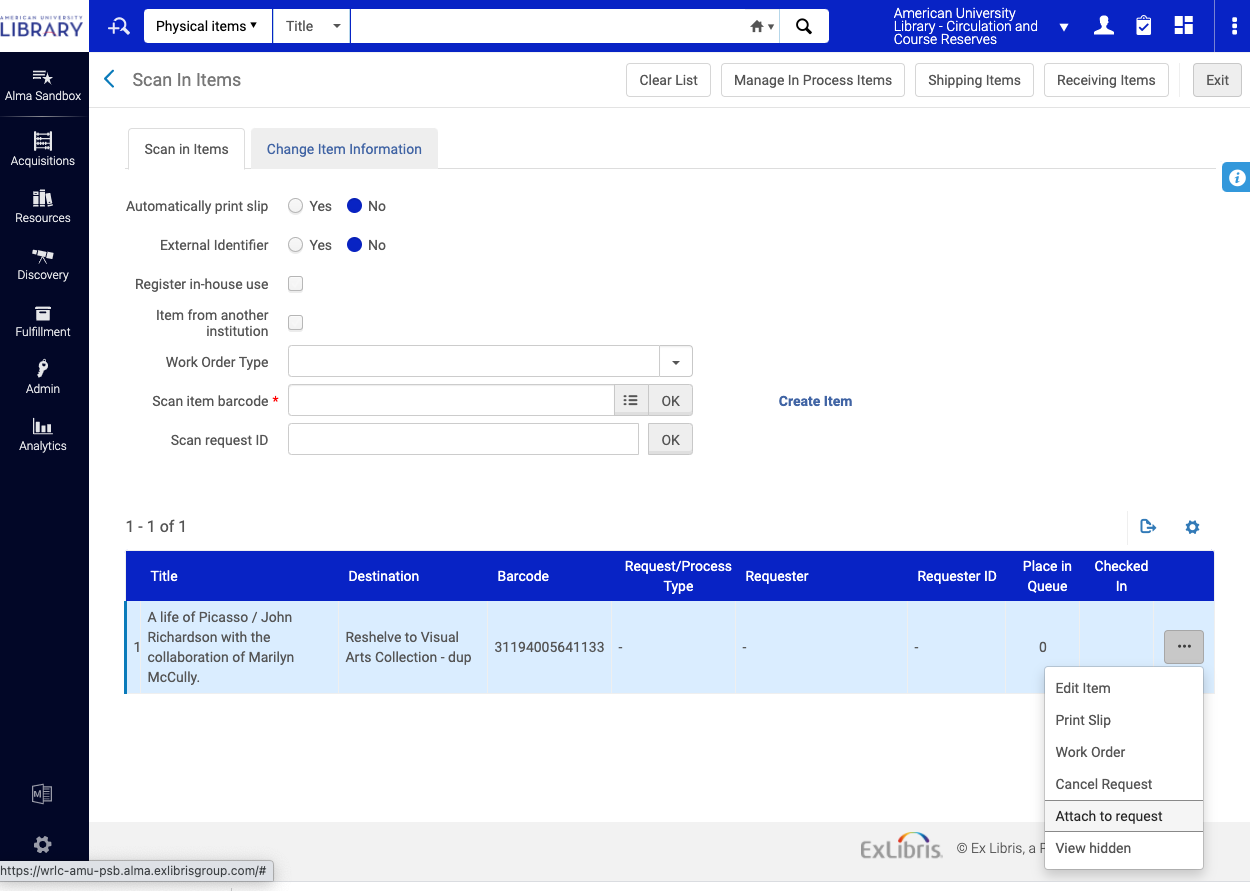
Select request to attach item to:
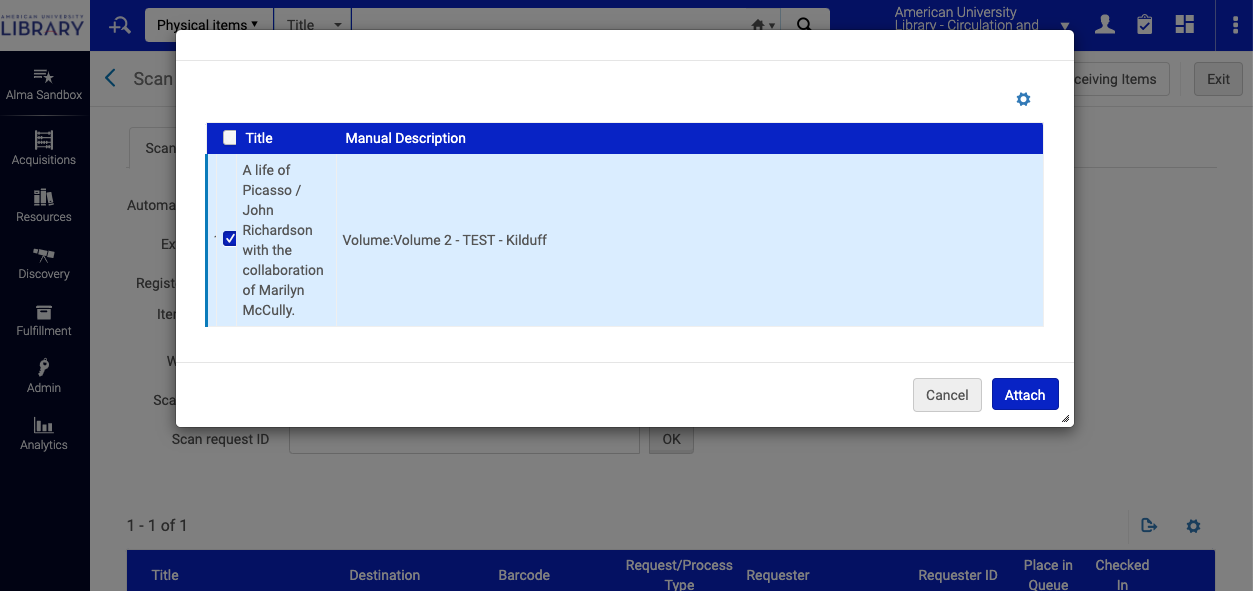
Request is filled and now In Transit to patron:
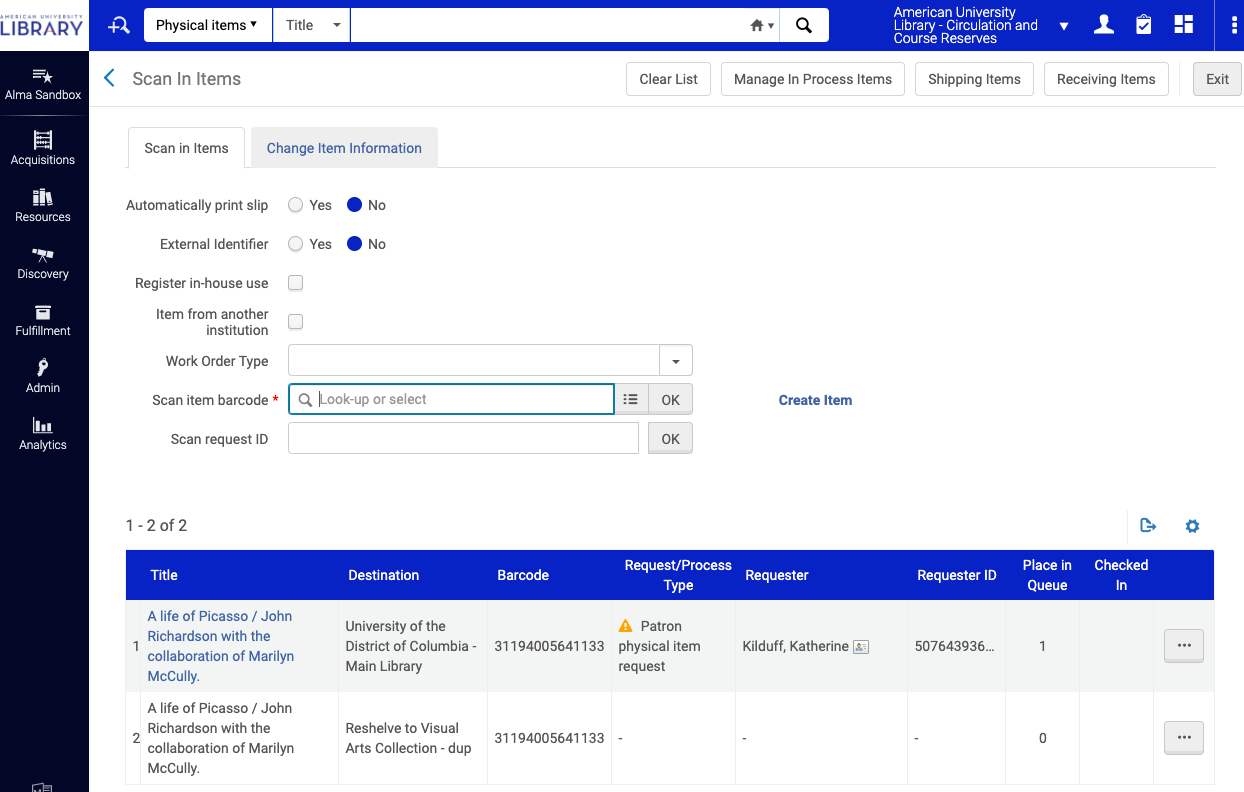
Item scanned in at borrowing library:
Item now On Hold shelf for patron:
Item can now be checked out to the patron. Return is the normal process.
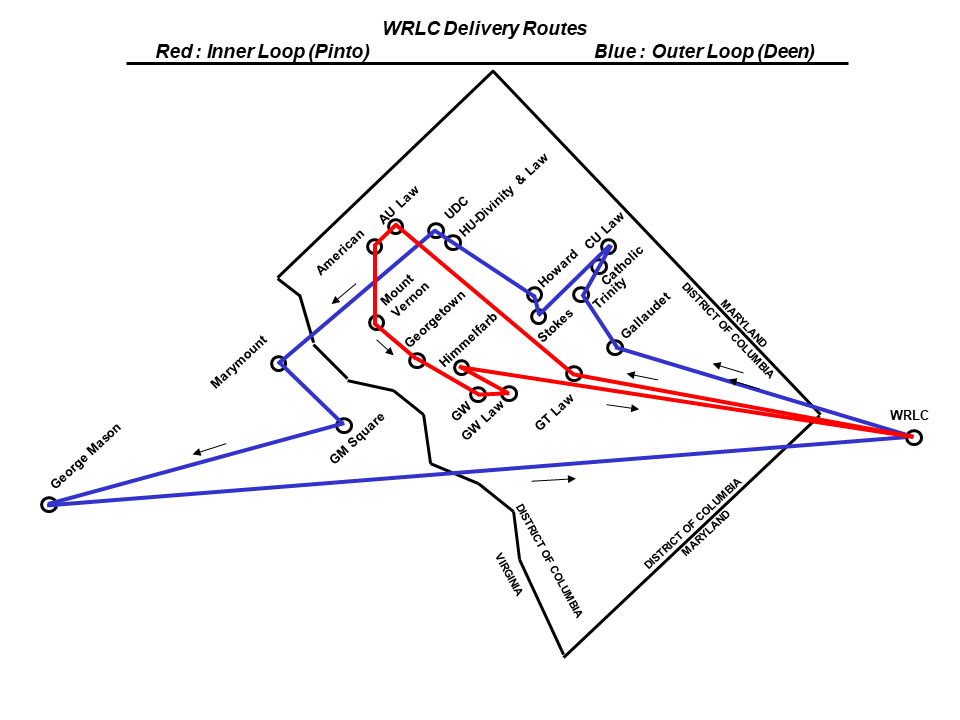
WRLC Delivery Routes
Barcodes: In Transit, SCF Hold Shelf, SCF Floor


Clear loan status for processed items that were never scanned in
When items from Voyager were migrated to SCF IZ in 2018 and items found eventually then added, this caused Alma to assign the loan status to the items even though items were already in the SCF.
Also, after new items get processed in Alma and people who does the processing may forget to scan them in which would mean the loan status would remain.
In order to clear the loan status, we will need to use Analytics to identify items with the loan date that has the same date as when items are created.
Click on "Analytics"
Click on "Access Analytics" under "Create Analysis"
When Analytics opens, click on Create > Analysis > Physical Items
In Analytics:

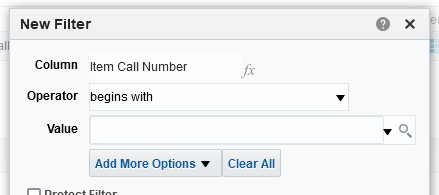
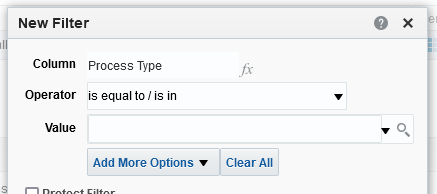
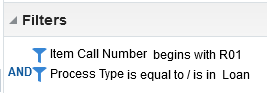
Apply filters by clicking on the cog wheel for Item Call Number and Process Type.
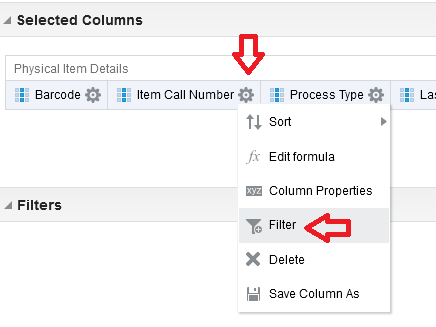
Item Call Number can be any row. In this screenshot, it is row 1.
Click on the up arrow in the Last Loan Date (calendar) column to put the dates in order starting with the earliest date.
Please take your time when reading the dates. We don't want the actual loans to be touched.
Look for the same dates.
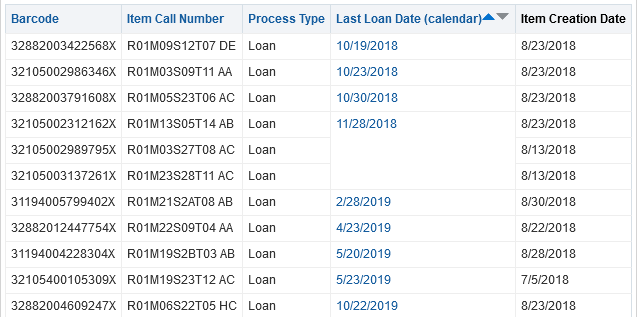
No dates between Last Loan Date (calendar) and Item Creation Date are the same and this means these items are actual loans.

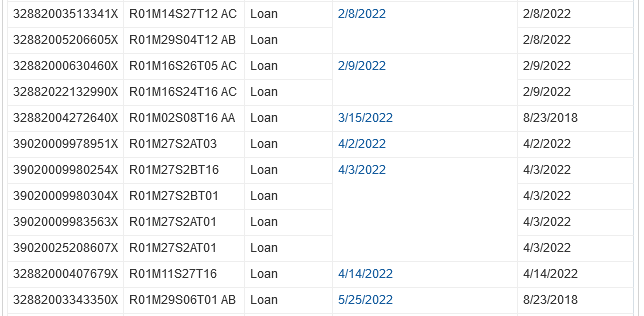
There are dates between Last Loan Date (calendar) and Item Creation Date that are the same and this means the loans are not real and they will need to be cleared.
- 2/8/2022
- 2/9/2022
- 4/2/2022
- 4/3/2022
- 4/14/2022
Copy the item barcodes to Notepad and save the file to anywhere on the computer.
32882003513341X
32882005206605X
32882000630460X
32882022132990X
39020009978951X
39020009980254X
39020009980304X
39020009983563X
39020025208607X
32882000407679X
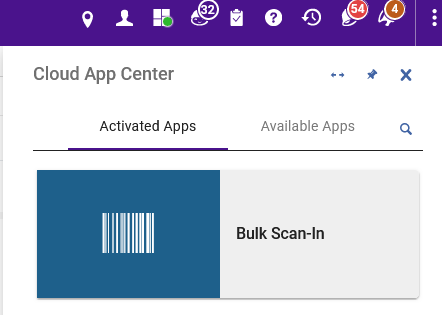
In SCF IZ, go to Cloud App Center and click on Bulk Scan-In.
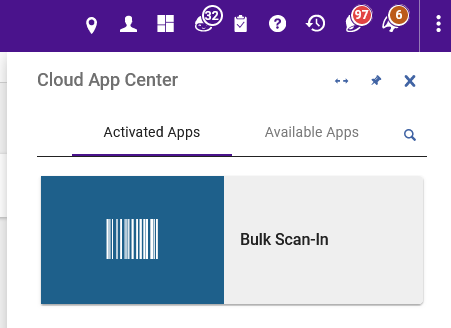
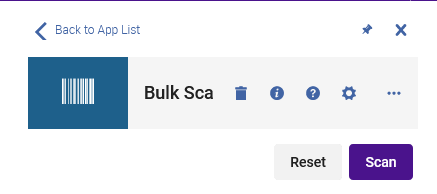
Drag the Notepad file to the box labeled, "Choose barcode file" then click on Scan. This will clear the loan status.
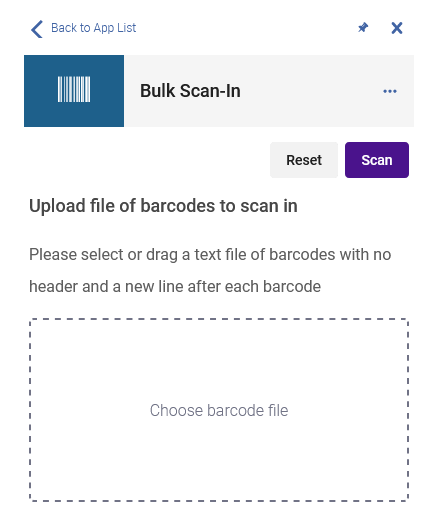
You can scan in items as many as you want...10 items at a time or 100 items, it doesn't matter. Just be sure to save the Notepad file before doing the bulk scan-in.
Updating volume & year info for Himmelfarb volumes in SCF IZ
You will need to have both SCF and HI IZs open at the same time and you will be entering the data in SCF IZ.
Himmefarb barcodes start with P.

Look for items in SCF IZ that are missing the description.
You can see that the second item is missing the description:
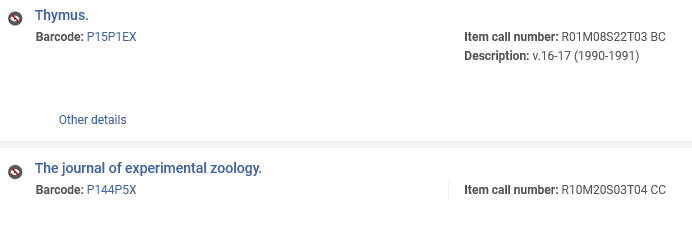
Click on then copy the item barcode. Paste it in HI IZ then remove the "X" at the end.
Click on the item barcode in HI IZ.
Look at the holdings info:
![]()
This shows volume and year info. You will see issue #s in some volumes as well. Be sure to ignore the info in the bib title!
Go back to SCF IZ and click on the ENUM/CHRON tab. Fill the info according to the guide (right below) then save and confirm.
- Enumeration A: enter volume number without “v.”
- Enumeration B: enter number without "n", "no.", etc.
- Enumeration C: enter the issue #
- Enumeration D: enter a message such as supplement, index, incomplete, page #, etc.
- Chronology I: enter the year
- Chronology J: enter the month
- Chronology K: enter the day
Double check the description to make sure it looks correct.
Go to the next item and do the same steps.
If the data in HI IZ looks funny or something, email Tammy the item barcode and she will take a look at it.
WRLC Forklift Daily Checklist
Forms are located at WRLC COMMON - Documents\SCF Forms and Route Slips\Forklift Checklists
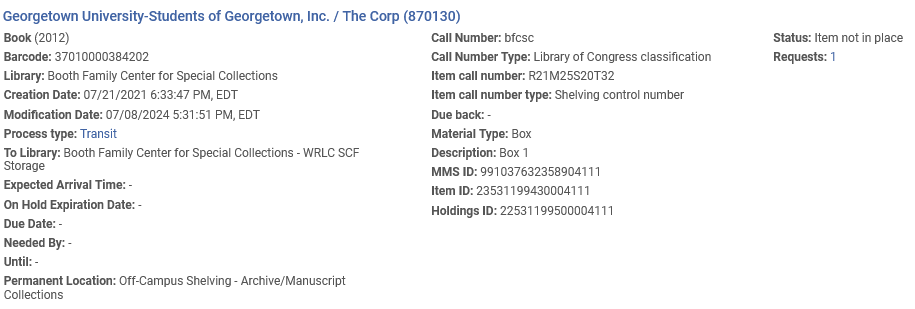
Check in archival materials (To be performed by the Shared Collections Supervisor only)
For returning Georgetown Special Collections archival materials, we will need to check them in so the status could be cleared in both SCF and owning IZs. And the "SCF Floor" message will be added to Internal Note 3 in SCF IZ. Then after the materials have been reshelved, Internal Note 3 in SCF IZ will need to be cleared.
4 things that need to be done:
- Scan barcodes to Notepad
- Scan in items in SCF IZ
- Update Internal Note 3 in SCF IZ for return materials; Internal Note 1 for new materials
- Check owning IZ and SCF IZ to make sure items have the status of "Item in Place"
Using the portable scanner, scan all item barcodes and count the items. Count the number of items.
Upload the barcodes to Notepad and check to make sure that total items is the same as the manual count.
Add "Barcode" at the top then save the file on the Common Drive:
C:\Users\xxx\WRLC\WRLC COMMON - Documents\1_Storage Refiles\Alma\Boxes and Clamshells
The file name should be: Today's date_GTSC_your name_GTIZ (ex. 7_10_24_GTSC_Tammy_GTIZ)
Add "X" to every item barcodes.
Save the file as Today's date_GTSC_your name (ex. 7_10_24_GTSC_Tammy)
Open the SCAN IN file stored on your desktop and delete old barcodes. Copy the new return items with X and paste them in the SCAN IN file. Make sure the total count of boxes is accurate.
Go to the SCF IZ and do the bulk scan-in.
Click on the cog icon for settings:
The settings should look like this:
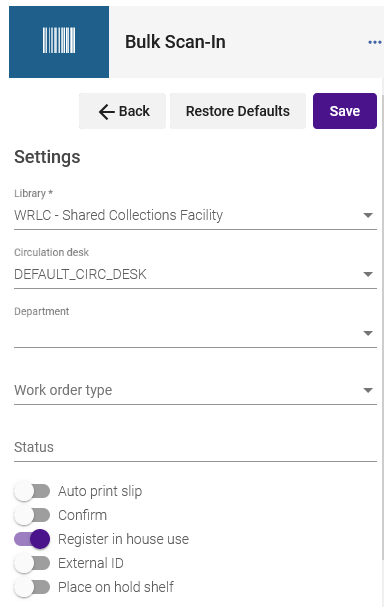
No need to check this every time you come back to bulk scan-in.
With the "Choose barcode file" box open, drag the SCAN IN Notepad file from the desktop to the box then click on "Scan". Once in a while, there may be an item that could not be scanned in. Copy the item barcode then paste it to manually scan it in.
Create a set: Admin > Manage Sets > Create Itemized Set > Set name is the same as the file name that was just created excluding "GTIZ" (ex. 7_10_24_GTSC_Tammy) > Set content type: Physical Items > Add items to set: From file > upload the file > Create
Admin > Run a Job > Description box: physical; enter > Change Physical items information > Next > Select file > Next > Check the box next to Material Type and select "Box" > Check the box next to Internal Note 3 and add "SCF Floor" to Internal Note 3> Next > Submit > Confirm
Wait for the job to finish then check Internal Note 3 to make sure the count is correct.
Go to GT IZ
Do the same steps to create a set and the file name is Today's date_GTSC_your name_GTIZ (ex. 7_10_24_GTSC_Tammy_GTIZ)
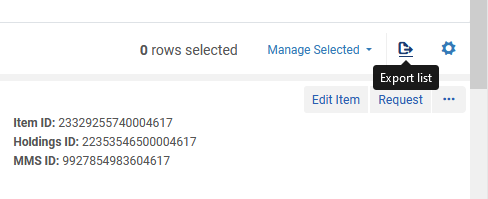
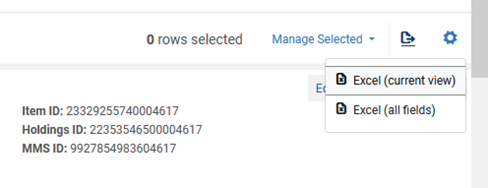
Admin > Manage Sets > File just created should be highlighted already > Content > Export list > Excel (current view) > Open file > Retain the following columns:
- Barcode
- Temporary Location
- Status
Check the Status column. All items should have "Item in place".
If an item(s) has the status of "Item no in place", it will need to be cleared.
Check the Temporary location column.
If there is no temporary location then clear the transit status using the circulation desk of Booth Family Center for Special Collections - WRLC SCF Storage and return the item.
Circulation desk:

If there is a temporary location of Special Collections then an email to John Zarrillo will need to be sent and have him remove it. In the meantime, the circulation desk should be Booth Family Center for Special Collections - Special Collections Circulation Desk and return the item.

This is what it should always look like...no temporary location and the status says, "Item in place":
Check the set content again to make sure all of the items have the status of, "Item in place".
All done!
For American Archives, Catholic Archives, Gallaudet Archives, George Mason Special Collections and Marymount Archives, they normally return the boxes in a small amount so it would be quicker to manually return in Alma and update items using the Grima tool.
Scan item barcodes to Notepad.
In SCF IZ, use "Return items" and scan the item barcodes.
Add the message, "SCF Floor" to Internal Note 3 in SCF IZ for return materials and Internal Note 1 for new materials.
Check the owning IZ to make sure items have the status of, "Item in place" and check SCF IZ as well.
Clear SCF Floor from Internal Note 3 for return archival materials (To be performed by the Shared Collections Supervisor only)
After the archival materials have been reshelved, the Internal Note 3 field will need to be cleared.
Go to C:\Users\yourlastname\WRLC\WRLC COMMON - Documents\1_Storage Refiles\Alma\Boxes and Clamshells
Find the file of the person that did the reshelving of the materials and open it.
Remove the shelf location of all items then add "Barcode" at the top.
Save the file by adding "_Clear Status your name" to the existing filename (ex. 7_10_24_GTSC_Clark_Clear Status Tammy)
Create a set: Admin > Manage Sets > Create Itemized Set > Set name is the same as the file name that was just created (ex. 7_10_24_GTSC_Clark_Clear Status Tammy) > Set content type: Physical Items > Add items to set: From file > upload the file > Create
Admin > Run a Job > Description box: physical; enter > Change Physical items information > Next > Select file > Next > Check the box next to Internal Note 3 and leave Internal Note 3 field blank > Next > Submit > Confirm
Wait for the job to finish then check Internal Note 3 to make sure the count is correct.
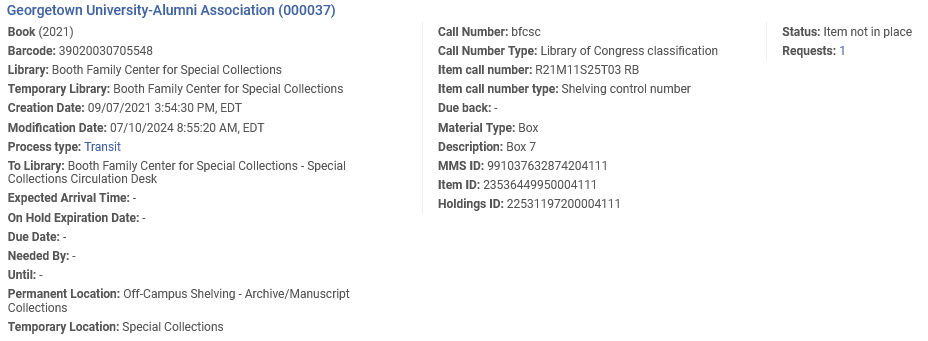
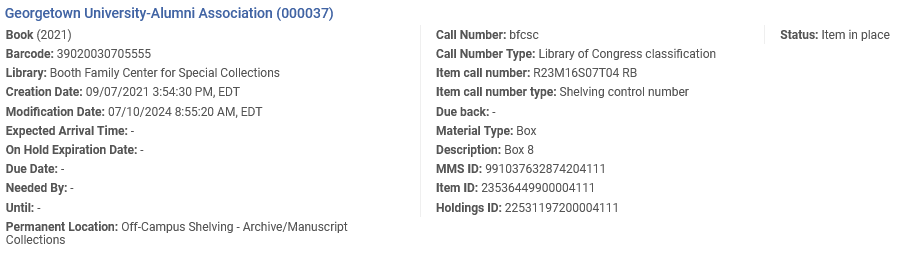
Issues with checking in return books (to be performed by the Shared Collections Supervisor only)
When SCF staff checks in books, sometimes they will encounter items that will show patron's name or something else after scanning the item barcode.
Go to the owning IZ to check on the item record. All items must have the status of "Item in place" and process type needs to be clear.
Problem #1 - permanent/temporary location
If you see "Item not in place", check the permanent and temporary location to see what it says.
Example...the permanent location is Georgetown, not WRLC so the book will need to be sent back to Georgetown. Leave the process type alone.
If permanent and/or temporary location is WRLC and if there is a tray location:
- If says "item not in place", return it* then double check to make sure the process type is clear of transit then check it in
- If it says "item in place", go ahead and check it in
*The circulation desk MUST be WRLC SCF Storage
Problem #2 - no tray location in SCF IZ
In the owning IZ, make sure the permanent/temporary location is WRLC and that there is no tray location. Also, check to make sure that the status says, "Item in place".
Go to SCF IZ and pull up the item record. Double check to make sure that there is no tray location. If there is no tray location then add the message of, "At WRLC waiting to be processed" to internal note 1. Sort the book and add it to the unfilled tray in SCF 3 that are waiting to be processed. Be sure to put the book in appropriate school. For example, GM book, put in GM tray.
Problem #3 - saw patron's name or something else when returning it in SCF IZ
In the owning IZ, check and see what the permanent/temporary location and status show.
If it says Item in place, go ahead and check SCF IZ to see if there is a tray location or not.
- If there is a tray location, add, "SCF Hold Shelf" to internal note 3 and make sure status says, "Item in place" as well. Add a slip with the tray location on it then put in the book.
- If there is NO tray location, add the message of, "At WRLC waiting to be processed" to internal note 1. Sort the book and add it to the unfilled tray waiting to be processed in SCF 3. Be sure to put the book in appropriate school. For example, GM book, put in GM tray. Also, make sure the status says, "Item in place".
New books not in SCF IZ (To be performed by the Shared Collections Supervisor only)
We have a project where we check for items that are missing a tray location from item call number and internal note 1. After making sure that they are not here, the bib records will get deleted.
Sometimes we get new books and they did have a bib record in SCF IZ that got deleted. So, we will need to restore them.
SCF IZ > Analytics > Access Analytics > Create > Analysis > Physical Items:
As you can see, four items were deleted from the SCF IZ. So, they need to be restored.
SCF IZ > Resources > Managed Deleted Repository
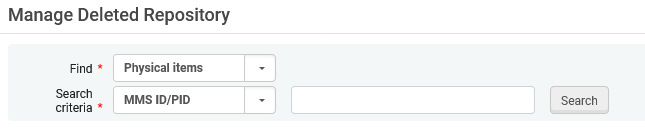
Copy Physical item ID from Analytics and paste into the box on the right in "Manage Deleted Repository".
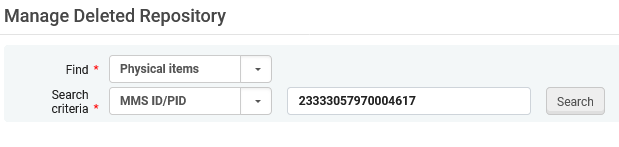
After the item information shows up, double check the title to make sure it matches to the book.
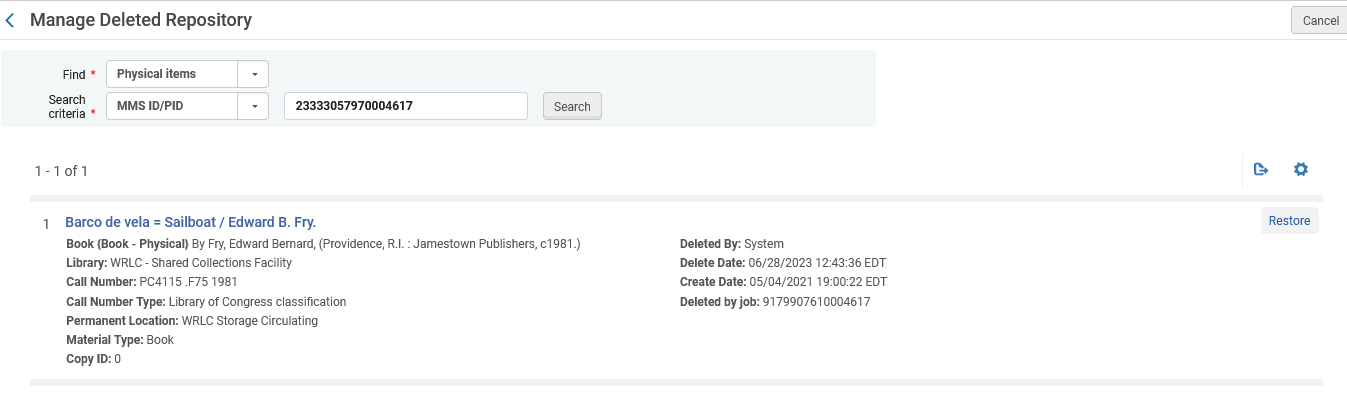
If the title matches then click on "Restore" to restore the bib record.
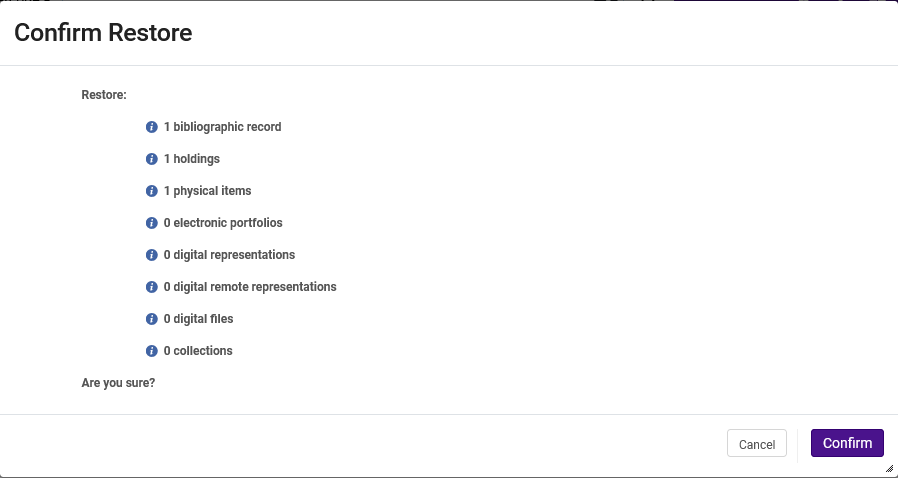
Click on "Confirm" then do the same steps for the next book if any.
When done, do the steps for new AU books: add "At WRLC waiting..." to Internal Note 1 field then sort and put them in trays.
Checking In Return Books 2025
Courier will drop off return materials at the end of the day. Those books and boxes should have the green "WRLC" slips inside the books or on the boxes/packages. If you see the slip with a different library abbreviation on it, put the item on the outgoing table for the courier to pick up.
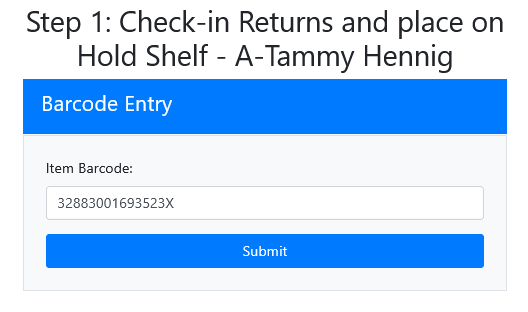
Use the SCF Processing website to check in books. If you need to leave your desk briefly, it will be a good idea to refresh the page when you comes back before starting work to ensure everything is ready to proceed.
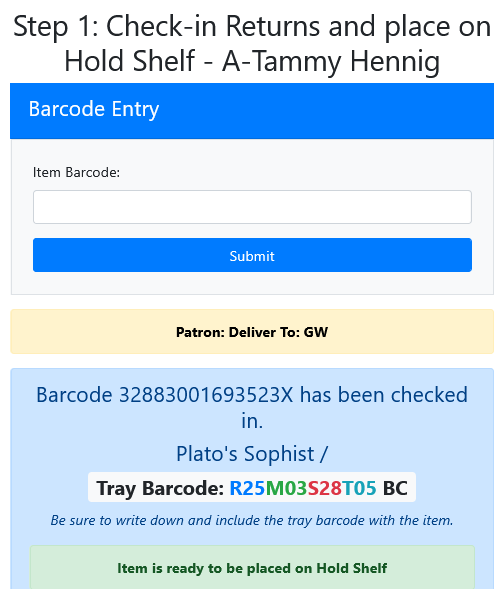
When an item has been checked in, it means:
- The "SCF Hold Shelf" message gets added to Internal Note 3
- The Item is in temporary location has been switched to "Yes"
- The temporary library of "" has been added
- The temporary location is updated to SCF Hold Shelf
Important note: Do NOT check in an item twice! This will create a transit status for it.
Do Step 1 to check in books. Click on "Check-In".
RESULT:
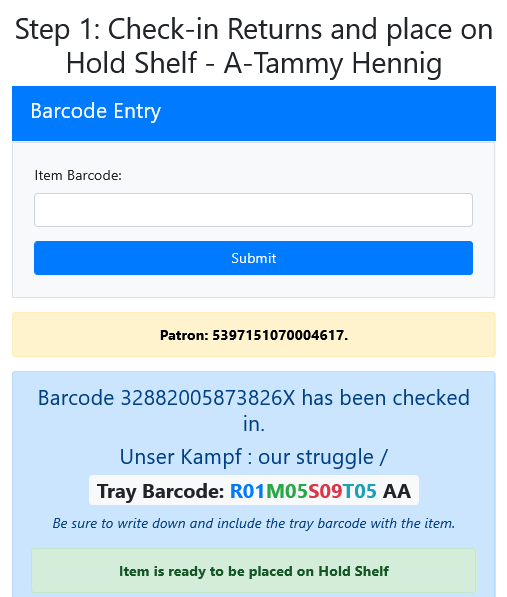
ALWAYS LOOK AT THE PATRON INFORMATION!
If you see a library abbreviation (Ex. Patron: Deliver to GW) then that means the item has been checked in without any issue.
Write down the RMST data on a slip.
If you do not see any library abbreviation or see something else not mentioned here, give it to your supervisor.
Items checked out to GW ILL, CU ILL and AU ILL will show digits like this:
- 5397151070004617, GELMAN ILL STAFF, OK
- 3250417390004617, General, Libraries, OK
- 3253554340004617, CUA ILL, OK
- 4648321900004617, AU LENDING, OK
- 6176782810004617, GT ILL, OK
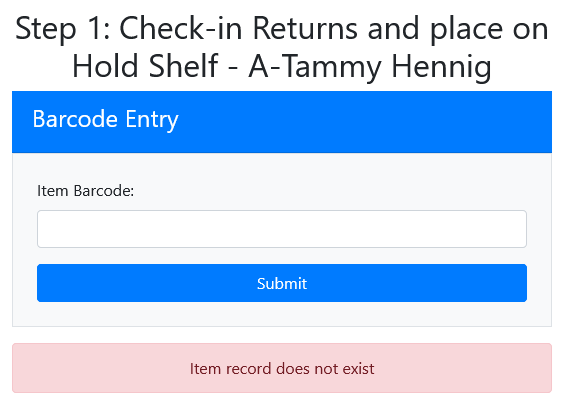
There will be various issues with checking in books (screenshots listed below):
- New book
- Item not found
- Note in Internal Note 3
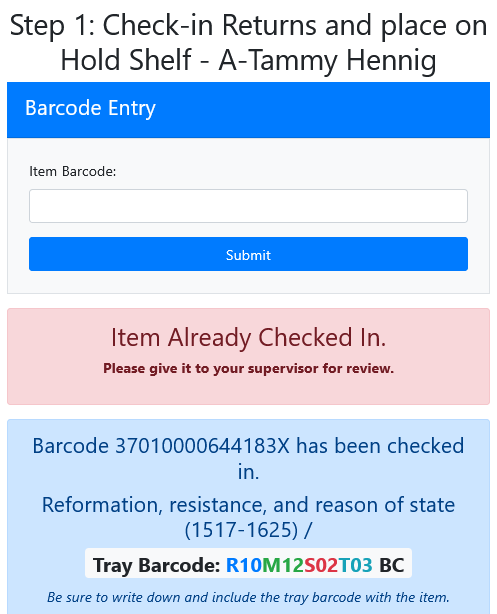
- Item already checked in
- No patron data
NEW BOOK

For new AU books, proceed with adding
“At WRLC waiting to be processed” to Internal Note 1.
ITEM NOT FOUND
NOTE IN INTERNAL NOTE 3
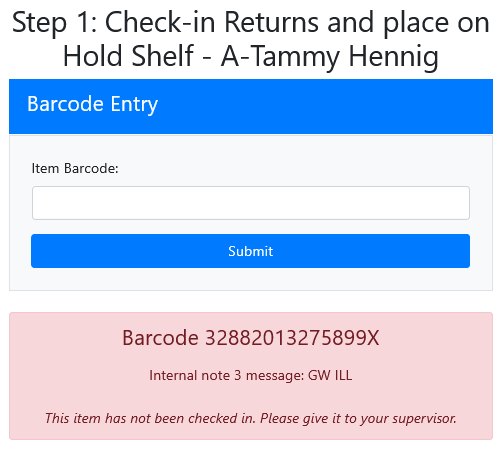
For Gallaudet DVDs with cases, get the case then clear IN 3 message in Alma.
Then check DVD in again and it should be checked in as usual.
ITEM ALREADY CHECKED IN
AND
NO PATRON DATA
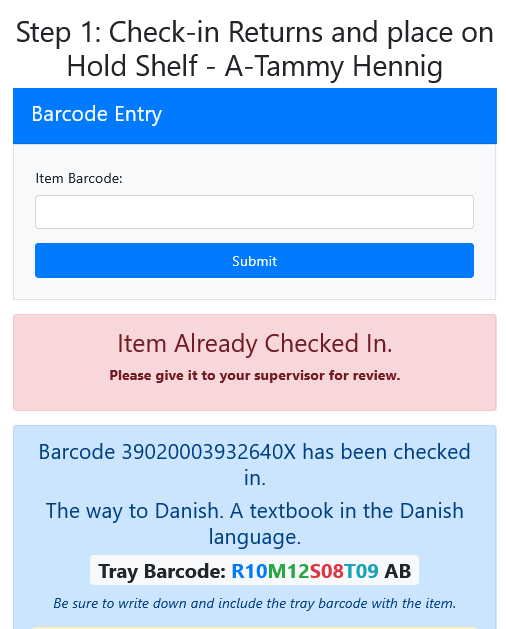
The supervisor will have to go to the owning IZ to clear transit status.
Oxford University Press (OUP) books
Even though OUP books do not have a X at the end of item barcode, the check in app will "add" a X but it will not change in Alma. There is no need to give OUP books to the supervisor.
Patron IDs for Patron Services
When needing to check out the materials manually, select the appropriate patron ID:
(I will reach out to Jackie and Angelique to see if a couple of IDs could be edited to make it more sense)
American: Deliver To: AU
American ILL: Deliver To: Lending, AU
American Law: Deliver To: AULAW
American Archives: Deliver To: AU
Catholic: Deliver To: CU
Catholic ILL: Deliver To: ILL, CUA
Catholic Law: Deliver To: CU
Catholic Archives: Deliver To: CU
Catholic Lima: Deliver To: CU (for Lima)
Gallaudet: Deliver To: GA
Gallaudet ILL: Deliver To: GA, ILL
Gallaudet Archives: Deliver To: GA
George Mason: Deliver To: GM
George Mason ILL: Deliver To: GM
George Mason Square: Deliver To: GMA
George Mason Prince Williams: Deliver To: GMP
George Mason Special Collections: Deliver To: GM
George Washington: Deliver To: GW
George Washington ILL: Deliver To: Gelman ILL Staff
George Washington Law: Deliver To: JB
George Washington Off Campus: Deliver To: GWOC
George Washington Special Collections: Deliver To: GW-SC
George Washington Global Resources Center: Deliver To: GW
Mount Vernon: Deliver To: GWE
Himmelfarb: Deliver To: HI
National Security Archives: Deliver To GW
Georgetown: Deliver To: GT (PICK LAU, NOT QATAR)
Georgetown Law: Deliver To: GTL
Georgetown ILL: Deliver To: ILL, GTU
Georgetown Bioethics: Deliver To: GT-Bioethics
Georgetown McCourt: Deliver To: GT-McCourt
Georgetown School of Continuing Studies: Deliver To: GT-SCS
Georgetown Office Delivery: Deliver To: GT-OD
Georgetown Special Collections: Deliver To GT-Booth
Howard: Deliver To: HU
Howard Health Sciences:
Howard Divinity & Law: Deliver To: HUWC
Marymount: Deliver To: MU
Marymount Ballston: Deliver To: MUB
Marymount Archives: Deliver To: MU
Trinity: Deliver To: TR
University of the District of Columbia: Deliver To: DC
University of the District of Columbia Law: Deliver To: DCLaw
University of the District of Columbia Jazz Archives: Deliver To: DC
WRLC Storage Reshelving Procedures for BOOKS 2025
WRLC Storage Reshelving Procedures for BOOKS 2025
1. Scanning Procedures
Aim scanner and press the trigger to scan each barcode
-
-
-
-
Scan the tray location barcode on the tray then the item barcode on the book.
-
If more than one book need to go in the same tray, the tray location barcode will need to be scanned again.
-
-
-
2. Retrieving Items from Scanner
-
Plug the Opticon Scanner to the computer
-
Click on OPN Companion Application
-
Click on “get barcodes”
-
A txt file titled “Barcodes” will automatically appear on desktop listing the barcodes that were just scanned
-
Click on “delete barcodes” then “yes” to proceed *THIS IS VERY IMPORTANT!
-
Click on “close” then close the window
-
Open the “Barcodes” file and remove extra space at the end (be sure the cursor is at the end of the last barcode)
-
Save the file as text to:
C:\Users\your last name\WRLC\WRLC COMMON - Documents\1_Storage Refiles\Alma\Books\Row x & x
File name is the date that list was created
Ex. notepad_7_12_16
-
Delete the “Barcodes” file *THIS IS VERY IMPORTANT!
3. Uploading reshelved items
Use the SCF Processing website to upload reshelved books. If you needed to leave your desk briefly, it will be a good idea to refresh the page when you comes back before starting work to ensure everything is ready to proceed.
When items have been uploaded it means:
- The message, "SCF Hold Shelf" in Internal Note 3 has been cleared
- The Item is in temporary location has been switched to "No"
- The temporary library of "" has been removed
- The temporary location of "SCF Hold Shelf" has been removed
Do Step 2 to perform upload of the reshelved items. Click on "Bulk".
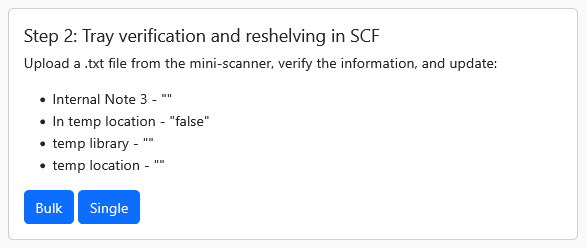
Select the file that was just created after uploading the items from the portable scanner.
Click on "Preview Records from File"
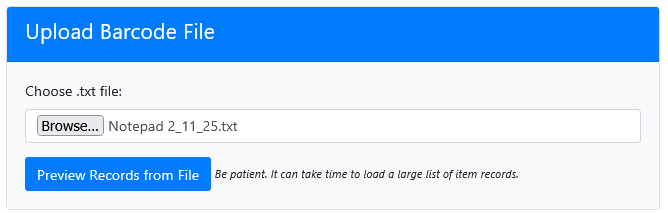
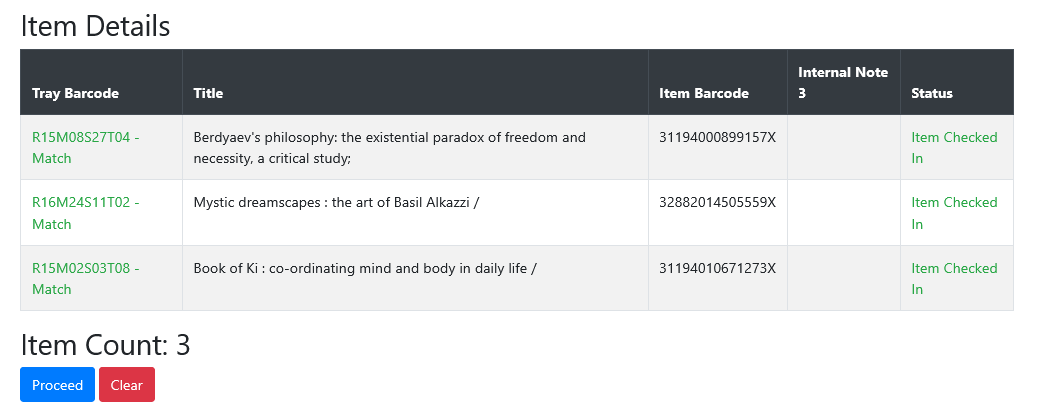
PLEASE VERIFY THE ITEM COUNT...MAKE SURE THE NUMBER IS THE SAME AS TO THE WORD DOCUMENT THAT WAS CREATED WHEN DOING THE PRE-RESHELVING PROCEDURE
Click on "Proceed" to have multiple fields in Alma updated
When you see "Updated Item Details" and "Updated", it means that the item records have been updated.
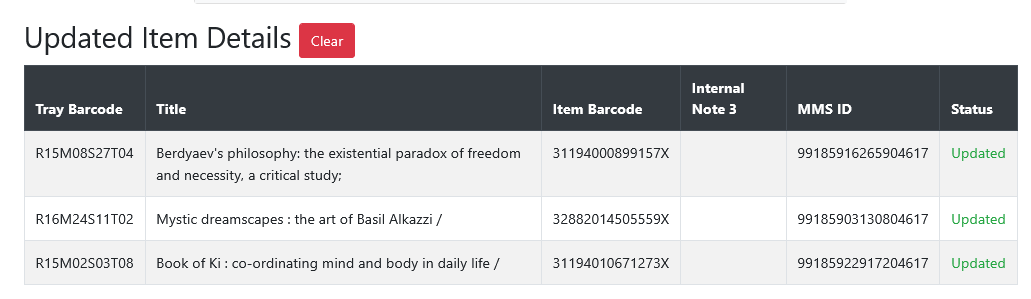
All done!
ISSUES:
1) Incorrect item barcode scanned. For example, Catholic books have both old and current barcodes:
OLD (barcode is shortened): 3053001646981
CURRENT: 30530003349875
If the old barcode was scanned and uploaded, this message will appear:

Steps to fix this:
- Click on "Proceed" so the remaining items could be updated.
- You will need to go back to the tray and get the book then give it to the supervisor.
- Make a note on the Word document
2) Item placed in the wrong tray or wrong tray location was scanned:
31194010728958 was placed in R21M19S30T08 when it should have been placed in R22M18S09T12.
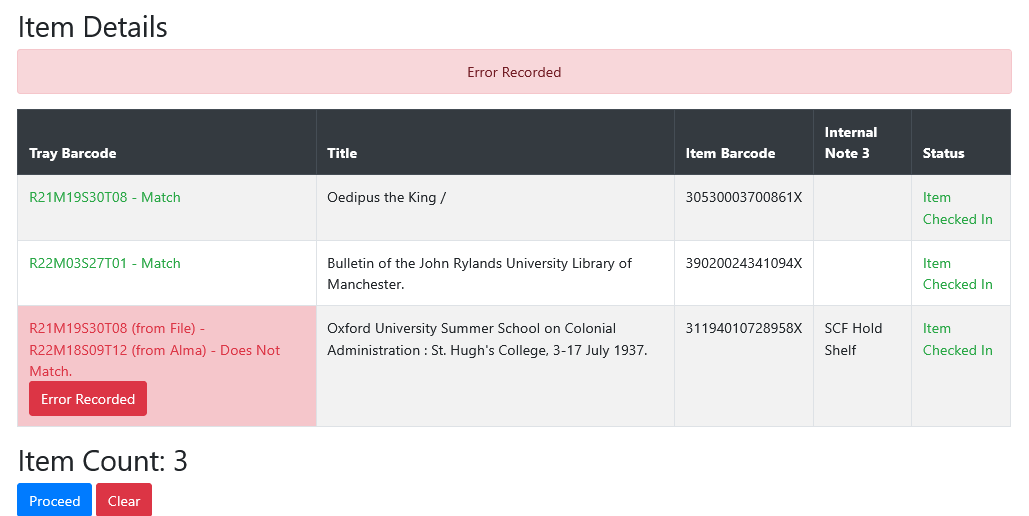
Steps to fix this:
- Click on "Proceed" so the remaining items could be updated.
- You will need to go back to the tray and get the book.
- Retrieve the slip that was in the book and put it back in the book then give it to the supervisor.
- Make a note on the Word document.
3) Internal note 1 is blank:
Tray location is missing from Internal Note 1 field.
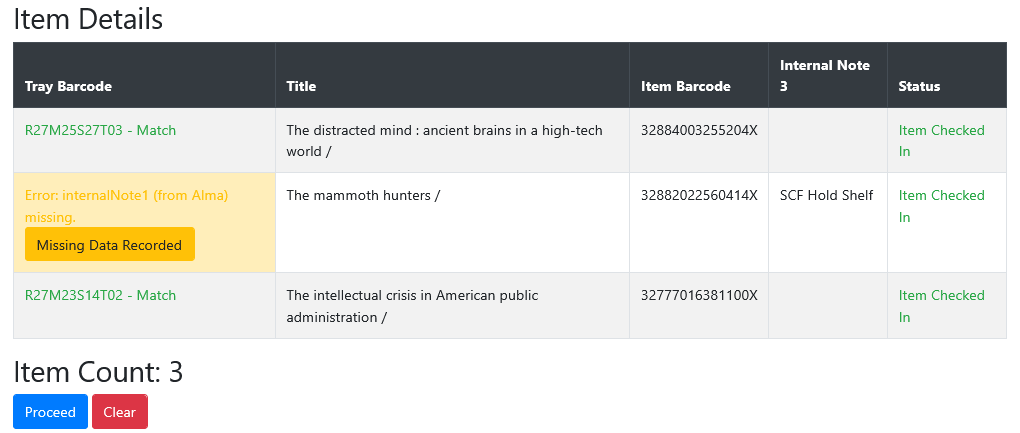
Steps to fix this:
- Click on "Proceed" so the remaining items could be updated.
- Send an email to the supervisor with item barcode.
- Make a note on the Word document.
4) Item is checked out:

When you see a pink box with the message saying, "Checked Out", send an email to the supervisor with item barcode.
Printouts Queue in Alma
The Printouts Queue page in Alma lists all documents that Alma has sent to the printer via email. In the SCF IZ, these documents are primarily Pull Slips.
Go to Admin > Printing > Printouts Queue
Be sure to choose the correct filter options at the top left-hand side of the screen : Printed by = ALL and Status = ALL
Some helpful things to keep in mind about the Printouts Queue
- When a document has a Status of Printed,it means that the slip was sent via email to the printer. It doesn't necessarily mean that the slip was printed by the printer, it only means the email was sent by Alma.
- Information in the Source column can give us clues about the origin of each Pull Slip:
- If the Source of a document is API, Ex Libris, it means the document was created by the SCF Remote Storage App; these requests are sent to the SCF IZ twice per day, at midnight and at noon.
- If the Source of a document is System, it is a Pull Slip requesting a WRLC Shared Monograph; these requests can be sent to the SCF IZ at any time of the day.

- You have the option to Preview each document sent to the print. Go to the ellipsis button (...) to the right hand side of each document, then click Preview.