Fulfillment
How material, both physical and digitized, is shared with patrons.
Types of Fulfillment requests include:
Booking
Hold
CLS/AFN
Resource Sharing
Move (both temporary and permanent)
ILL (both physical and digitization)
- CLS/AFN
- Faculty Due Date Maintenance
- Consortial Partners in CLS/AFN
- Standard Opening Hours
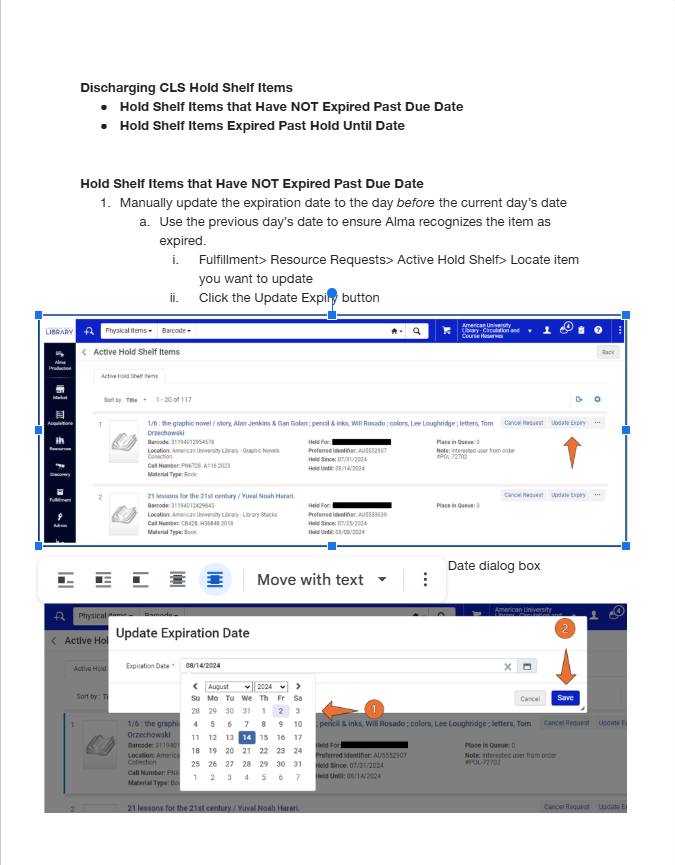
- Discharging CLS Hold Shelf Items
- Expired Hold Shelf Audit Workflow
- Weekly Request Status Exception Report
- AFN Network Zone Configurations
- AFN Institution Zone Configurations
- Display Logic Rules for the AFN/CLS Request Form in Primo
- Peer to Peer Resource Sharing
- Configuring Peer to Peer Resource Sharing in the IZ
- Moving P2P partner profiles from the NZ to the IZ (Cancelled)
- SUNY P2P partners Stony Brook, Binghamton, Albany, and Buffalo
- Adding P2P Partners from the Resource Sharing Directory
- Addons
- Libraries and Location codes
- wrlc user
- Affiliate Libraries
CLS/AFN
Common Alma policies and tasks related to consortial lending and borrowing.
For a detailed explanation of the WRLC's CLS borrowing policies (such as loan periods, fine amounts, etc.) outside of Alma, please see the Borrowing and Consortium Loan Service (CLS) Policies page on the WRLC Intranet - you must first be logged in to the Intranet to view the page.
Faculty Due Date Maintenance
Each IZ that participates in consortial lending needs to maintain the fixed due date on their calendars for patrons in "wrlc user" user group with the "WRLC Faculty" job category. This is done 3 times a year so that Faculty can have loans that last the semester. The dates are changed about 6 weeks prior to the expiration of the current due date.
The designated due dates are January 31st for the Fall semester, May 31st for the Spring semester, and September 30th for the Summer sessions.
The dates are changed on the following schedule:
- January 31 due date is set on about August 15th.
- May 31st due date is set on about December 15th.
- September 30th due date is set on about April 15th.
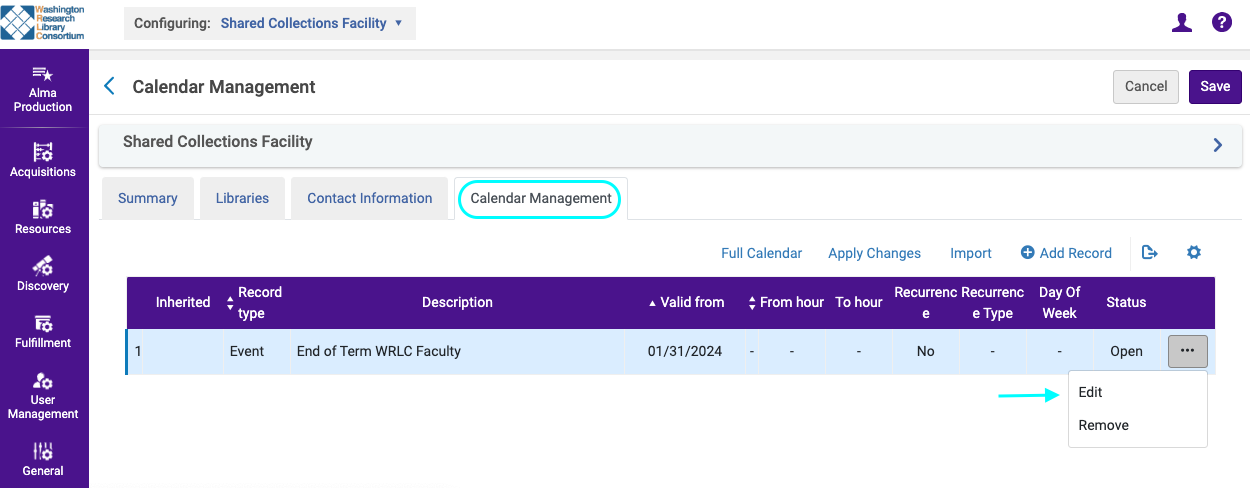
Procedure: Update the Faculty Due Date
The following procedure assumes that the "End of Term WRLC Faculty" date is configured at and inherited from the Institution's Calendar. All Libraries under the IZ that have this date on their calendar will be updated by the procedure below.
If you do not have this date configured on the Institution Calendar, you will need to select the individual Libraries that have this date and update them individually following the same basic procedure except at the Library level.
Go To: Alma --> Configuration --> General --> Libraries --> Add a Library or Edit Library Information
Select the Calendar Management tab. Click on the ellipsis to Edit the "End of Term WRLC Faculty" date. Select Edit.
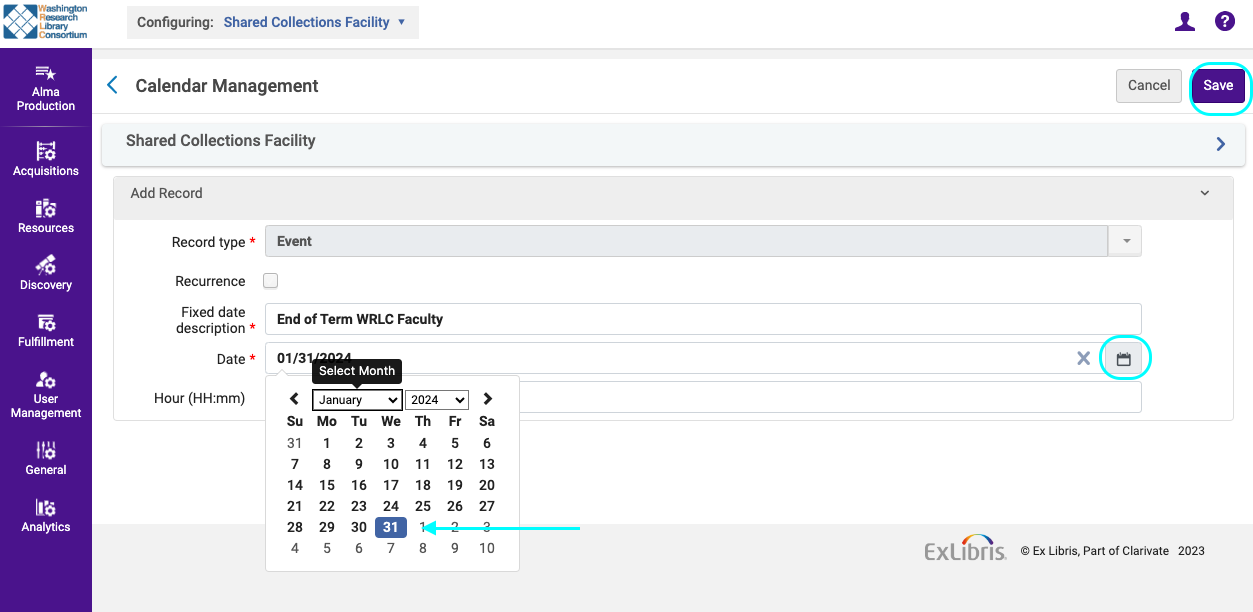
Click on the calendar button on the right. Select the new "End of Term WRLC Faculty" date. Then Save.
After saving, make sure that you "Apply Changes"!
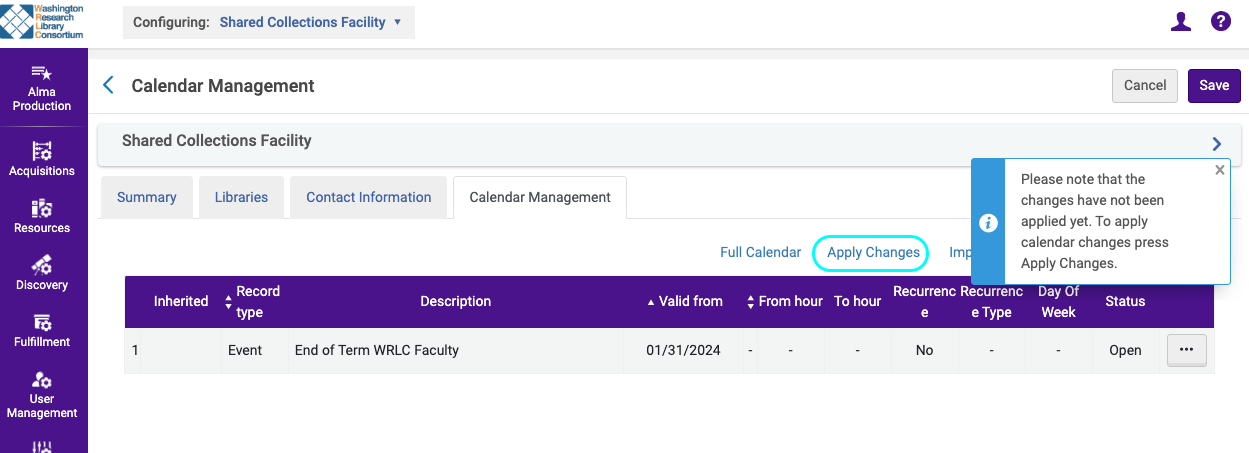
You will be notified once you submitted the job to apply the changes.
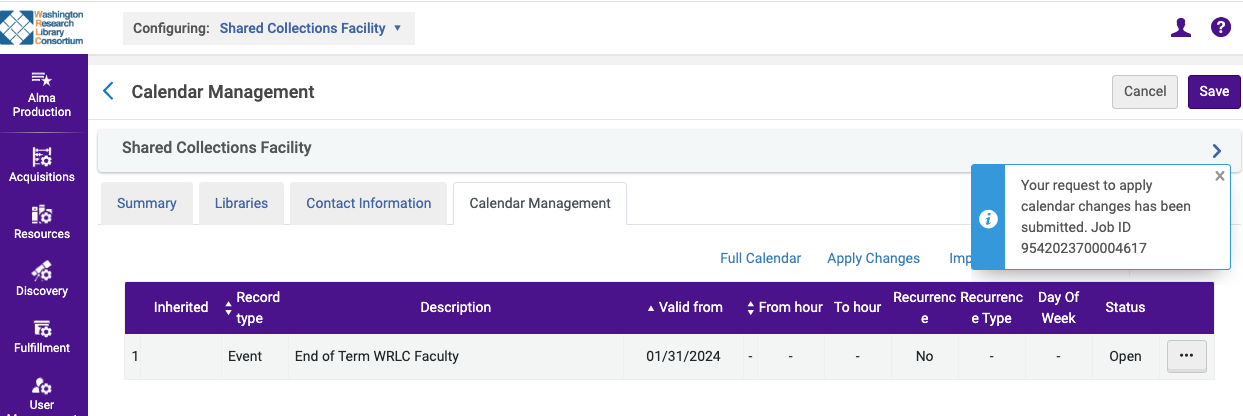
The "End of Term WRLC Faculty" date is now updated.
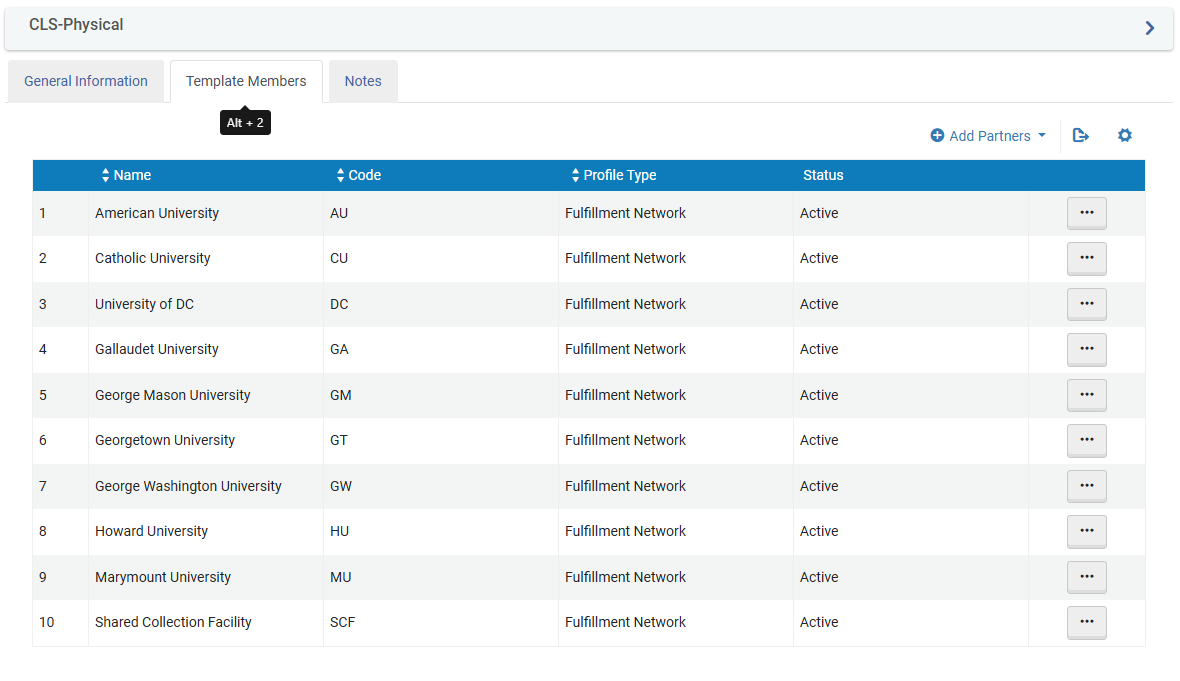
Consortial Partners in CLS/AFN
Lending and Borrowing Partners
These partners are configured in the ROTA for the "Consortium Book Borrowing"
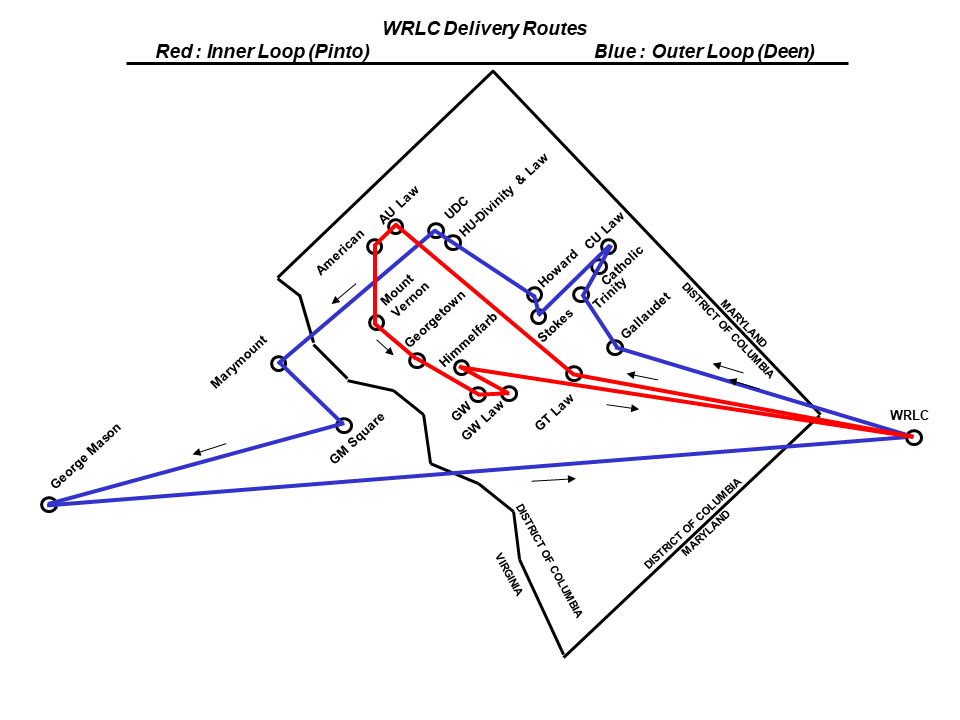
- American University - 01WRLC_AMU
- Catholic University of America - 01WRLC_CAA
- Gallaudet University - 01WRLC_GAL
- George Mason University - 01WRLC_GML
- Georgetown University - 01WRLC_GUNIV
- George Washington University - 01WRLC_GWA
- Howard University - 01WRLC_HOW
- Marymount University - 01WRLC_MAR
- University of the District of Columbia - 01 WRLC_DOC
- Washington Research Library Consortium (SCF) - 01WRLC_SCF
Borrowing Partners*
- American University, Washington College of Law - 01WRLC_AMULAW
- Catholic University of America, Columbus School of Law - 01WRLC_CUALAW
- Georgetown University Law Center - 01WRLC_GUNIVLAW
- George Washington University School of Medicine and Health (Himmelfarb Health Sciences Library) - 01WRLC_GWAHLTH
- George Washington University Law School (Jacob Burns Law Library) - 01WRLC_GWALAW
- University of the District of Columbia, David A. Clarke School of Law - 01WRLC_DOCLAW
- Trinity Washington University - 01WRLC_TRN
*Borrowing partners do not lend via CLS although they may lend via ILL requests and other methods.
Standard Opening Hours
Impact on Due Dates
A library's Standard Opening Hours along with other events in their calendar can affect item due dates and renewal dates. It is good practice to review the Standard Opening Hours each semester when you may be adding specific events, exceptions or holidays.
A library's Standard Opening Hours are always set at the library level. (They do not "inherit" from the institutional calendar.) The "Valid from" date to the "Valid to" date is set to 3 years. If the "Valid to" date is approaching, this can shorten due dates for items that would otherwise get a much longer loan period.
The procedure to update the "Valid to" dates in your library's calendar is fairly simple. You must have the role of Fulfillment Administrator (or General Administrator).
Updating the Standard Opening Hours
The following procedure assumes that you have the role of Fulfillment Administrator (or General Administrator) and you have selected a valid Library from the top of the Configuration page.
Go To: Alma --> Configuration --> Fulfillment --> Library Management --> Opening Hours
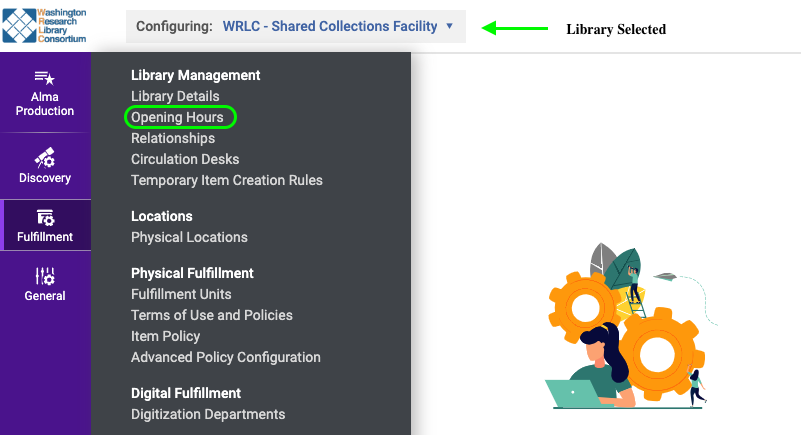
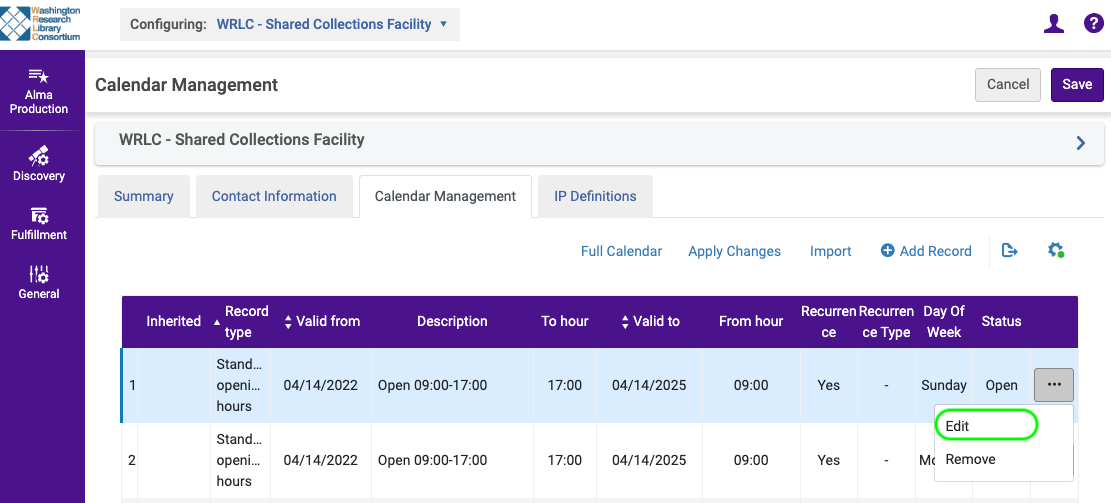
Find the calendar entries of type "Standard opening hours". (You can arrange the record types alphabetically by clicking on the Record type column header.) Select the ellipsis at the right of the first entry.

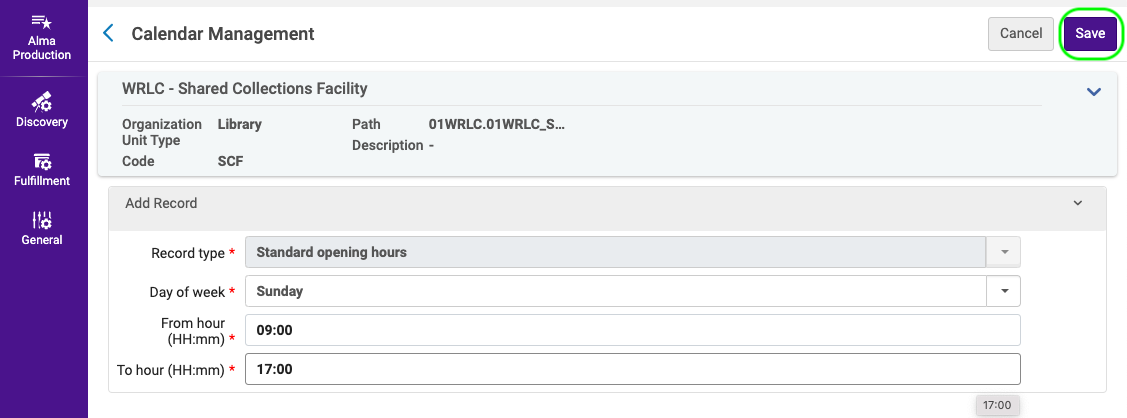
Select Edit on the first Standard opening hours entry.
Select Save. This will automatically update the "from" and “to” date. (You do not need to make any changes.)
Repeat this for the remaining 6 Standard Opening Hours entries.
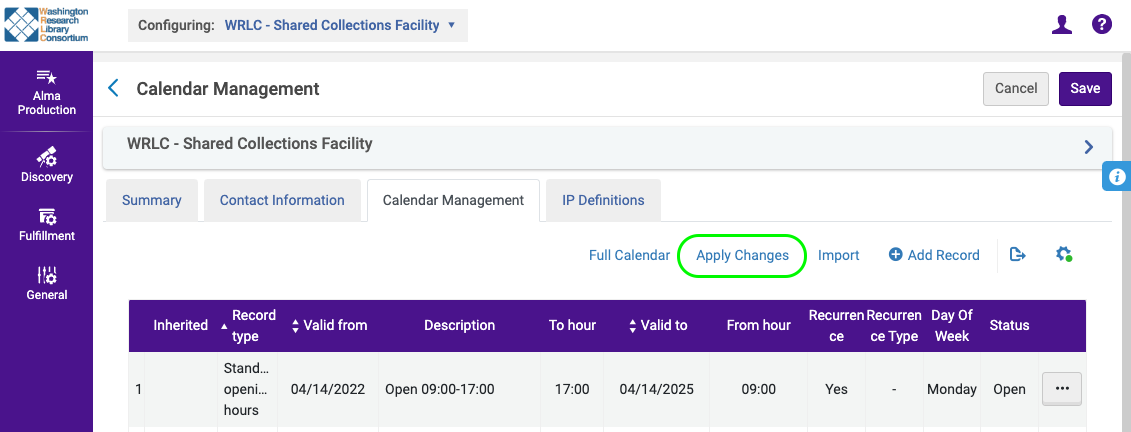
As with all calendar updates, "Apply Changes"!
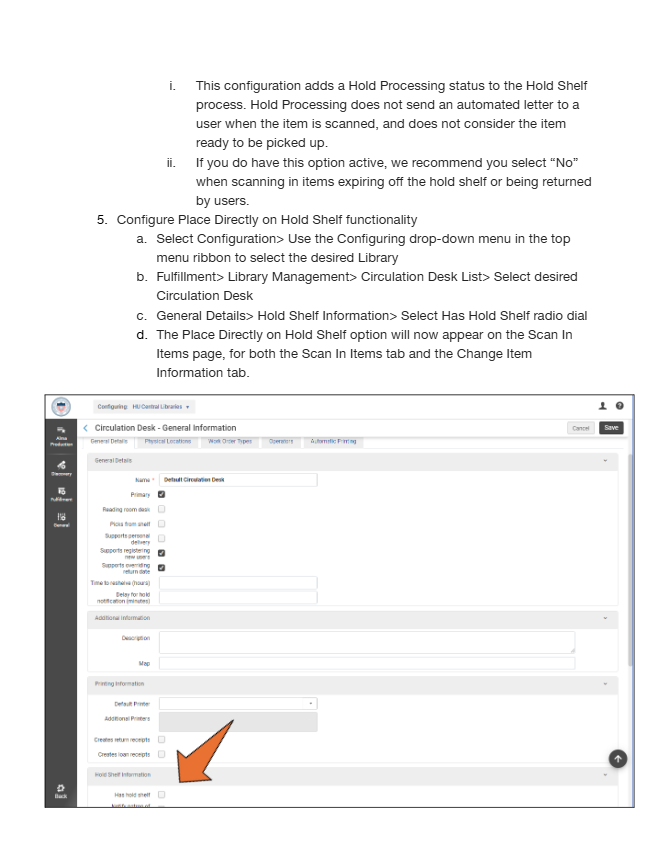
Discharging CLS Hold Shelf Items
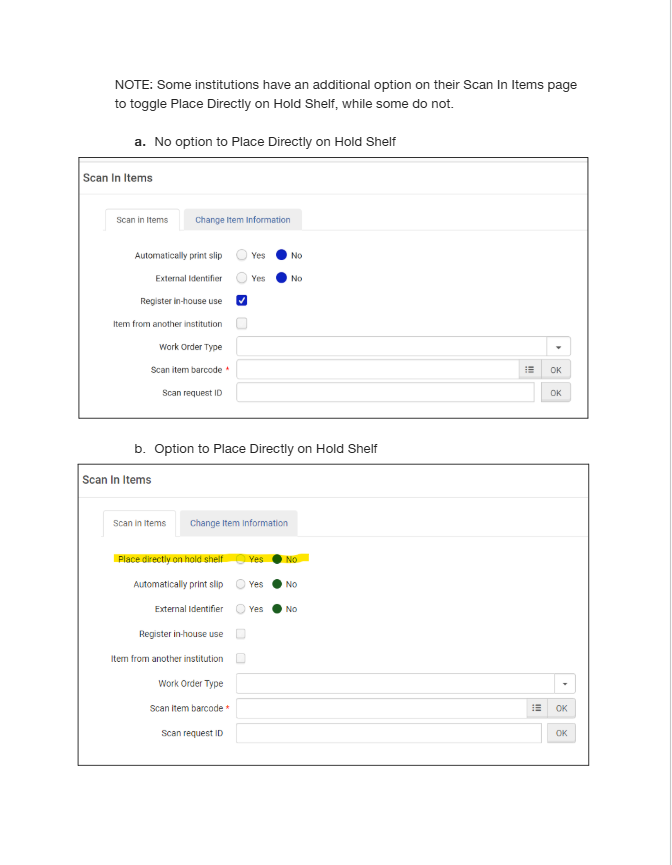
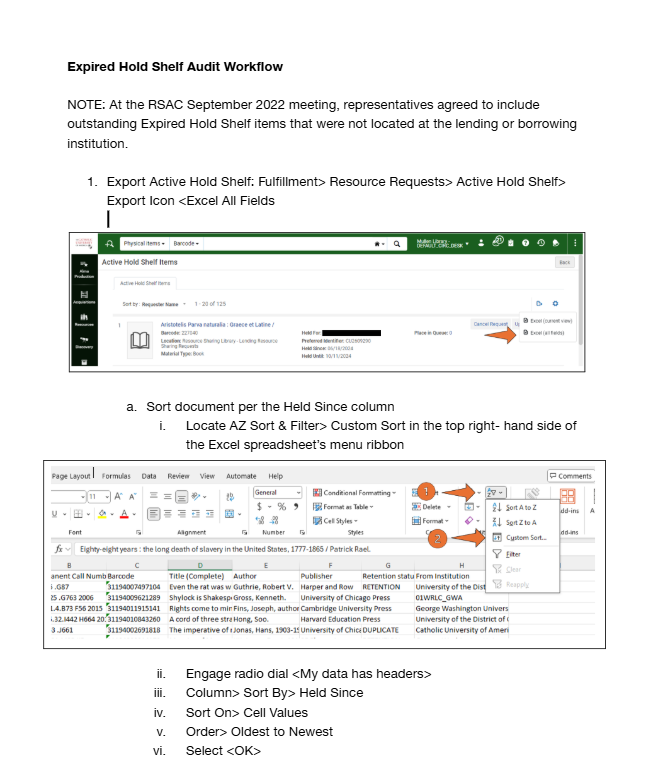
Expired Hold Shelf Audit Workflow

Weekly Request Status Exception Report
The Weekly Request Status Exception report reflects requests that have stalled in the rota the previous week. It is an opportunity to see what material is outstanding and reach out to the library staff at the IZ where the request is waiting. This report is run weekly at 6am on Monday and can be configured to be sent directly to a preferred email.
Once you contact the library staff where the request is stalled, they can then investigate why it has not been fulfilled and, if the item is not available, cancel the request so that it can be moved along the rota to the next IZ where the item is available.
AFN Network Zone Configurations
The following Automated Fulfillment Network (AFN) configurations are set in the WRLC Network Zone. Most of the settings are visible (and not editable) in the Institution Zones; the only one that is not visible in the Institution Zone is the Institutions Relations configuration.
Locate Profiles
Configuration > Fulfillment > Resource Sharing > Locate Profiles
For the WRLC AFN, a locate profile defines how the AFN searches a particular institution's catalog. Locate Profiles are associated with a specific resource sharing partner profile.
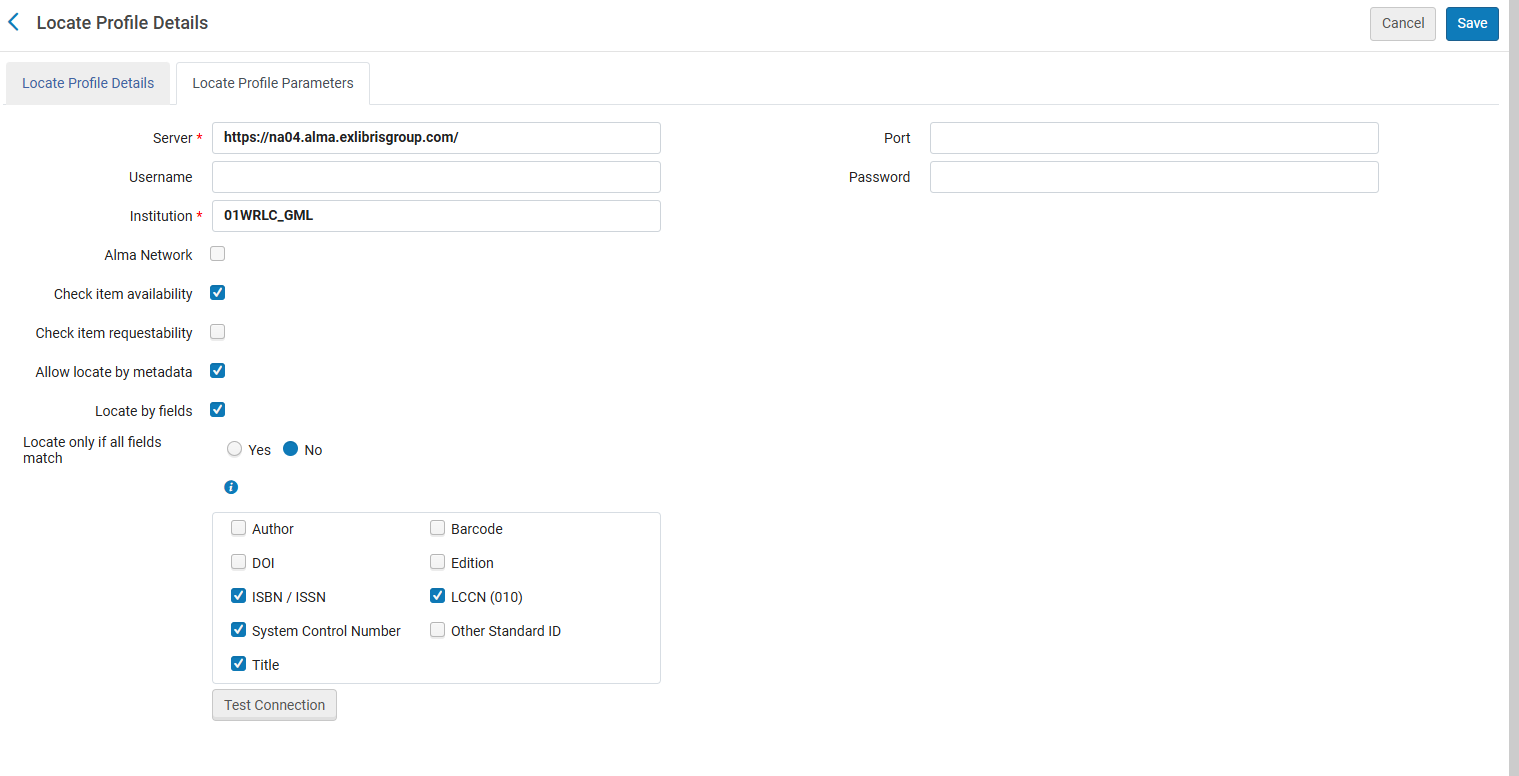
- Alma Network is NOT checked. This is to allow the search against each institution's local catalog, instead of only searching records linked to the NZ.
- Check item availability is checked. This sees whether an item is available in the institution. If it is not, the institution will not be added to the rota for the request
- Check item requestability is not checked. Not checking this option ensures that the Is Requestable for Physical Resource Sharing policy and the Is Requestable for Digital Resource Sharing policy of the TOUs is consulted instead of the Is Requestable policy of the TOUs. For more information, see the Automated Fulfillment Network Requests page on the Alma Knowledge Center.
- Allow locate by metadata locates an item based on the metadata listed below; a match is successful if any field listed below matches the bib record. This option allows borrowers that share an NZ to create requests for records not linked to the NZ. It also allows hold requests to be converted to AFN requests
- ISBN / ISSN
- System Control Number
- Title
- LCCN
For more information, see the Alma Knowledgebase page Configuring Locate Profiles.
Workflow Profiles
Configuration > Fulfillment > Resource Sharing > Workflow Profiles
Workflows control the actions that can be performed on the borrowing and lending request task lists for the defined partner; Workflow Profiles are associated with a specific resource sharing partner profile.
There is one workflow each for borrowing and lending. Below are the borrowing and lending configurations for the WRLC AFN
CLS Borrowing RS
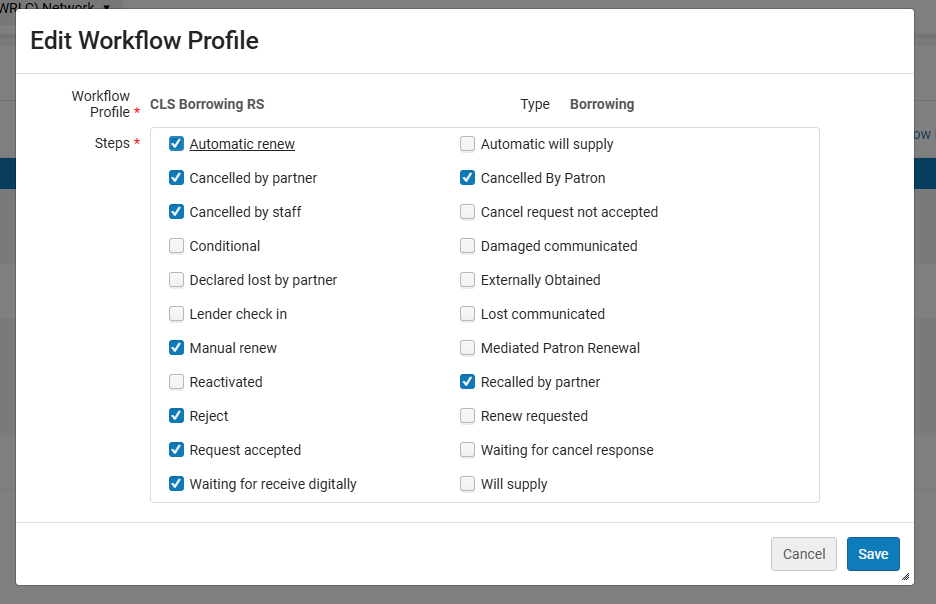
CLS Lending RS

For more information, see the Alma Knowledgebase page Configuring Workflow Profiles
Institutions Relations
Configuration > General > Network Groups > Institutions Relations
Please note that this configuration is NOT viewable in the Institution Zone.
These relation configurations determine if items belonging to an institution can be checked out/in or delivered to other institutions.
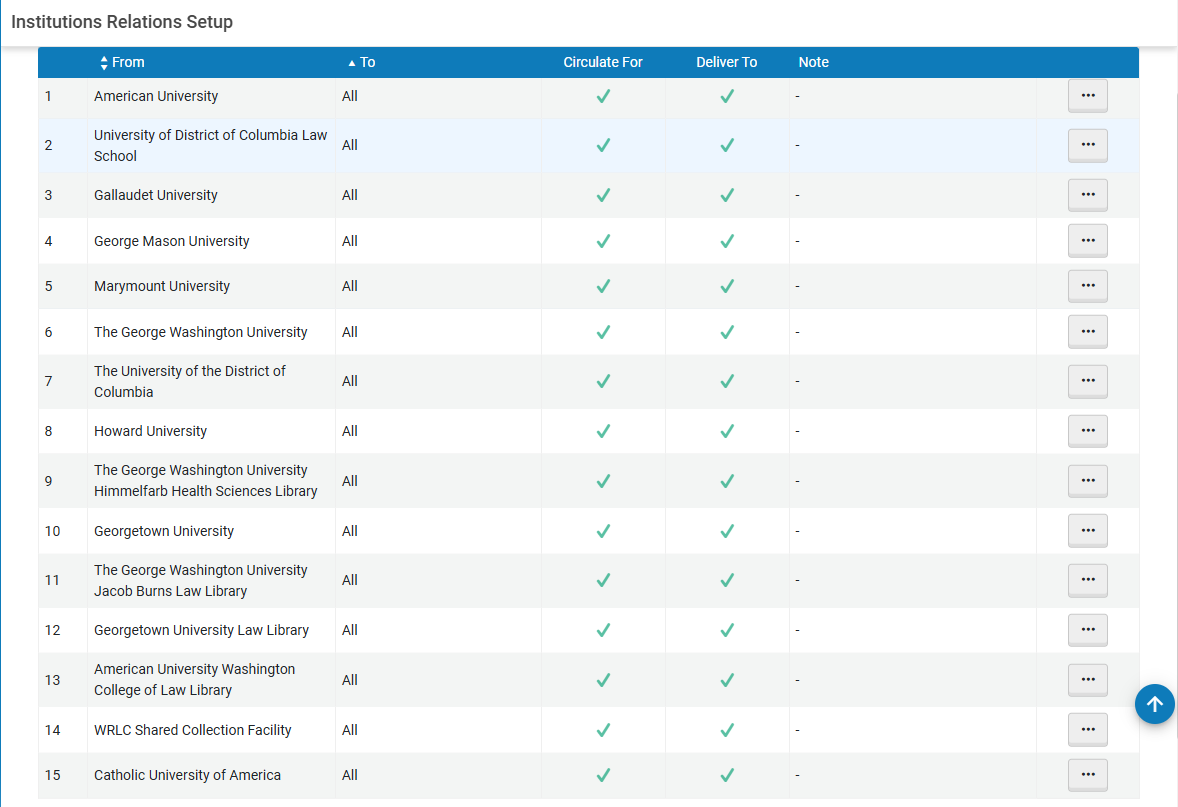
- From: the institution whose fulfillment network behavior is configured
- To: the institution(s) who participate in the fulfillment process; in the case of the WRLC, the value All signifies all Institution Zones in the WRLC NZ
- Circulate For is checked; this specific institution can check out and check in items belonging to all of the other institutions
- Deliver To is checked; this specific institution can send its own items to all of the other institutions for pick up.
For more information, see the Alma Knowledgebase page Configuring Pick Up Anywhere/Return Anywhere
Resource Sharing Partners
Fulfillment > Resource Sharing > Partners
Partner profiles define the types of request and communication sent to a specific institution. The profile also defines the Locate Profile and the Workflow Profiles for an institution.
For a list of all partner profiles in the WRLC AFN, as well as their borrowing and lending preferences, see the Consortial Partners in CLS/AFN page.
Typical Partner Profile for a Borrowing AND Lending WRLC Institution
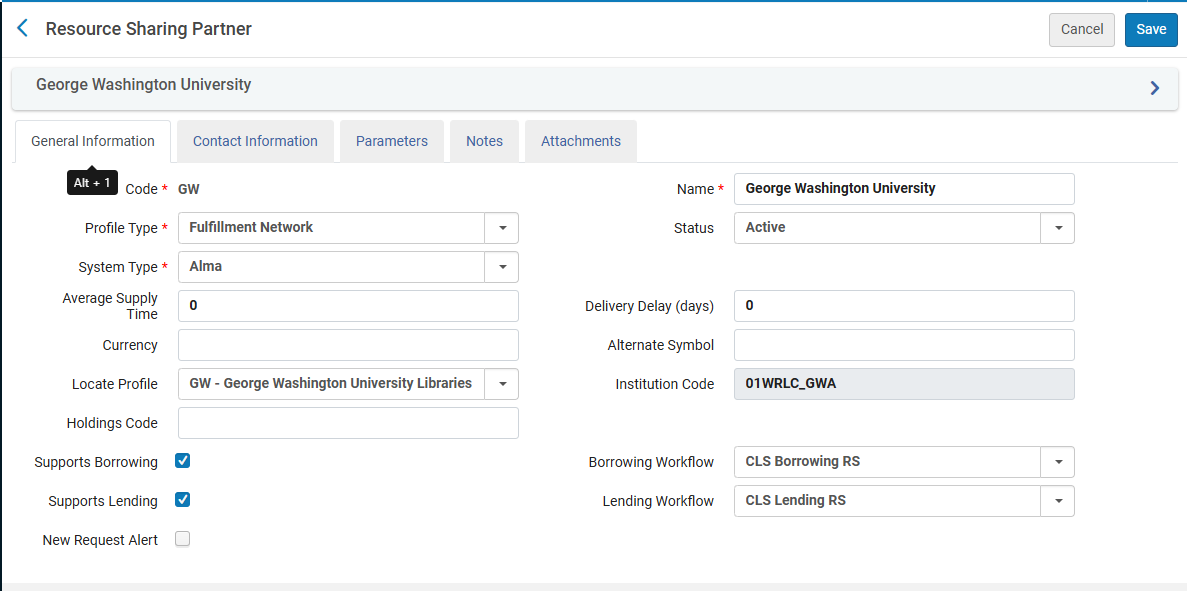
- Profile Type equals Fulfillment Network to signify the AFN
- Locate Profile specifies the Locate Profile (how Alma searches their catalog for a matching item) that should be used for this institution.
- Supports Borrowing / Lending is checkmarked for the WRLC Institutions that lend and borrow in the AFN
- Borrowing / Lending Workflow specifies the Workflow Profile (actions that can be performed on the borrowing and lending request task lists for the defined partner) that is used for borrowing and/or lending in the AFN
For a full list for all WRLC partners that both borrow and lend in the AFN, see the Consortial Partners in CLS/AFN page.
Typical Partner Profile for a Borrowing ONLY WRLC Institution
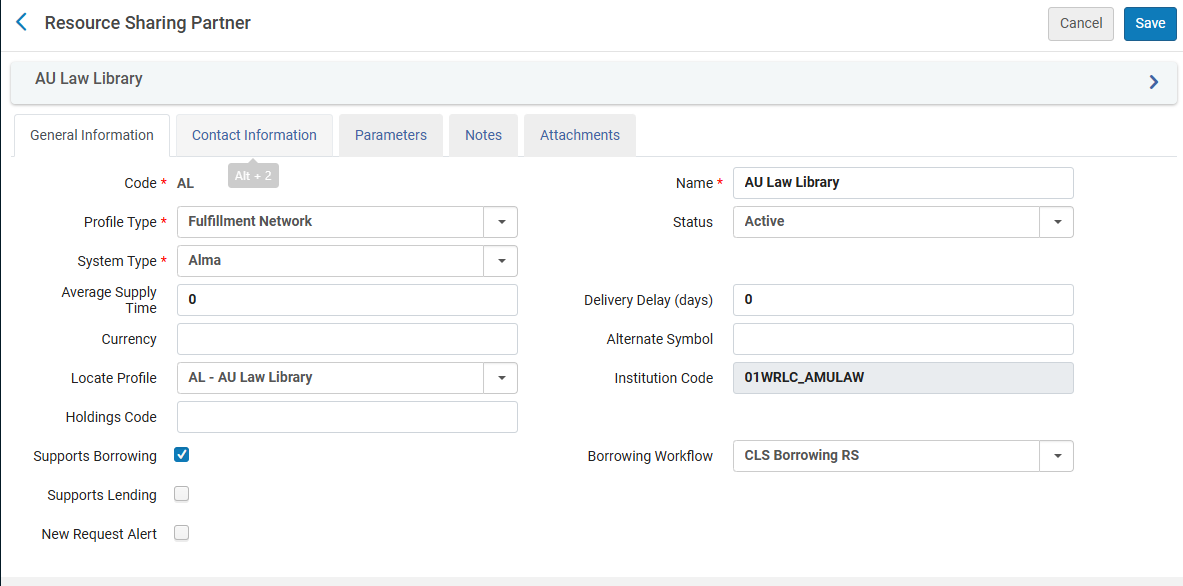
- Profile Type equals Fulfillment Network to signify the AFN
- Locate Profile specifies the Locate Profile (how Alma searches their catalog for a matching item) that should be used for this institution.
- Supports Borrowing is checkmarked for the WRLC Institutions that ONLY borrow from other AFN partners (they do not lend their own materials to other partners)
- Borrowing Workflow specifies the Workflow Profile (actions that can be performed on the borrowing and lending request task lists for the defined partner) that is used for borrowing in the AFN
For a full list for all WRLC partners that only borrow in the AFN, see the Consortial Partners in CLS/AFN page.
Borrowing only partners do not lend via CLS although they may lend via ILL requests and other methods.
For more information, see the Alma Knowledgebase page Configuring a Resource Sharing Partner
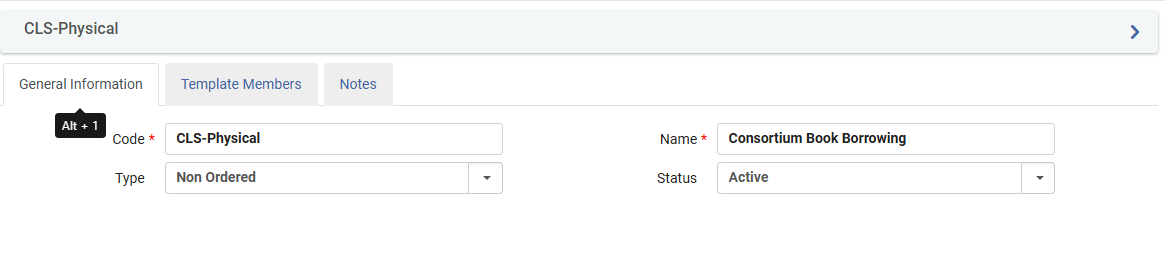
Rota Templates
Fulfillment > Resource Sharing > Rota Templates
A rota template specifies the list of partners that are queried to see if a particular borrowing request can be fulfilled. The rota template for the WRLC AFN (named CLS-Physical) only lists the institutions in the WRLC that lend items in the AFN (for a full list of lending institutions in the WRLC, see the Consortial Partners in CLS/AFN page); this rota is a non-ordered template, meaning requests are sent to partners in a random order.
For more information, see the Alma Knowledgebase page Configuring Rota Templates page.
Rota Assignment Rules
Configuration > Fulfillment > Resource Sharing > Rota Assignment Rules > CLS Book Borrowing
Rota Assignments assigns rules to a specific Rota template. The rule assigned to the CLS-Physical rota template is that the request requires a physical format.
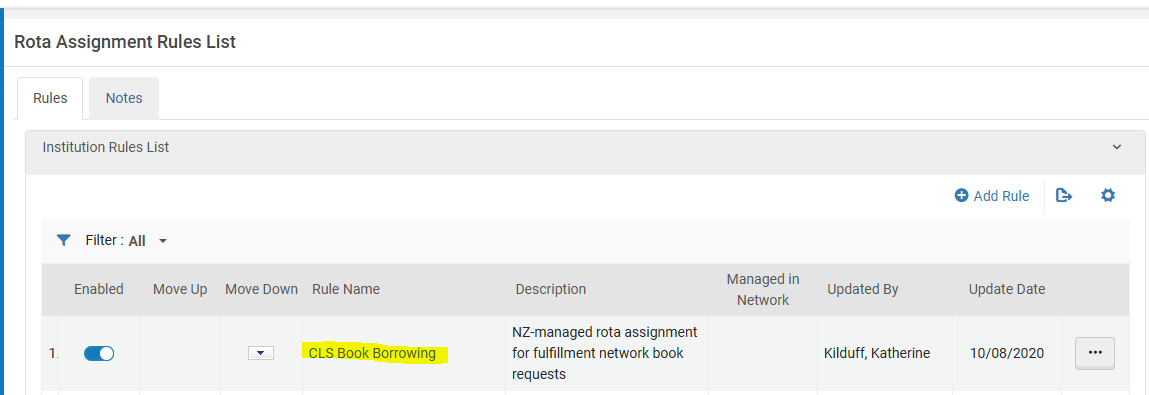
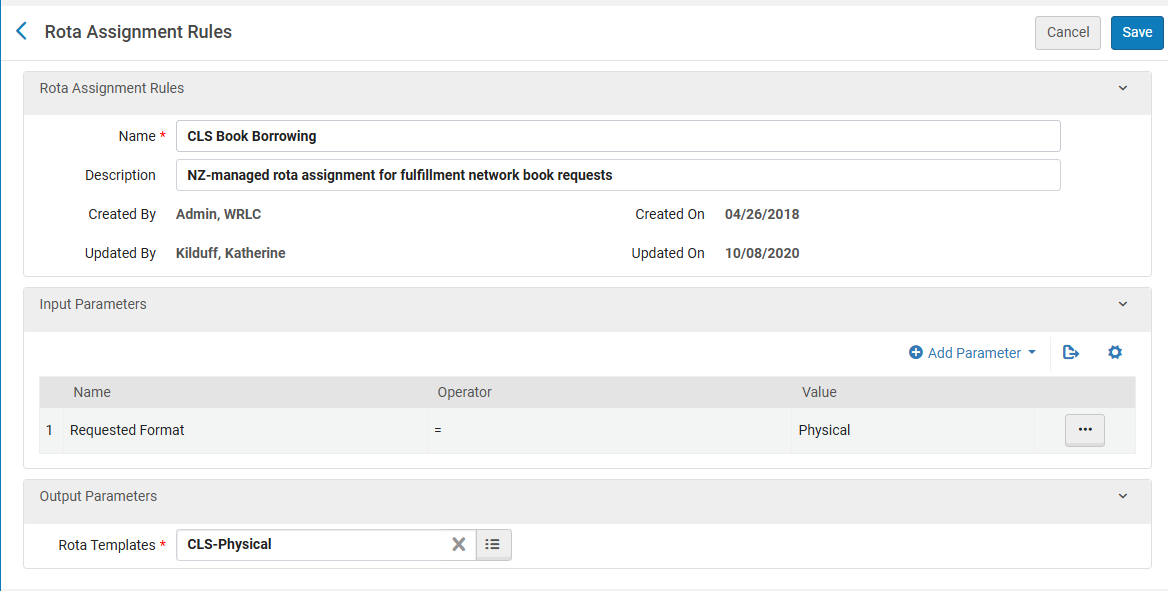
For more information, see the Alma Knowledgebase page Configuring Rota Assignment Rules
Fulfillment Unit
Configuration > Fulfillment > Physical Fulfillment > Fulfillment Units
The Fulfillment Unit named WRLC Fulfillment Network (code WRLC_FN) sets the rules by which items circulate in the fulfillment network. This NZ-managed Fulfilment unit is applied to the each Institution's Fulfillment Unit for items requestable and loanable via the WRLC AFN. For more information on IZ Fulfillment Units, see the AFN Insitution Zone Configurations - Fulfillment Units section.
WRLC-FN Fulfillment Unit Details
- On shelf Request Policy = Request for pickup anywhere regardless of availability
The above settings means all pickup locations that are allowed according to the Pickup Locations policy are available, regardless of whether the item is on the shelf
WRLC-FN Fulfillment Unit Rules
Loan rule type
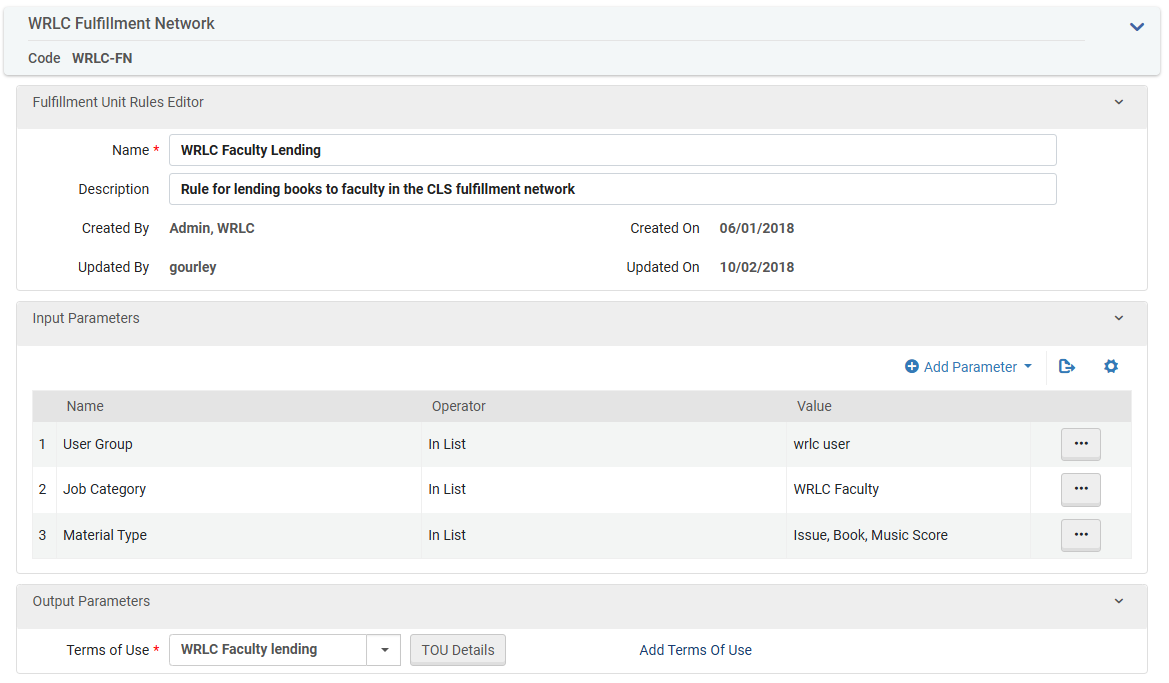
WRLC Faculty Lending
-
-
- IF the patron's profile has 1) a user group of wrlc user, and 2) a job category of WRLC Faculty, AND the item is a material type of Issue, Book, or Music Score, THEN the Terms of Use applied to the loan is WRLC Faculty Lending TOU
-
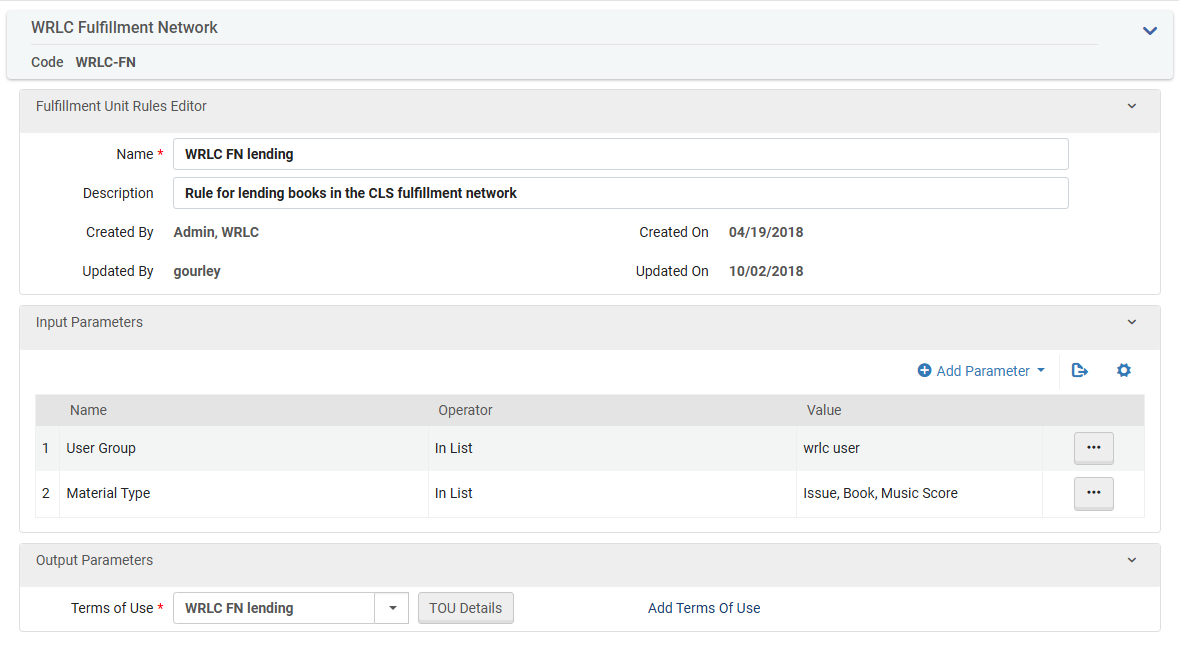
WRLC FN Lending
-
-
- IF the patron's profile has a user group of wrlc user AND the item has a material type of Issue, Book, or Music Score, THEN the Terms of Use applied to the loan is WRLC FN Lending TOU
-
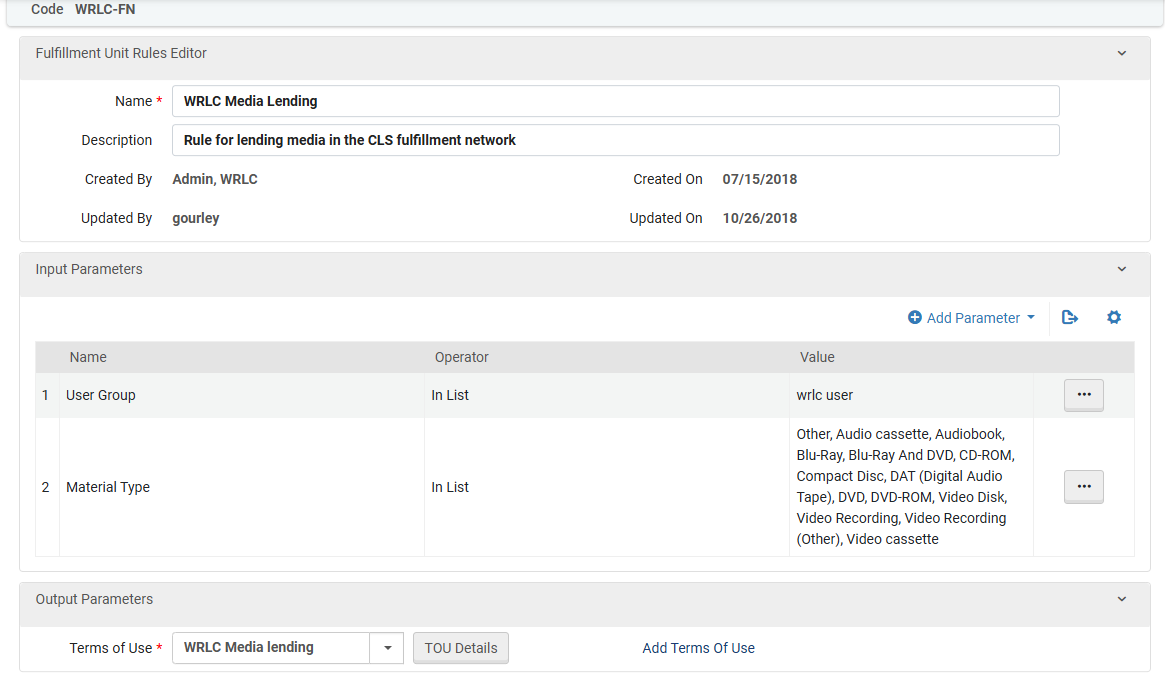
WRLC Media Lending
-
-
- IF the patron's profile has a user group of wrlc user AND the item has a material type of Other, Audio cassette, Audiobook, Blu-Ray, Blu-Ray And DVD, CD-ROM, Compact Disc, DAT (Digital Audio Tape), DVD, DVD-ROM, Video Disk, Video Recording, Video Recording (Other), or Video Cassette, THEN the Terms of Use applied to the loan is WRLC Media Lending TOU
-
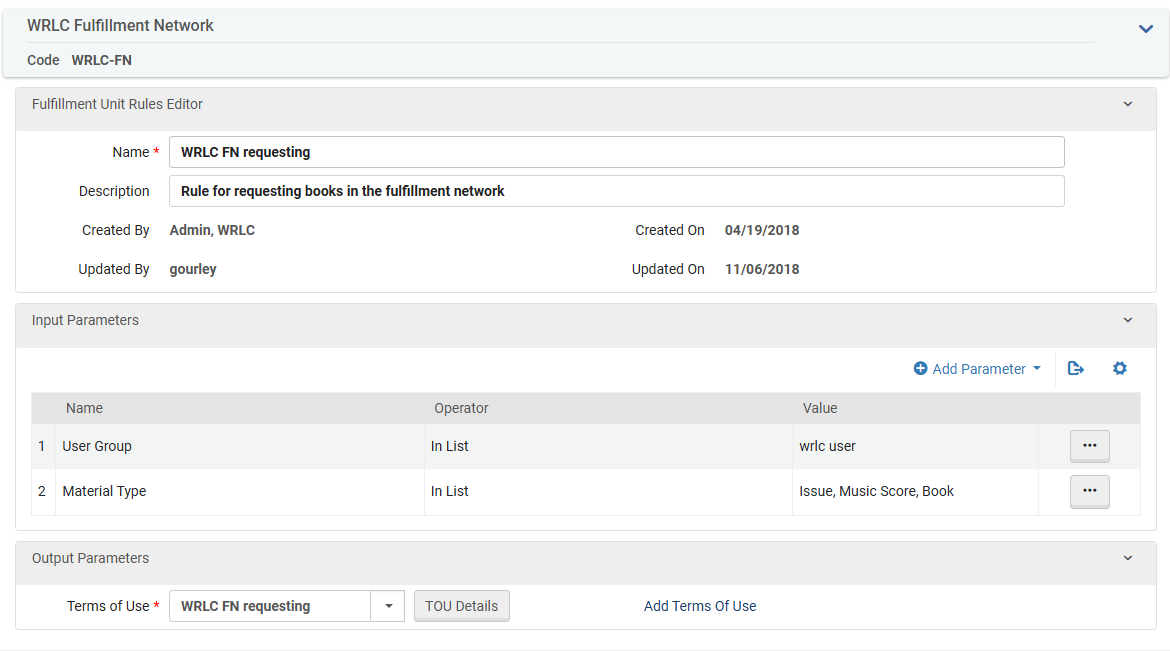
Request rule type
WRLC FN Requesting
-
-
- IF the patron's profile has a user group of wrlc user AND the item has a material type of Issue, Book, or Music Score, THEN the Terms of Use applied to the request is WRLC FN Requesting TOU
-
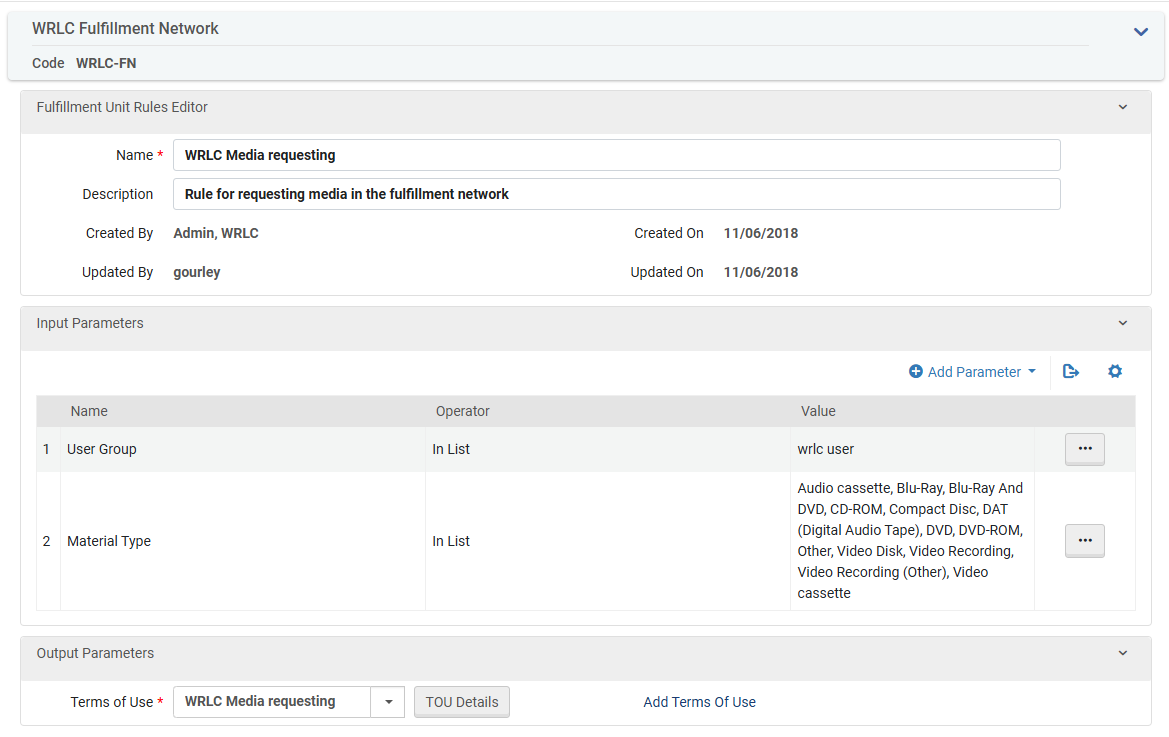
WRLC Media Requesting
-
-
- IF the patron's profile has a user group of wrlc user AND the item has a material type of Other, Audio cassette, Audiobook, Blu-Ray, Blu-Ray And DVD, CD-ROM, Compact Disc, DAT (Digital Audio Tape), DVD, DVD-ROM, Video Disk, Video Recording, Video Recording (Other), or Video Cassette, THEN the Terms of Use applied to the request is WRLC Media Requesting TOU
-
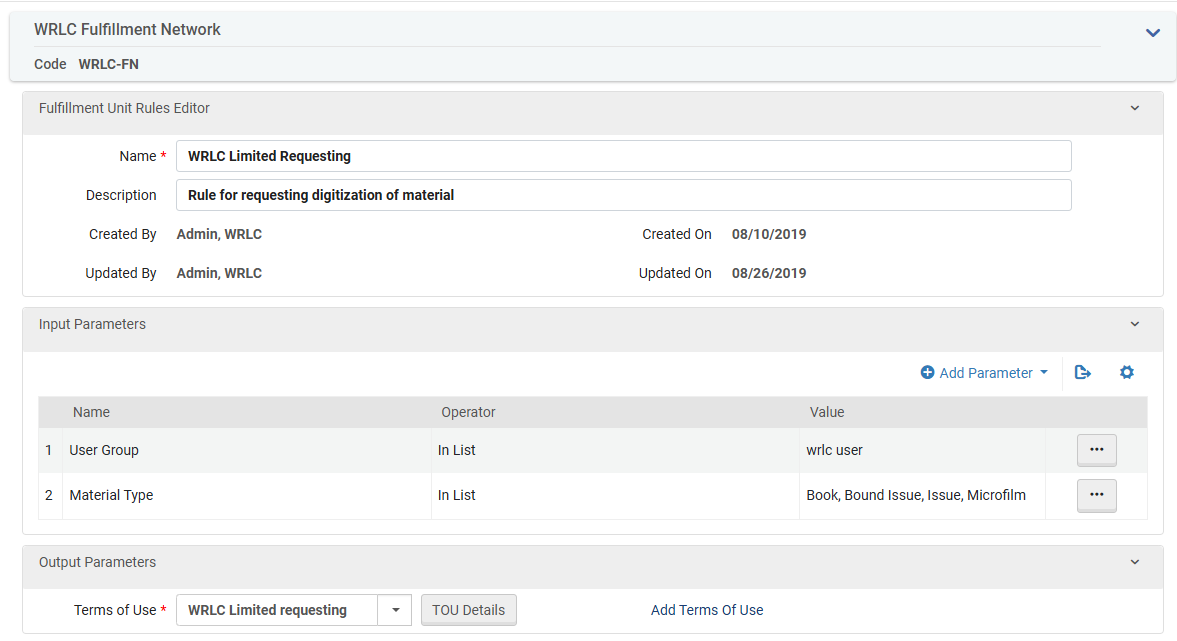
WRLC Limited Requesting
-
-
- IF the patron's profile has a user group of wrlc user AND the item has a material type of Book, Bound Issue, Issue, or Microfilm, THEN the Terms of Use applied to the request is WRLC Limited Requesting TOU
-
For more information, see the Alma Knowledgebase page Configuring Fulfillment Units
Terms of Use
Configuration > Fulfillment > Physical Fulfillment > Terms of Use and Policies
Terms of Use refers to a list of policies that define the institutional services that will be provided or terminated. Terms of Use are assigned to specific Fulfillment Unit Rules.
WRLC-FN Terms of Use
Below are the Terms of Use owned by the Network Zone and affiliated with the WRLC-FN Fulfillment Unit
Loan TOUs
WRLC Faculty Lending
Terms for lending to Faculty in the CLS fulfillment network. This TOU is applied to the WRLC Faculty Lending Loan rule.
| Policy Type | Policy Name | Policy Description |
| Is Loanable | Loanable | Loanable |
| Is Recallable | Recall Allowed | Recall is possible |
| Due Date | CLS - Faculty | End-of-term loan for faculty |
| Requested Item Due Date | 14 day limit if request exists | Limit new loans to 14 days if another request on the same item |
| Recall Period | 14 Days Recall Period | 14 Days Recall Period |
| Renew Fee | No Renewal Fee | Default No Renewal Fee |
| Lost Item Fine | No Lost Item Fine | Default Lost Item fine - per RSAC 10/5/2022 |
| Lost Item Replacement Fee | CLS $110 replacement fee | Default replacement fee for WRLC-FN Lending TOU 8/20/2018 |
| Lost Item Replacement Fee Refund Ratio | 100 Percent Lost Item Refund | Default lost item replacement refund |
| Maximum Fine | CLS $25 maximum fine | Max fine for WRLC FN Lending TOU 8/20/2018 |
| Overdue Fine | CLS no overdue fine | Daily overdue fine removed 4/15/2019 |
| Recalled Overdue Fine | CLS $5/day recalled item fine | Overdue for recalled items for WRLC FN Lending TOU 8/20/2018 |
| Grace Period | CLS 39 day grace period. | Extension of grace period before Lost Item Fine |
| Is Renewable | Renewable | Is item renewable |
| Maximum Renewal Period | No Maximum Renew Period | Default Maximum Renewal Period |
| Closed Library Due Date Management | Move Due Time to Next Open Time | When the Library will close before the Due Time of a short loan, lengthen the due time to the Library's next opening time |
| Cancelled Recall Due Date | Restore to original due date | This option will take the due date of the loan before the recall was done on the loan |
| Overdue Notification Fine Type 1 | No Overdue Fine | Default value - No Overdue Fine |
| Overdue Notification Fine Type 2 | No Overdue Fine | Default value - No Overdue Fine |
| Overdue Notification Fine Type 3 | No Overdue Fine | Default value - No Overdue Fine |
| Overdue Notification Fine Type 4 | No Overdue Fine | Default value - No Overdue Fine |
| Overdue Notification Fine Type 5 | No Overdue Fine | Default value - No Overdue Fine |
| Block When Overdue | No block when overdue | Do not create a block when overdue |
| Maximum Period for Overdue Block | No Maximum Block Period | No Maximum Block Period for Block When Overdue |
| Reloan Limit | No Reloan Limit | No Reloan Limit |
| Time frame when loan renewal is allowed | No limit | Do not limit the time in which renewal is allowed |
WRLC FN Lending
Terms for lending in the CLS fulfillment network. This TOU is applied to the WRLC FN Lending Loan rule.
| Policy Type | Policy Name | Policy Description |
| Is Loanable | Loanable | Loanable |
| Is Recallable | Recall Allowed | Recall is possible |
| Due Date | 6 wk general loan | 6 week general loan |
| Requested Item Due Date | 14 day limit if request exists | Limit new loans to 14 days if another request on the same item |
| Recall Period | 14 Days Recall Period | 14 Days Recall Period |
| Renew Fee | No Renewal Fee | Default No Renewal Fee |
| Lost Item Fine | No Lost Item Fine | Default Lost Item fine - per RSAC 10/5/2022 |
| Lost Item Replacement Fee | CLS $110 replacement fee | Default replacement fee for WRLC-FN Lending TOU 8/20/2018 |
| Lost Item Replacement Fee Refund Ratio | 100 Percent Lost Item Refund | Default lost item replacement refund |
| Maximum Fine | CLS $25 maximum fine | Max fine for WRLC FN Lending TOU 8/20/2018 |
| Overdue Fine | CLS no overdue fine | Daily overdue fine removed 4/15/2019 |
| Recalled Overdue Fine | CLS $5/day recalled item fine | Overdue for recalled items for WRLC FN Lending TOU 8/20/2018 |
| Grace Period | CLS 39 day grace period. | Extension of grace period before Lost Item Fine |
| Is Renewable | Renewable | Is item renewable |
| Maximum Renewal Period | No Maximum Renew Period | Default Maximum Renewal Period |
| Closed Library Due Date Management | Move Due Time to Next Open Time | When the Library will close before the Due Time of a short loan, lengthen the due time to the Library's next opening time |
| Cancelled Recall Due Date | Restore to original due date | This option will take the due date of the loan before the recall was done on the loan |
| Overdue Notification Fine Type 1 | No Overdue Fine | Default value - No Overdue Fine |
| Overdue Notification Fine Type 2 | No Overdue Fine | Default value - No Overdue Fine |
| Overdue Notification Fine Type 3 | No Overdue Fine | Default value - No Overdue Fine |
| Overdue Notification Fine Type 4 | No Overdue Fine | Default value - No Overdue Fine |
| Overdue Notification Fine Type 5 | No Overdue Fine | Default value - No Overdue Fine |
| Block When Overdue | No block when overdue | Do not create a block when overdue |
| Maximum Period for Overdue Block | No Maximum Block Period | No Maximum Block Period for Block When Overdue |
| Reloan Limit | No Reloan Limit | No Reloan Limit |
| Time frame when loan renewal is allowed | No limit | Do not limit the time in which renewal is allowed |
WRLC Media Lending
Terms for media loans in the CLS fulfillment network. This TOU is applied to the WRLC Media Lending Loan rule.
| Policy Type | Policy Name | Policy Description |
| Is Loanable | Loanable | Loanable |
| Is Recallable | No Recall | Default Recall is not possible |
| Due Date | 1 week media loan | 7 day loan period for WRLC media lending TOU |
| Requested Item Due Date | No Requested Due Date | Default value - No Requested Item Due Date |
| Recall Period | No Recall Due Date | Default Recall Due date - none |
| Renew Fee | No Renewal Fee | Default No Renewal Fee |
| Lost Item Fine | No Lost Item Fine | Default Lost Item fine - per RSAC 10/5/2022 |
| Lost Item Replacement Fee | CLS $110 replacement fee | Default replacement fee for WRLC-FN Lending TOU 8/20/2018 |
| Lost Item Replacement Fee Refund Ratio | 100 Percent Lost Item Refund | Default lost item replacement refund |
| Maximum Fine | CLS $25 maximum fine | Max fine for WRLC FN Lending TOU 8/20/2018 |
| Overdue Fine | CLS $5/day overdue media fine | Overdue fine for WRLC FN Media 8/20/2018 |
| Recalled Overdue Fine | No Recall Overdue Fine | Default Value for recalled overdue fine |
| Grace Period | No Grace | Default value for Grace |
| Is Renewable | Not Renewable | Item not renewable |
| Maximum Renewal Period | No Maximum Renew Period | Default Maximum Renewal Period |
| Closed Library Due Date Management | Move Due Time to Next Open Time | When the Library will close before the Due Time of a short loan, lengthen the due time to the Library's next opening time |
| Cancelled Recall Due Date | Keep due date | No change to the due date |
| Overdue Notification Fine Type 1 | No Overdue Fine | Default value - No Overdue Fine |
| Overdue Notification Fine Type 2 | No Overdue Fine | Default value - No Overdue Fine |
| Overdue Notification Fine Type 3 | No Overdue Fine | Default value - No Overdue Fine |
| Overdue Notification Fine Type 4 | No Overdue Fine | Default value - No Overdue Fine |
| Overdue Notification Fine Type 5 | No Overdue Fine | Default value - No Overdue Fine |
| Block When Overdue | No block when overdue | Do not create a block when overdue |
| Maximum Period for Overdue Block | No Maximum Block Period | No Maximum Block Period for Block When Overdue |
| Reloan Limit | No Reloan Limit | No Reloan Limit |
| Time frame when loan renewal is allowed | No limit | Do not limit the time in which renewal is allowed |
Request TOUs
WRLC FN Requesting
Terms for requests in the CLS fulfillment network. This TOU is applied to the WRLC FN Requesting Request rule.
| Policy Type | Policy Name | Policy Description |
| Is Requestable | Requestable | Requestable |
| Pickup Locations | Pickup At Any Institution | Pickup At Any Institution |
| Hold Shelf Period | 14 day Hold Shelf (Covid default) | Longer hold shelf time due to library restrictions. |
| Is Digitizable | Is Digitizable | Default value for Digitizable |
| Is Requestable for Physical Resource Sharing | Requestable for Physical Resource Sharing | Requestable for Physical Resource Sharing |
| Is Requestable for Digital Resource Sharing | Requestable for Digital Resource Sharing | Requestable for Digital Resource Sharing |
| Request Priority | Medium | Medium |
| On Shelf Request Policy | Use fulfillment unit definition | Use fulfillment unit definition |
| Personal Delivery | Personal Delivery - None | Do not deliver items at all |
| Personal Delivery Fee | Personal Delivery Fee - No Fee | Personal Delivery is not charged with a fee |
| Automatically convert to resource sharing | Do not convert to resource sharing | Do not convert to resource sharing |
| Digitization Fee per Digitization | No Fee | Digitization request is not charged with a fee |
| Digitization Fee per page | No Fee | Digitization request is not charged with a fee per page |
WRLC Media Requesting
Terms for media requests (requestable but not digitizable) in the CLS fulfillment network. This TOU is applied to the WRLC Media Requesting Request rule.
| Policy Type | Policy Name | Policy Description |
| Is Requestable | Requestable | Requestable |
| Pickup Locations | Pickup At Any Institution | Pickup At Any Institution |
| Hold Shelf Period | 7 day Hold Shelf | Default value for HoldShelfPeriod |
| Is Digitizable | Not Digitizable | Not Digitizable |
| Is Requestable for Physical Resource Sharing | Not requestable for Physical Resource Sharing | Not requestable for Physical Resource Sharing |
| Is Requestable for Digital Resource Sharing | Not requestable for Digital Resource Sharing | Not requestable for Digital Resource Sharing |
| Request Priority | Medium | Medium |
| On Shelf Request Policy | Use fulfillment unit definition | Use fulfillment unit definition |
| Personal Delivery | Personal Delivery - None | Do not deliver items at all |
| Personal Delivery Fee | Personal Delivery Fee - No Fee | Personal Delivery is not charged with a fee |
| Automatically convert to resource sharing | Do not convert to resource sharing | Do not convert to resource sharing |
| Digitization Fee per Digitization | No Fee | Digitization request is not charged with a fee |
| Digitization Fee per page | No Fee | Digitization request is not charged with a fee per page |
WRLC Limited Requesting
Terms for limited requests (digitizable but not requestable) in the CLS fulfillment network. This TOU is applied to the WRLC Limited Requesting Request rule.
| Policy Type | Policy Name | Policy Description |
| Is Requestable | Not Requestable | Default value is not requestable |
| Pickup Locations | Pickup At Any Institution | Pickup At Any Institution |
| Hold Shelf Period | 10 day Hold Shelf | Default value for HoldShelfPeriod (per RSAC) |
| Is Digitizable | Is Digitizable | Default value for Digitizable |
| Is Requestable for Physical Resource Sharing | Not requestable for Physical Resource Sharing | Not requestable for Physical Resource Sharing |
| Is Requestable for Digital Resource Sharing | Requestable for Digital Resource Sharing | Requestable for Digital Resource Sharing |
| Request Priority | Medium | Medium |
| On Shelf Request Policy | Use fulfillment unit definition | Use fulfillment unit definition |
| Personal Delivery | Personal Delivery - None | Do not deliver items at all |
| Personal Delivery Fee | Personal Delivery Fee - No Fee | Personal Delivery is not charged with a fee |
| Automatically convert to resource sharing | Do not convert to resource sharing | Do not convert to resource sharing |
| Digitization Fee per Digitization | No Fee | Digitization request is not charged with a fee |
| Digitization Fee per page | No Fee | Digitization request is not charged with a fee per page |
AFN Institution Zone Configurations
The following Automated Fulfillment Network (AFN) configurations are set in each WRLC Institution Zone. Settings will look slightly different depending on whether the Institution Zone is both a lender and borrower in the WRLC AFN, or if they are only a borrower.
For a list of all partner profiles in the WRLC AFN, as well as their borrowing and lending preferences, see the Consortial Partners in CLS/AFN page.
For information on how to edit the CL Request link in Primo, see the Display Logic Rules for the AFN/CLS Request Form in Primo page.
Resource Sharing Library
Configuration > Configuring drop-down menu = [choose your institution's Main Library] > Fulfillment > Library Management > Library Details
Your resource sharing library is the library where your temporary borrowing and lending locations are housed. For the WRLC AFN, your institution's Main Library is the designated Resource Sharing Library.
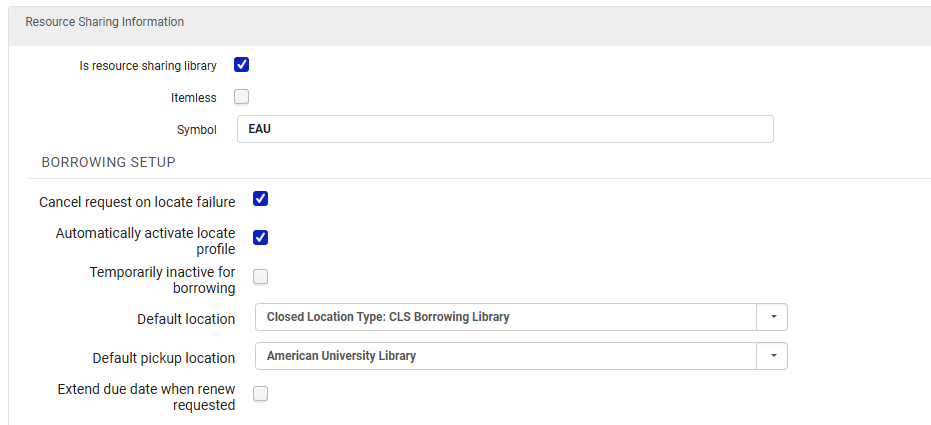
Resource Sharing Information section
- Is Resource Sharing Library = Yes
- Itemless = No
- Symbol = [ISO symbol]
Borrowing Setup section
- Cancel request on locate failure = Yes
- Automatically activate locate profile = Yes
- Temporarily inactive for borrowing = No
- This can be switched to Yes for a specific period of time, for example if the Library is closed
- Default location = CLS Borrowing Library
- Default pickup location = [Institution's Library]
- Extend due date when renew requested = No
Lending Setup section
Please note that the Lending Setup portion of the Resource Sharing section is NOT used by the WRLC AFN. This is because our AFN handles all lending requests as regular hold requests within the owning Institution's IZ; they are NOT considered true lending requests by Alma. For more information, see the Alma Knowledgebase page Automated Fulfillment Network Requests (AFN)
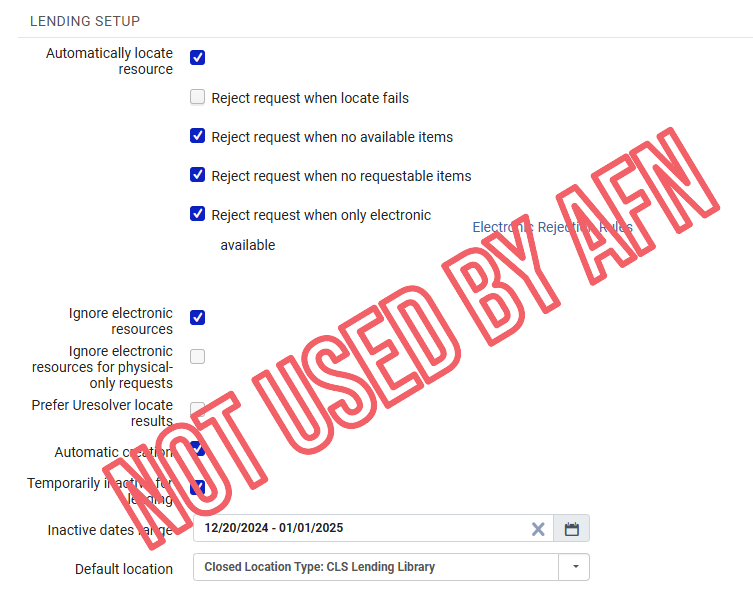
Similarly, the AFN follows the settings in each Institution's Locate Profile to find a matching item, NOT the settings in the Lending Setup section of the Library Details page. This is because our AFN handles all lending requests as regular hold requests within the owning Institution's IZ; they are NOT considered true lending requests by Alma.
For more information, see the Alma Knowledgebase page Configuring Parameters of a Resource Sharing Library
Temporary Resource Sharing Locations
Configuration > Configuring drop-down menu = [choose your institution's Main Library] > Fulfillment > Locations > Physical Locations
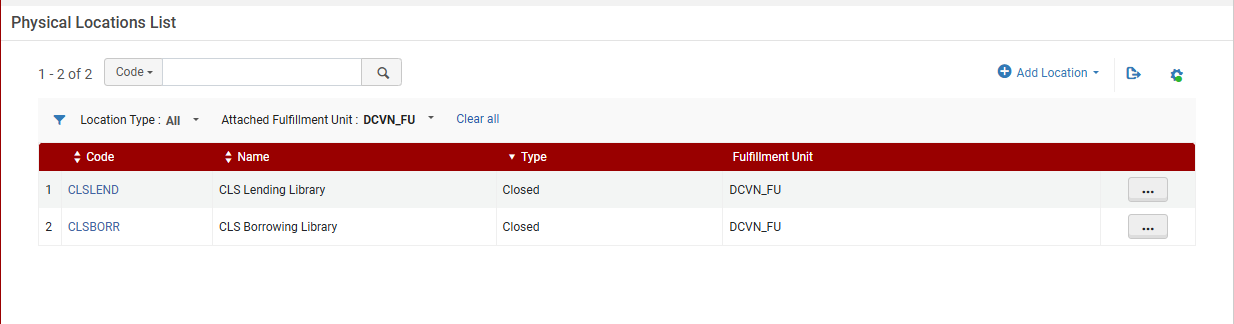
- CLSBORR (CLS Borrowing Library location)
- Item records for AFN items borrowed from other libraries will be given the temporary borrowing location CLSBORR.
- IZs that only borrow in the WRLC AFN will only have the CLSBORR location configured in their IZ. For a list of all partner profiles in the WRLC AFN, as well as their borrowing and lending preferences, see the Consortial Partners in CLS/AFN page.
- CLSLEND (CLS Lending Library location)
- Although there is a location named CLSLEND, it is NOT used in the AFN workflow. Items lent out via AFN will have a status of Loan, but will not be given a temporary location. Meanwhile, items lent out in either Peer 2 Peer or Rapido requests are given the CLSLEND temporary location.
For more information, see the Alma Knowledgebase page Configuring Physical Locations
Temp Item Creation Rule
Configuration > Configuring drop-down menu = [choose your institution's Main Library] > Fulfillment >Library Management > Temporary Item Creation Rules
These are rules that dictate what location and item policy are given to temporary item records created by AFN requests.
- Rule Name = Temporary item rule
- Location = CLSBORR
- Item Policy = 4 week loan
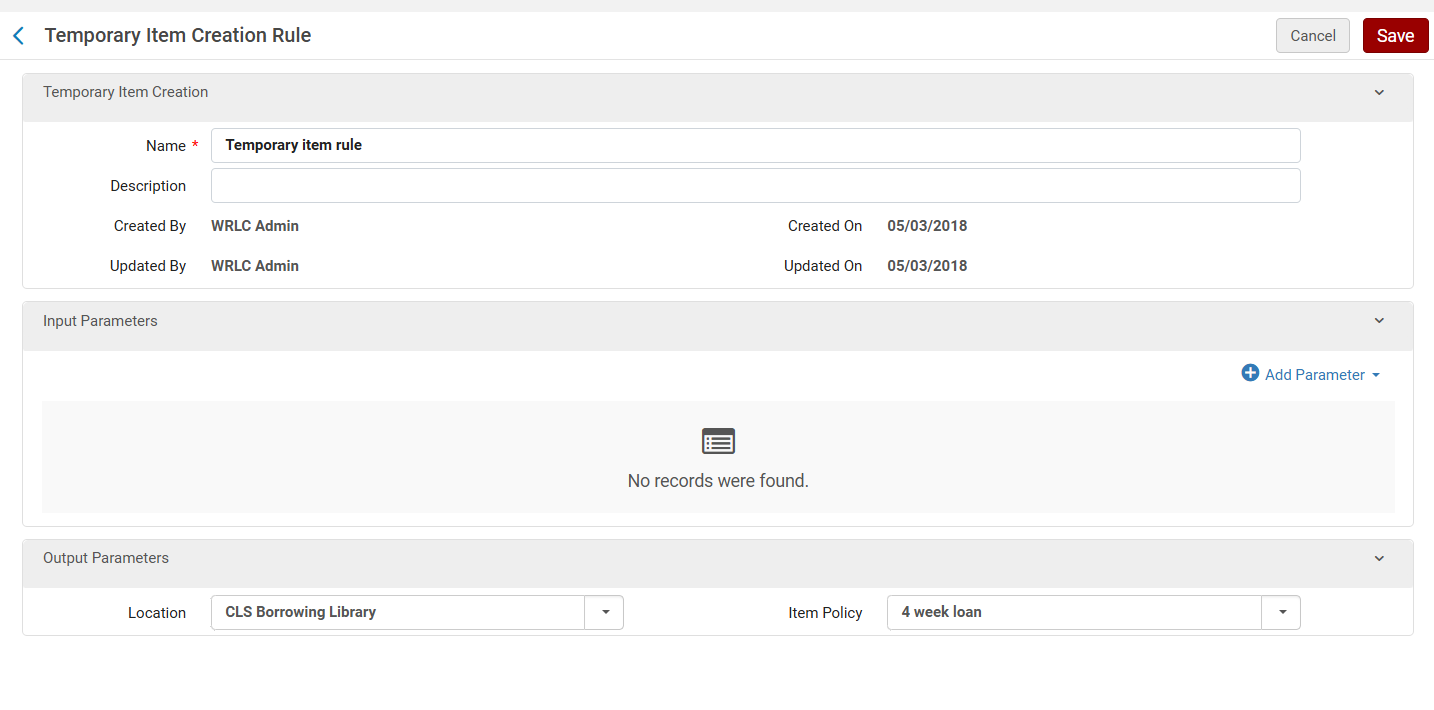
Please note that the length of loans are dictated by TOUs and fulfillment units, NOT the item policy assigned to CLS items
For more information, see the Alma Knowledgebase page Configuring Temporary Item Creation Rules
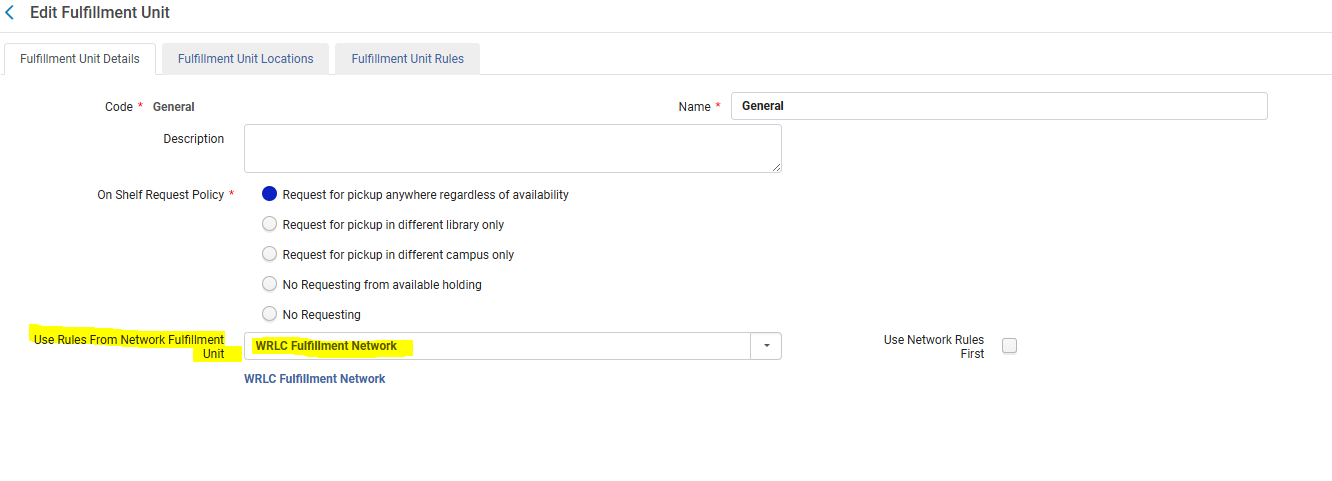
Fulfillment Units
Configuration > Fulfillment > Physical Fulfillment > Fulfillment Units > Edit Fulfillment Unit > Fulfillment Unit Details tab
Fulfillment Units are one or more physical locations in an institution that follow the same fulfillment policies. Similarly, the Network Zone has a fulfillment unit for WRLC's AFN, that dictates the rules by which items circulate in the fulfillment network.
NZ-managed Fulfillment Units can be applied to institutional Fulfillment Units. The WRLC AFN Fulfillment Unit (named WRLC Fulfillment Network) should be applied to Institutional fulfillment Units that are requestable through the AFN.
- On Shelf Request Policy = Request for pickup anywhere regardless of availability
- Use Rules from Network Fulfillment Unit = WRLC Fulfillment Network
- Choose the WRLC Fulfillment Unit from the drop-down menu if the institutional Fulfillment Unit is requestable through the AFN
- If the Fulfillment Unit is NOT requestable through the AFN, choose a non-requestable option for the On Shelf Request Policy and leave this field blank
For more information, see the Alma Knowledgebase page Configuring Fulfillment Units
Sending Borrowing Request Rules
Configuration > Fulfillment > Resource Sharing > Sending Borrowing Request Rules
Sending Borrowing Request Rules dictate when a borrowing request is sent automatically to an active partner institution without staff intervention.
- CLS Sending Request
- Input Parameters
- Name = Partner
- Operator = In List
- Value = American University, Catholic University, Gallaudet University, George Mason University, George Washington University, Georgetown University, Howard University, Marymount University, Shared Collection Facility, University of DC
- Output Parameters
- Send Request = True
- Input Parameters
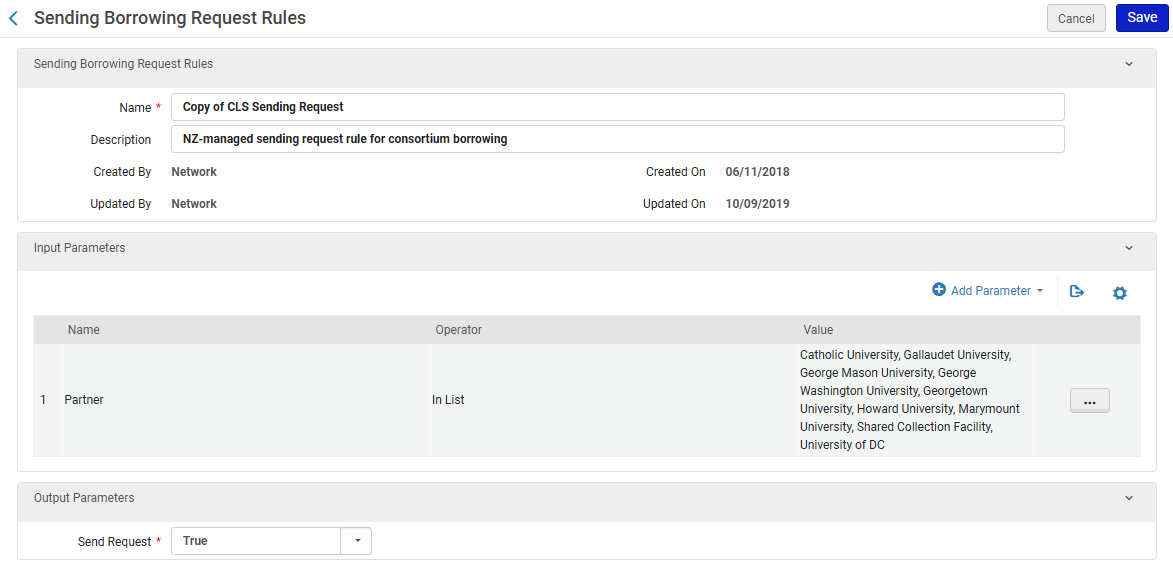
For more information, see the Alma Knowledgebase page Configuring Sending Borrowing Request Rules
Rota Assignment Rules
Configuration > Fulfillment > Resource Sharing > Rota Assignment Rules
Rota Assignment Rules assign Rota Templates to specific requests, based on specified criteria.
The following assignment rule is configured in each individual Institution Zone.
The Copy of CLS Book Borrowing rule should be at the top of the list.
The priority of Institution rules versus Network rules is determined by the network_rota_assignment_rules_precedence setting found in Configuration > Fulfillment > General > Other Settings. The default setting for WRLC is FALSE (IZ rules take precedent over NZ rules).
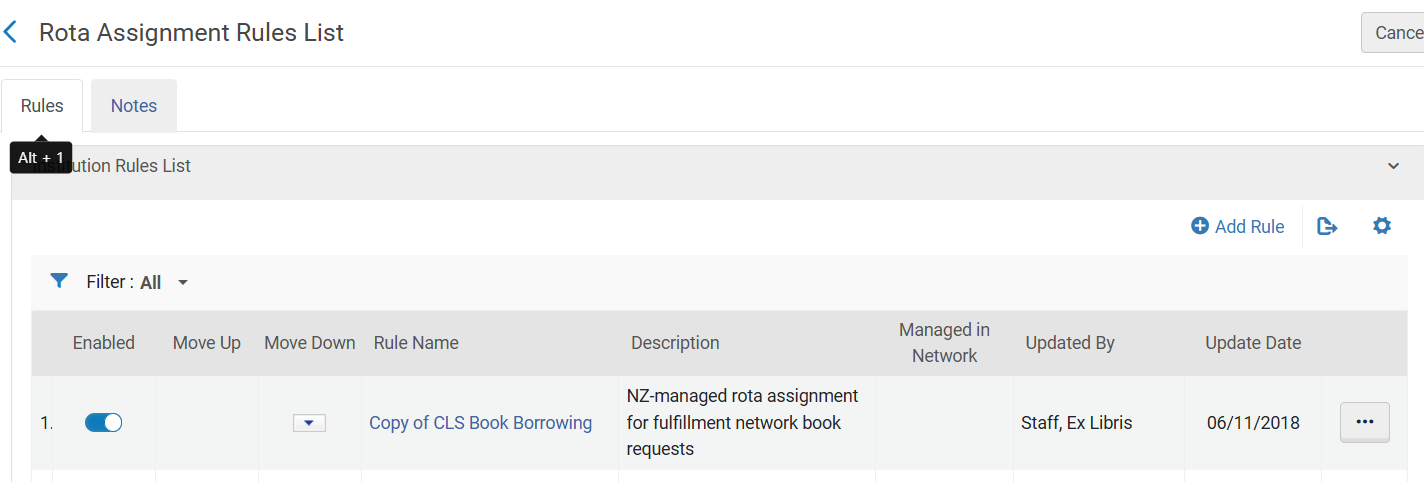
- Copy of CLS Book Borrowing
- Input Parameters
- Name - Requested Format
- Operator - =
- Value - Physical
- Output Parameters
- Rota Templates - CLS Physical
- Input Parameters
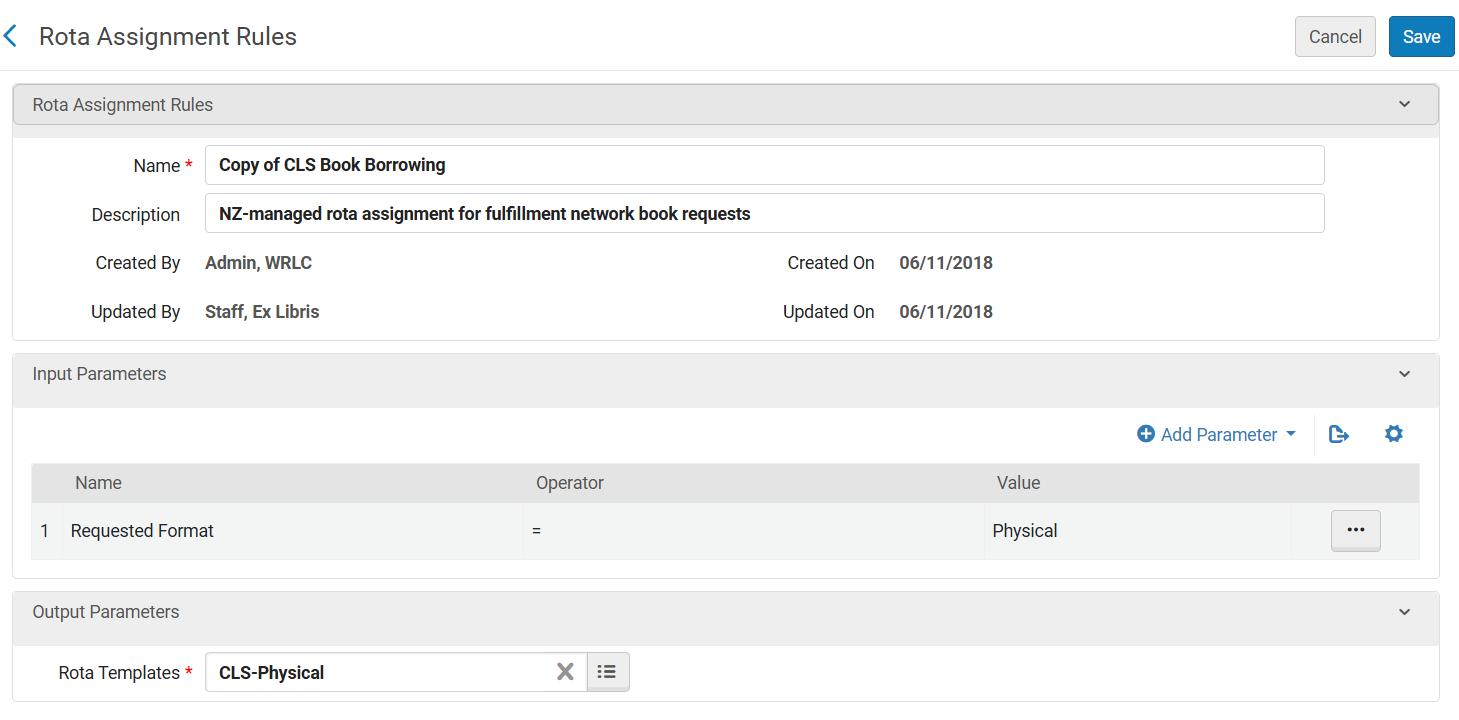
For more information, see the Alma Knowledgebase page Configuring Rota Assignment Rules
Display Logic Rules for the AFN/CLS Request Form in Primo
The Display Logic Rules configuration page determines when and for whom various Primo links appear for patrons, including the link to the CLS Request Form; this is referred to as the Resource Sharing Request.
The pathfinder to display logic rules: Configuration> Fulfillment> Discovery Interface Display Logic> Display Logic Rules
In general, WRLC libraries are allowed to make in-house decisions and independently configure their own Display Logic Rules. However, below are some helpful configuration rules for the CLS Request Form
Hide the CLS Request Link from specific user groups
This rule will hide the CLS Request link (referred to as the Resource Sharing Request on this configuration page) from view for patrons whose accounts have a specific user group. This is a helpful if specific users are not allowed to place CLS requests (for example, alumni).
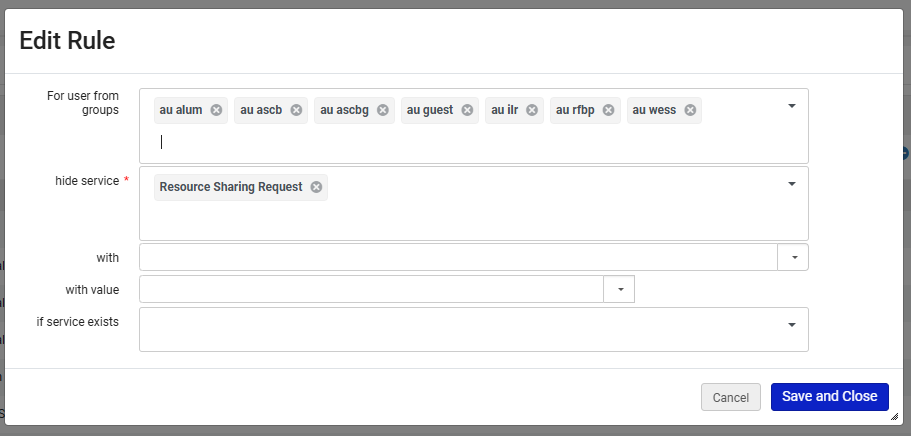
- For user from groups : list of all user groups
- hide service : Resource Sharing Request
Hide the CLS Request Link when your Institution's copy is available for a Hold Request
This rule will hide the CLS Request link (referred to as the Resource Sharing Request on this configuration page) from view when the following conditions are met:
- Your institution has a copy of this title
- Your institution's copy has a status of Available
- The patron is allowed to place a Hold on your institution's copy
This is helpful when you only want CLS requests to be placed for items your institution does not have already available to a patron.
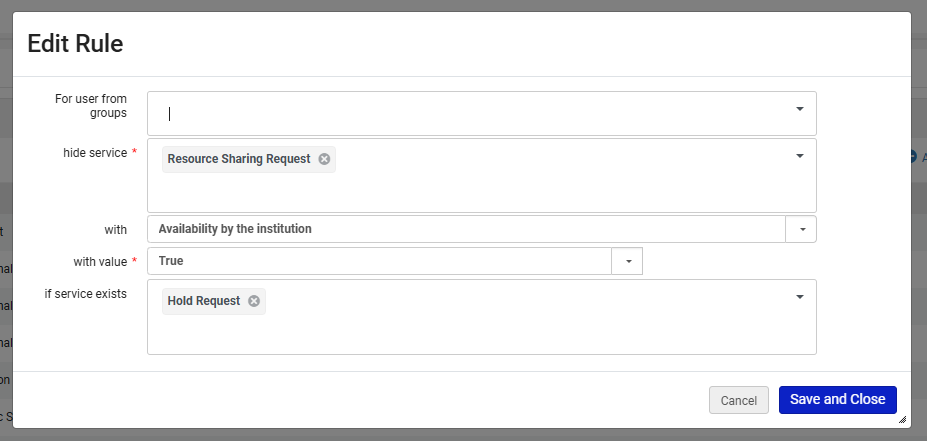
- hide service : Resource Sharing Request
- with : Availability by the institution
- with value : True
- if service exists : Hold Request
For more information about Display Logic Rules, see the Configuring Display Logic Rules page on the Alma Knowledgebase
Peer to Peer Resource Sharing
Instructions and information on how to set up peer-to-peer resource sharing in Alma.
Configuring Peer to Peer Resource Sharing in the IZ
To fully configure peer to peer resource sharing, you will need to configure the following:
- Temporary Resource Sharing Locations
- Resource Sharing Library
- Resource Sharing Jobs
- Other Resource Sharing Settings
- Workflow Profiles
- Resource Sharing Partner
- Item Policy
- Temporary Item Creation Rule
- Fulfillment Policies
- Loan and Lending Resource Sharing TOUs
- Fulfillment Unit Rules
- Rota Template
- Rota Assignment Rule
- Sending Borrowing Request Rule
All names and descriptions listed in this document are merely suggestions. You may use whatever names and descriptions work best for your library.
You will need the Fulfillment Administrator and Resource Sharing Partners Manager roles to do this configuration work. All configuration work should be done at the institution level.
Temporary Resource Sharing Locations
Temporary item records for items borrowed from other libraries will be housed in your temporary borrowing location, and items loaned to other libraries will be temporarily moved to your temporary lending location.
As a frame of reference, WRLC's AFN / CLS process uses CLSBORR and CLSLEND as your Institution's temporary resource sharing locations.
1. Go to Configuration, select the library you’ve designated as your resource sharing library, and then go to Fulfillment | Locations | Physical Locations.
2. Click the Add Location link, enter the values in the first row of the table below into the window that opens, and then click the Add Location button. Repeat that process using the values in the second row of the table.
|
Code |
Name |
External Name |
Type |
Remote Storage |
Fulfillment Unit |
Call Number Type |
Map |
|
BORROWING |
Borrowing |
Borrowing |
Open |
leave blank |
Select value ending in “_FU” |
leave blank |
leave blank |
|
LENDING |
Lending |
Lending |
Open |
leave blank |
Select value ending in “_FU” |
leave blank |
leave blank |
3. Go to Fulfillment | Locations | Physical Locations, click the ellipsis next to your Borrowing location, scroll down to the Physical Location Circulation Desk List section, click the Attach Existing Circulation Desk link, select your resource sharing library’s circulation desk, make sure the Check In, Check Out, and Reshelve boxes are checked, click Attach Existing Circulation Desk, and then click the Save button. Repeat this process for your Lending location.
Resource Sharing Library
Your resource sharing library is the library where your temporary borrowing and lending locations are housed. It is possible to use your main library as your resource sharing library, or you can use the stand-alone resource sharing library that was created by Ex Libris. If you use the stand-alone resource sharing library, there will be a transit step between your main library and the resource sharing library whenever you receive or return a resource sharing item. If you use your main library as your resource sharing library, there is no transit step.
As a frame of reference, WRLC's AFN / CLS process uses your institution's Main Library , NOT the resource sharing library created by Ex Libris.
1. Go to Configuration, select the library you want to be your resource sharing library from the Configuring dropdown, and then go to Fulfillment | Library Management | Library Details.
2. Scroll down to the Resource Sharing Information section and make sure the Is Resource Sharing Library box is checked. Also, make sure your OCLC symbol is listed in the Symbol field.
3. Scroll down to the Borrowing Information section and check the following :
- Cancel Request on Locate Failure
- Automatically Activate Locate Profile
Next, select your temporary borrowing location from the Default Location dropdown (the one you created in the Temporary Resource Sharing Locations section). Lastly, select the library that you would like to serve as your default pickup location from the Default Pickup Location dropdown.
For libraries participating in WRLC's AFN, please note that the location configured as the default Borrowing location is already set to a CLS location. In order to use a different location for items borrowed from P2P partners, do not change the location in the Borrowing Information section (leave as is), and instead create a Temporary Item Creation rule.
4. Scroll down to the Lending Information section and check the following boxes :
- Automatically Locate Resource
- Reject Request When No Available Items
- Reject Request When No Requestable Items
- Reject Request When Only Electronic Available
- Ignore Electronic Resources
- Automatic Creation boxes
Next, select your temporary lending location from the Default Location dropdown (the one you created in the Temporary Resource Sharing Locations section).
For libraries participating in WRLC's AFN, please note that location configured as the default Lending location is NEVER used for AFN requests. Lending requests in the AFN are regular hold requests instead. For more information, see the Lending Setup section of the AFN Institution Zone Configurations page.
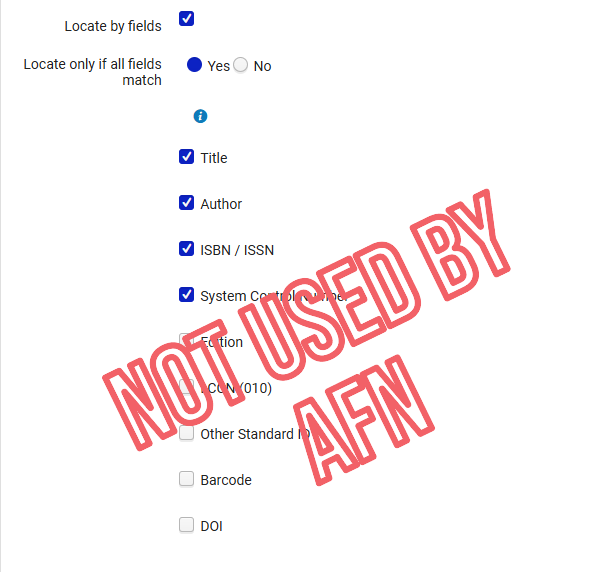
5. Scroll down to the bottom of the page, check the Locate By Fields box, click the No button, and then check the Title, Author, ISBN/ISSN, System Control Number, and LCCN (010) boxes.
6. Click the Save button.
Resource Sharing Jobs
This job must be running in order for resource sharing requests to automatically move on to the next lender if they’re not filled within the expiry days value listed in the resource sharing partner.
1. Go to Configuration | Fulfillment | General | Fulfillment Jobs Configuration, switch the status of the Expired Resource Sharing Requests job to Active, select Every Day at 02:00 from the Schedule dropdown, and then click the Save button.
Other Resource Sharing Settings
Because the setting below are NOT library specific, they apply to all libraries within an institution. When working with multi-resource sharing libraries in a single institution zone, leave the location and library code information blank, and instead 1) assign specific library and locations via the Lending and Borrowing sections of the Library Information page, and 2) assign a resource sharing library in the patron record.
|
Setting |
Value |
|
ill_item_creation_lib_code |
the code for your resource sharing library |
|
ill_item_creation_location_code |
the code for your temporary borrowing location |
|
rs_allow_actions_on_scan_in |
true |
|
rs_auto_request_lending |
true |
|
rs_disable_borrowing_auto_assign |
true |
|
rs_disable_lending_auto_assign |
true |
Workflow profiles
Workflow profiles help determine how resource sharing requests behave.
1. Go to Configuration | Fulfillment | Resource Sharing | Workflow Profiles.
2. Click the Add Workflow Profile link, enter “Peer to Peer Borrowing” into the Workflow Profile field, leave the Type dropdown set to Borrowing, check the boxes listed below, and then click the Add and Close button.
· Automatic renew, Cancelled By Patron, Cancelled by partner, Cancelled by staff, Conditional, Lender check in, Manual renew, Reject, Renew requested, Request accepted, Will supply
3. Click the Add Workflow Profile link again, enter “Peer to Peer Lending” into the Workflow Profile field, switch the Type dropdown to Lending, check the boxes listed below, and then click the Add and Close button.
· Borrower recall, Cancel reply, Conditional, Lender check in, Patron renewal, Staff renewal
Resource Sharing Partners
Resource sharing partners allow Alma institutions to send resource sharing requests to each other.
1. From the main Alma screen, go to Fulfillment | Resource Sharing | Partners, click the Community tab, change the search dropdown from Description to Name, and search for the partner, click the ellipsis next to their name, and then click Copy.
2. Click on the Institution tab, click the ellipsis next to the partner's name, and click Edit.
3. Select the workflow profiles you configured from the Borrowing Workflow and Lending Workflow dropdowns.
4. Click the Parameters tab, change the Expiry Time (Days) setting to the appropriate number, and then click the Save button.
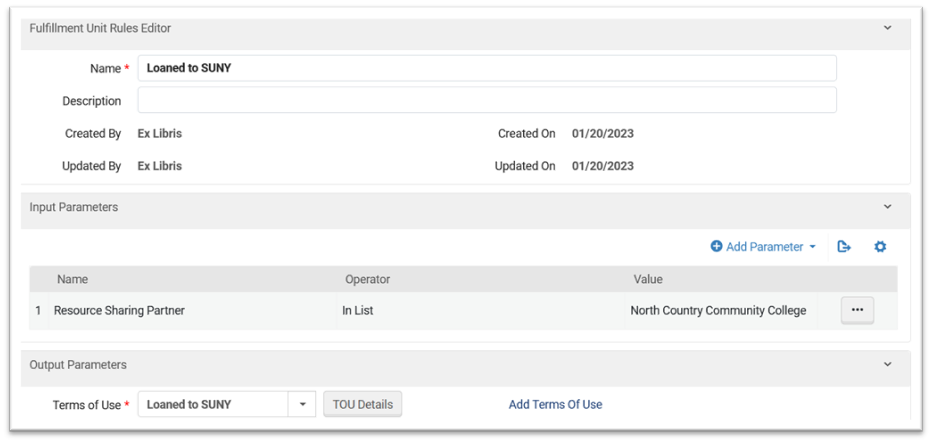
Item Policy
This Item Policy will be added to the temporary records Alma will create for the items you borrow from SUNY. This configuration work must be done at the resource sharing library level.
1. Go to Configuration, select your resource sharing library from the Configuring dropdown, and then go to Fulfillment | Physical Fulfillment | Item Policy.
2. Click the Add Row button. The Item Policy configuration window will open.
3. Configure the Item Policy as shown in the image below and then click Add Row. Once the Item Policy configuration window closes, click the Save button.
Temporary Item Creation Rule
This Temporary Item Creation Rule will add the Item Policy you previously configured to the temporary item records Alma will create for the items you borrow from your peer-to-peer lending institutions. It will also determine the temporary item record’s location. This configuration work must be done at the resource sharing library level.
1. Go to Configuration, select your resource sharing library from the Configuring dropdown, and then go to Fulfillment | Library Management | Temporary Item Creation Rules
2. Click the Add Rule button
3. Configure the Temporary Item Creation Rule to have the following input parameters
Name = Resource Sharing Partner
Operator = InList
Value = [List of Resource Sharing Partners]
4. Make sure this rule is positioned at the top of your Temporary Item Creation rules list.
Fulfillment Policies
These fulfillment policies will be used in the Loan and Lending Resource Sharing TOUs you will configure for items borrowed from and loaned to your peer-to-peer lenders. This configuration work should be done at the institution level.
Please contact your lending partners to determine the values necessary for your fulfillment policies.
1. Go to Configuration, select your institution from the Configuring dropdown, and then go to Fulfillment | Physical Fulfillment | Advanced Policy Configuration.
2. Click the Add Fulfillment Policy button, select the type of policy you would like to configure, configure the relevant policies, and then click the Save button.
Note: If you already have policies configured for these resource sharing partnerships, there’s no need to configure additional policies. You can use the policies you’ve already configured.
Loan, Borrowing, Resource Sharing, and Lending Resource Sharing TOU's
These TOUs will determine the loan and renewal periods for the items you borrow from and loan to your peer-to-peer partners. They will also determine which user groups are allowed to submit borrowing requests in Primo. This configuration work should be done at the institution level.
Please contact your lending partners to determine the values necessary for your fulfillment policies.
1. Go to Configuration, select your institution from the Configuring dropdown, and then go to Fulfillment | Physical Fulfillment | Terms of Use and Policies.
2. Click the Add a Terms of Use button.
3. Click the Loan button and then click the Next button.
4. Select the relevant policies in the table below, click the Next button, and then click the Save button.
5. Click the Add a Terms of Use button again.
6. Click the Lending Resource Sharing button and then click the Next button.
7. Select the relevant policies in the table below, click the Next button, and then click the Save button.
8. Click the Add a Terms of Use button again.
9. Click the Borrowing Resource Sharing button and then click the Next button.
10. Select the relevant policies in the table below, click the Next button, and then click the Save button.
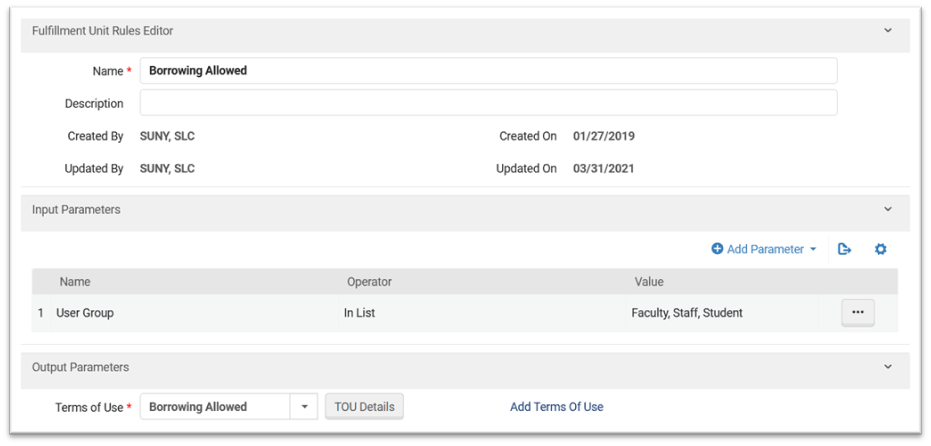
Fulfillment Unit Rules
These fulfillment unit rules will determine which Loan and Lending Resource Sharing TOUs are assigned to the items you borrow from and lend to your peer-to-peer partners. This configuration work must be done at the resource sharing library level.
1. Go to Configuration, select your resource sharing library from the Configuring dropdown, and then go to Fulfillment | Physical Fulfillment | Fulfillment Units
2. Click the ellipsis next to your resource sharing fulfillment unit and then click Edit.
3. Click the Fulfillment Unit Rules tab, select “Loan” from the Rule Type dropdown, and then click the Add Rule button.
4. Configure the Loan fulfillment unit rule to use your newly created Item Policy, then click the Save button.
5. Make sure the Loan fulfillment unit rule you’ve configured is positioned above any other Loan fulfillment unit rules that could potentially be applied to items borrowed from your peer-to-peer partners and then click the Save button.
6. Click the ellipsis next to your resource sharing fulfillment unit and then click Edit.
7. Click the Fulfillment Unit Rules tab, select “Lending Resource Sharing” from the Rule Type dropdown, and then click the Add Rule button.
8. Configure the Lending Resource Sharing fulfillment unit rule similar to the image below; in the list, add all of your P2P partners. Then click the Save button.
9. Make sure the Lending Resource Sharing fulfillment unit rule you’ve configured is positioned above any other Lending Resource Sharing fulfillment unit rules that could potentially be applied to items loaned to your peer-to-peer partners and then click the Save button.
10. Click the ellipsis next to your resource sharing fulfillment unit and then click Edit.
11. Click the Fulfillment Unit Rules tab, select “Borrowing Resource Sharing” from the Rule Type dropdown, and then click the Add Rule button.
12. Configure the Borrowing Resource Sharing fulfillment unit rule similar to the image below (when configuring the input parameter, select the user groups you want to be able to submit borrowing requests) and then click the Save button.
13. Make sure the Borrowing Resource Sharing fulfillment unit rule you’ve configured is positioned above any other Borrowing Resource Sharing fulfillment unit rules that could potentially prevent users from submitting borrowing requests.
Rota Template
This Rota Template will determine which peer-to-peer libraries are added to your request rotas. This configuration work must be done from the main Alma page, not the Configuration page.
1. Go to Fulfillment | Resource Sharing | Rota Templates
2. Click the Add Template button.
3. Configure the Rota Template and then click the Save and Add Members button.
4. Click the Add Partners button, select your peer-to-peer partners, and then click the Save Button.
Rota Assignment Rule
This Rota Assignment Rule will determine where peer-to-peer libraries will be positioned in your request rotas. This configuration work should be done at the institution level.
1. Go to Configuration, select your institution from the Configuring dropdown, and then go to Fulfillment | Resource Sharing | Rota Assignment Rules.
2. Click the Add Rule button.
3. Configure the Rota Assignment Rule according to the terms of your lending agreement, and then click the Save button.
4. Make sure the Rota Assignment Rule is positioned at the top of your rota assignment rules list.
Sending Borrowing Request Rule
This rule will make sure borrowing requests assigned to your peer-to-peer libraries are sent automatically. This configuration work may not be necessary given how your other Sending Borrowing Request rules are configured. This configuration work should be done at the institution level.
1. Go to Configuration, select your institution from the Configuring dropdown, and then go to Fulfillment | Resource Sharing | Sending Borrowing Request Rules.
2. Click the Add Rule button.
3. Configure the Sending Borrowing Request rule according to the terms of your lending agreement, and then click the Save button.
Moving P2P partner profiles from the NZ to the IZ (Cancelled)
NOTE: Ex Libris has changed their original assessment of the issue; after some testing, they now believe there is no way to move NZ partner profiles to an individual IZ without disruption of services to patrons. For that reason, WRLC is cancelling this project.
Phase One
Configuration in the Network Zone
-
Create the new Replacement Partners in the NZ
- As I mentioned, the only data that needs to be unique is the Code; make this unique in whatever way you like, as long as it doesn't match the Directory. But all other details within the partners can be identical to the current NZ partners.
-
Once they have been created, distribute these Replacement partners to the IZs by running the "Distribute Resource Sharing Configuration" job in the NZ
-
After which, the IZs should update any/all Rota Templates, replacing the Original NZ partners with the Replacement partners
-
When the IZs are fully configured to use the Replacement partners, return to the NZ and mark the Original partners as Inactive,
-
Then Distribute the changes again by running the "Distribute Resource Sharing Configuration" job in the NZ
- This is just an extra step to ensure that no new requests are created with these Original partners
Initial Network Zone Cleanup
6. Once you have confirmed that Replacement partners are all working as expected (and I see no reason why they wouldn't), delete the Original partners from the NZ
- This will remove the Original partners from some but not all IZs, but this is expected
7. Then distribute the deletion of the original partners by running the "Distribute Resource Sharing Configuration" job in the NZ
8. Wait 24 hours for these changes to be visible in Alma Analytics, then run a Lending and a Borrowing Analytics report (see image below) in the Network Zone; send to participants.
Partner Borrowing & Lending Request Cleanup
It is recommended to go one partner at a time. For example: start by removing SUNYBUF from American, and once that is done move on to SUNYALB, and so on*
A. Clean up Lending Requests
- For Lending Requests with the following statuses, nothing needs to be done. We will let the lending workflow run its course until the request finally has a status of Completed
- Being processed
- Received by partner
- Returned by partner
- Shipped physically
- Overdue request
- Lending Requests with the statuses below still have an "active" status according to Alma. Their status needs to be changed to one that Alma considers Inactive: Request Completed, Deleted, or any of the various Cancelled statuses
- Expired
- Locate failed
- Rejected the borrower request
To change a status manually, follow the steps below in the Lending Requests Task List. Filter your results appropriately, expand the results to show 50 at a time, and you will be able to update requests in batches of 50 (there is no job that can do this in Alma)
B. Cleaning up Borrowing Requests
- For Borrowing Requests that A) have the following statuses, and B) the active partner is one of the 4 SUNY schools, nothing needs to be done. We will let the lending workflow run its course until the request finally has a status of Complete
- Loaned item to patron
- Physically received by library
- Ready to be sent
- Renewed by partner
- Returned by patron
- Returned item to partner
- Shipped physically
- For all other borrowing requests, you can complete one of the following workflows:
- For Borrowing Requests that A) have the following statuses, and B) the active partner is NOT one of the 4 SUNY schools, we will need to remove the Original SUNY partners from each BR's Rota. Active partners cannot be removed; only Pending and Rejected. This method, though, can only be one manually one request at a time, but allows you to cleanup the SUNY partners from any active BRs
- Loaned item to patron
- Lost communicated
- Physically received by library
- Ready to be sent
- Renewed by partner
- Returned by patron
- Returned item to partner
- Shipped physically
- For borrowing requests with a status listed below, you can follow the workflow outlined in Cleaning up Lending Requests to change the status of these borrowing requests
- Expired
- Exported to third party
- Rejected by partner
- For Borrowing Requests that A) have the following statuses, and B) the active partner is NOT one of the 4 SUNY schools, we will need to remove the Original SUNY partners from each BR's Rota. Active partners cannot be removed; only Pending and Rejected. This method, though, can only be one manually one request at a time, but allows you to cleanup the SUNY partners from any active BRs
C. Wait until all active lending and borrowing requests (those with items checked out to patrons) have a status of Completed
13. Once one (or more) of the Original partners have been cleaned up from an IZ, run the Distribute job in the NZ once again
-
- If all of the requests were cleaned up, that partner will be removed
- If not, you'll see the same error message indicating if any Borrowing and/or Lending requests remain
Phase Two Cleanup
-
Once you're ready to begin, this is where you'll finally create the IZ-managed partners, as desired. Since the Original NZ partners are now deleted, each IZ can download the SUNY partners from the Directory, as desired
-
And in doing so, any Rotas and Rules can be updated to use these Directory partners
-
Once the IZs have fully switched to using Directory partners, the Replacement partners can now be deleted. The replacement partners will be marked as Inactive
-
Then distribute these Replacement partners to the IZs by running the "Distribute Resource Sharing Configuration" job in the NZ
Then you will follow the remaining steps in Phase One, Initial Network Zone Cleanup and Partner Borrowing & Lending Request Cleanup, this time slowly removing requests associated with the temporary profiles.
-
Like we discussed, this is going to be a long process. This is mostly due to having to wait on some requests to finish organically before partners can be deleted. But the advantage to all of the extra steps means that there will be functionally no disruptions of service to any/all patrons. And your RS staff will see little-to-no difference in their day-to-day work.
-
Some requests might be troublesome - you can't find them when searching in Alma, they won't let you update their status, etc.
-
If these pop up, Ex Libris has methods to find and correct them, or just outright delete them if they are not needed
-
-
Lastly, I would not recommend bothering with this process in your PSBs.
-
If you don't need the PSBs for active Resource Sharing testing, it would be best to just wait for the August refresh, which will automatically copy Production settings to the PSBs
-
SUNY P2P partners Stony Brook, Binghamton, Albany, and Buffalo
Although the policy is for all Peer to Peer configuration to exist in the Institution Zone only, the following partner profiles are configured and managed in the WRLC Network Zone:
- Stony Brook University, SUNY
- Binghamton University, SUNY
- University at Albany, SUNY
- University at Buffalo, SUNY
If any WRLC institution wishes to make changes to the partner profiles above, please send in a Service Desk ticket at servicedesk@wrlc.org
Background
When the WRLC first started peer to peer lending in Alma, all of the configurations for this workflow were set in the Alma Network Zone; our four original partners were the schools listed above. The policy changed in 2025 to move P2P to be IZ-only, but the only part of configuration we were unable to move were the partner profiles.
This is because partner profiles need a unique code and a unique ISO symbol; our NZ profiles shared an ISO symbol with the partner profiles in the Community tab, so the Community profiles cannot be copied to the IZ. And if the NZ partner profiles were to have different ISO symbols, none of the requests attached to that particular partner profile would work. Moving the partner profiles to the IZ would result in service disruption for patrons.
More information on this issue can be found in Salesforce case #07877638
Adding P2P Partners from the Resource Sharing Directory
Downloading a P2P Partner from the Resource Sharing Directory
To download a new P2P partner and add them to the rota template, follow the instructions below:
- In Alma, go to Fulfillment > Resource Sharing > Partners
- Choose the Community tab
- Search for the relevant partner. In this view, you can search for the partner by Description, Name, Pods I'm Part Of, or Symbol
- Once you've found the correct institution, click on the box next to their name to checkmark the profile. Then click Copy on the top right-hand corner OR click on the ellipsis button (...) next to their name, then choose Copy. By copying them to your instance of Alma, you have downloaded both the institution's Partner Profile and Locate Profile.
- To add them to the rota, go to Fulfillment > Resource Sharing > Rota Templates
- Find the appropriate Rota from the list. Click on the ellipsis button (...), then choose Edit
- Choose the Template Members tab
- Click + Add Partners on the top right-hand corner. Then search for the relevant partner, and click Add Partners
- Then choose the Save button at the top right-hand corner to save the rota template
Add Partner to the Temporary Item Creation Rule
The Temporary Item Creation Rule assigns a specific location and item policy to item records borrowed by your patrons from your P2P libraries. Adding the new partner to the list in the Temporary Item Creation Rule guarantees that items borrowed from your new P2P library will be given the correct location and item policy.
- In Alma go to Configuration. Choose your designated Resource Sharing Library (for most WRLC institutions, it is your main library) from the drop down menu, then Fulfillment > Library Management > Temporary Item Creation Rules
- Choose the temporary item creation rule that your Library uses for P2P partners. Click on the ellipsis button (...), then choose Edit
- Under Input Parameters, edit the Parameter Resource Sharing Partner | In List
- Add your new P2P institution to the list, then click Save to save the input parameter
- Click Save again to save the entire temporary item creation rule
Add Partner to your P2P Terms of Use (TOU)
- In Alma go to Configuration. Choose your designated Resource Sharing Library (for most WRLC institutions, it is your main library) from the drop down menu, then Fulfillment > Physical Location > Fulfillment Units
- Choose the Fulfillment Unit your Library uses for P2P from the list. Click on the ellipsis button (...), then choose Edit
- Choose the Fulfillment Unit Rules tab. Then choose the Rule Type of Lending Resource Sharing from the drop down menu.
- Edit the appropriate rule from the Institution Rules List (for the original participants of the SUNY pilot project, it will be called SUNY Lending
- Under Input Parameters, edit the Parameter Resource Sharing Partner | In List
- Add your new P2P institution to the list, then click Save to save the input parameter
- Click Save again to save the entire fulfillment unit rule
- Then click Save again to save the entire fulfillment unit
Review the Partner Profile
It is always best practice to review the information in a recently downloaded partner profile, just to make sure that the correct configurations are in place. Workflows and Expiry times will vary depending on the set agreements between borrowing institutions; you will want to find out what these settings should be before making changes to partner profiles.
- In Alma, go to Fulfillment > Resource Sharing > Partners
- Find the relevant institution under the Institution tab (this is the tab that automatically appears when first opening this page). Click on the ellipsis button (...), then choose Edit
- Under the General Information tab, choose the appropriate Borrowing and Lending Workflows from the drop-down menu. These settings will vary depending on your agreement with the institution.
- Under the Parameters tab, make sure the Request Expiry option is correct, as well as the Expiry Time. These settings will vary depending on your agreement with the institution.
A partner's Expiry Time setting determines how long the partner school has to respond to your school's borrowing requests. If your borrowing request isn't updated to shipped within the expiry period, the request will be automatically rejected the next time the Expired Resource Sharing Requests job runs in the partner school's IZ (it runs daily at 2:00am).
5. Then choose the Save button at the top right-hand corner to save the edited partner profile
Review the Locate Profile
It is also best practice to review the information in a recently downloaded locate profile, just to make sure that the correct configurations are in place. These settings will vary depending on the set agreements between borrowing institutions; you will want to find out what these settings should be before making changes to locate profiles.
- In Alma, go to Configuration > Fulfillment > Resource Sharing > Locate Profiles
- Find the relevant institution in the list. Click on the ellipsis button (...), then choose Edit
- Choose the Locate Profile Parameters tab
- Check the settings (for example, Ignore Electronic and Digital Resources) to make sure these are correct. These settings will vary depending on your agreement with the institution.
- Then choose the Save button at the top right-hand corner to save the edited locate profile
Check other relevant configurations
- Make sure the Expired Resource Sharing Requests job is running daily (especially if you have configured Expiry Time)
- Go to Configuration > Fulfillment > General > Fulfillment Jobs Configuration
- Check to see that the Expired Resource Sharing Requests is Active and running everyday.
- Make sure the Resource Sharing Working Days list includes the days your staff do not process ILL
- Go to Configuration > Fulfillment > Resource Sharing > Resource Sharing Working Days
- Add the days of the week your staff do NOT process ILL to the list
- Then click Save
Addons
Information on Addons that enhance SCF processing of both physical and digitial requests.
Alma Digitization Request Addon
RSAC decided that all digitization request be made though ILLiad. To facilitate requests for material held at the SCF, the Alma digitization addon for ILLiad was created. This Addon takes an ILLiad digitiation request and creates an Alma digitization request that is sent to the SCF IZ.
The source code and installation instructions can be found on github here: Alma_Digitization_Addon.
TO BE COMPLETED.
Alma Physical Item Request Addon
SCF request processing is transitioning from using emails for items to be sent to fill an ILLiad request for our partners to requests generated in Alma by the Alma_Physical_Addon. This new request path provides for more accountability and documentation. It will also be easier to see when an item is sent to fill a request.
The source code and installation instructions can be found on github here: Alma_Physical_Addon.
Set up, Installation and Configuration
User/Account Set Up:
You will need to identify or create an ILL user in your Alma instance that will be the requesting patron. This may be the same or similar to the account used for ILLiad Addon Digitization. This user must have a Job Category of "ILL Staff", a local user group that is allowed to request items from the SCF. Make note of the Primary ID as you will need this for Configuration (see below).
Once you have this user created, please forward the Primary ID to WRLC (kilduff@wrlc.org) so that we can make sure a linked account is created in the SCF. We will also need your return address that will be printed on the slip that will be sent with the item. This should be the same return address that prints on your ILLiad slip.
Installation:
Download and install the Addon in your ILLiad client. See: Installing the ILLiad Client Addon
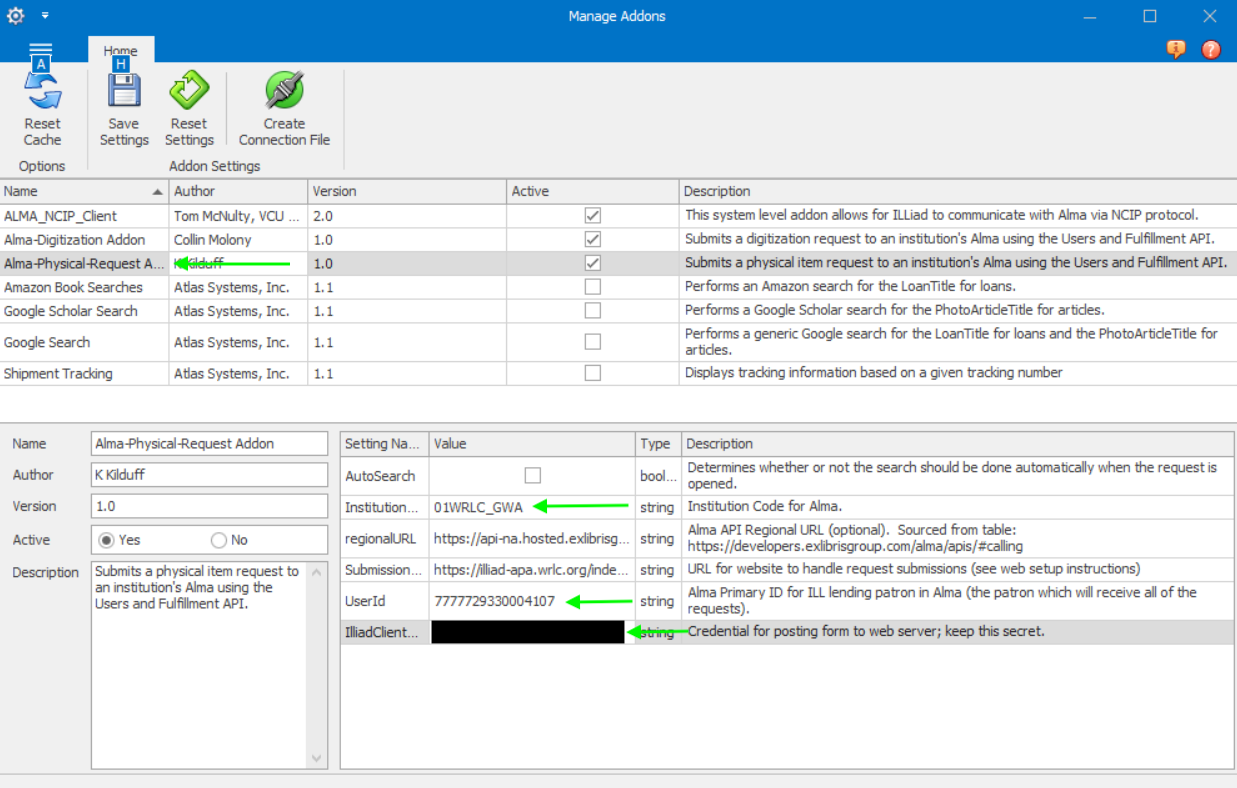
Configuration:
Configure these settings in the ILLiad client's 'Manage Addons' form:
-
-
- Institution Code = 01WRLC_GML (Be sure to use your own code!)
- UserId = this is the Primary ID of the user from “User/Account Set Up”
- IlliadClientSecret = (same secret as Digitization Addon, contact WRLC for secret)
-
(Main ILLiad → Manage Addons → Select “Alma-Physical-Request Addon” )
ILL Staff Addon Instructions
1. Once a request has been received in ILLiad for a physical item that is located at the SCF you will need certain item information. You will need to get the item’s “Item ID” and “MMS ID”. This can be accomplished using an Alma Physical item search.

2. These two ID numbers need to be inserted into the ILLiad transaction form. The MMS ID goes in the “Call Number” field, and the Item ID goes under the “Reference Number” field (Reference number is used instead of item number because ILLiad truncated item number to 10 characters, but Alma’s Item IDs can be longer than 10 digits).

Note: You could also enter the MMS ID and Item ID on the ILLiad Physical Item Request form that is loaded in a following step.
3. Select the WRLC Physical Request plugin tab.
4. Once on the plugin tab, select the Load Request Page button for the WRLC Physical Request form. This will load the form with information pre-populated from ILLIad. You will still need to enter some data.

5. The WRLC Physical Request Addon Form

6. You must complete the “WRLC mails item (Y or N)” field.
-
-
- Yes
-
- WRLC will mail the item if the address information is complete. (We may contact you if there are any questions.)
- We will insert a pull slip similar to this in the book (see below).
- We will scan the item in the SCF to put it “in transit” and then scan the item into the owning IZ. (This should put the item on the hold shelf for the requesting ILL patron. This will allow you to see when the item was pulled and sent to the requestor.)
-
- No
-
- WRLC will scan the item “in transit” and send it to the owning library via the courier.
-
- Yes
-
7. If you did not enter the Item ID and MMS ID in the “Transaction form, then you must do so now. Be sure that both IDs are correct and one or both are not numbers from the original request.
8. All items will have instructions on the Pull Slip to return the item to the owning library. (See example below.)

Libraries and Location codes
Partners with Library Names, Pull Slip Codes and Courier Slip Code.
Delivery locations with Codes
Partners with Library Names, Pull Slip Codes and Courier Slip Code
| Institution Name (IZ) | Library name | Location Code (Pull Slip) | Courier Slip Code |
* Not configured as part of the CLS/AFN Fulfillment Network
Courier routes
wrlc user
Patron accounts with the "wrlc user" user group are patron accounts in an IZ that is not their home IZ. These are often referred to as Linked Accounts.
Linked accounts are created when a patron makes a CLS/AFN request that can be filled by a partner.
Updating a patron's linked account.
Patron linked accounts can be updated in several ways.
- If a patron renews an item on loan from partner institution, the patron's expiry date will automatically be updated to match the expiry date at the home institution.
- If a patron requests a new item from a partner institution, the patron's expiry date will automatically be updated to match the expiry date at the home institution.
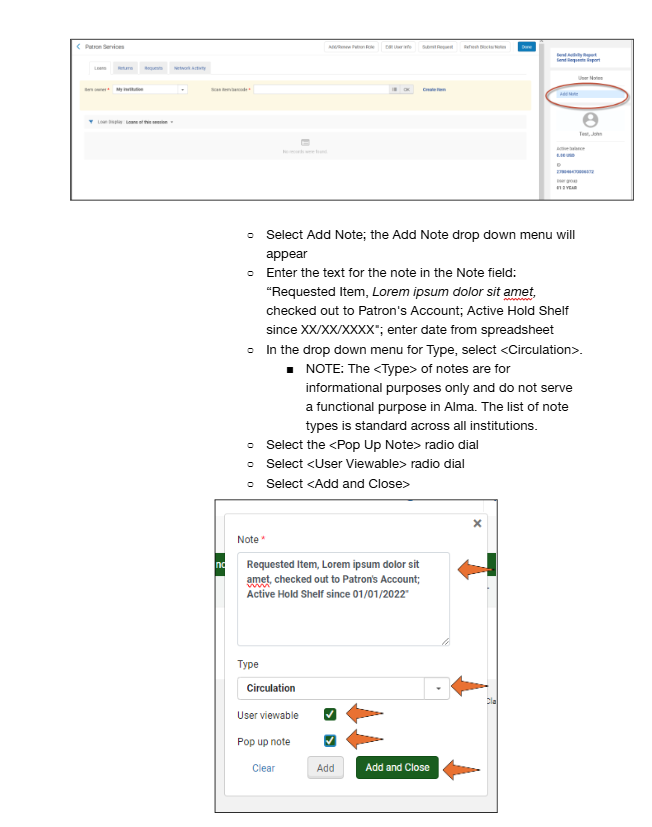
- A staff member can manually force an update to a linked patron's expiry date by using "Manage Patron Services".
Fulfillment --> Checkout/Checkin --> Manage Patron Services --> Patron Services page
-
-
- Select "Find user in other institution", select the appropriate institution.
- Scan patron's ID or search for patron and select appropriate one.
- "Find User" (This will force an update to the patron's linked account.
-
Affiliate Libraries
How members of affiliate libraries can request items in the SCF IZ or in Primo
Requesting in Primo
- Go to your affiliate library's Primo
- Click on the top-right Sign In link to sign into the system (you will have been given login credentials by WRLC)

- Once you are logged in, search for the item you would like to request
- Click on the title of the item from the search results list
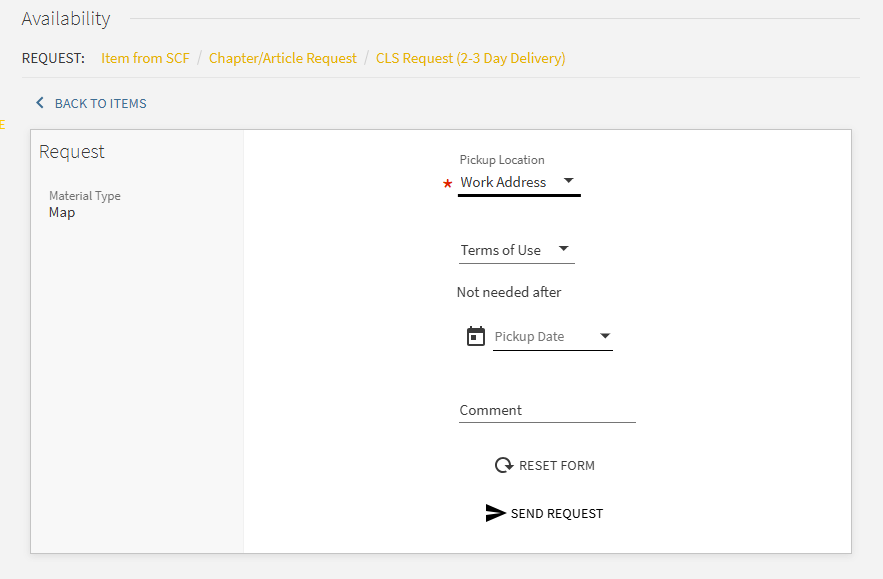
- On the title page, click on the Item from SCF link * Do NOT choose the other Availability options
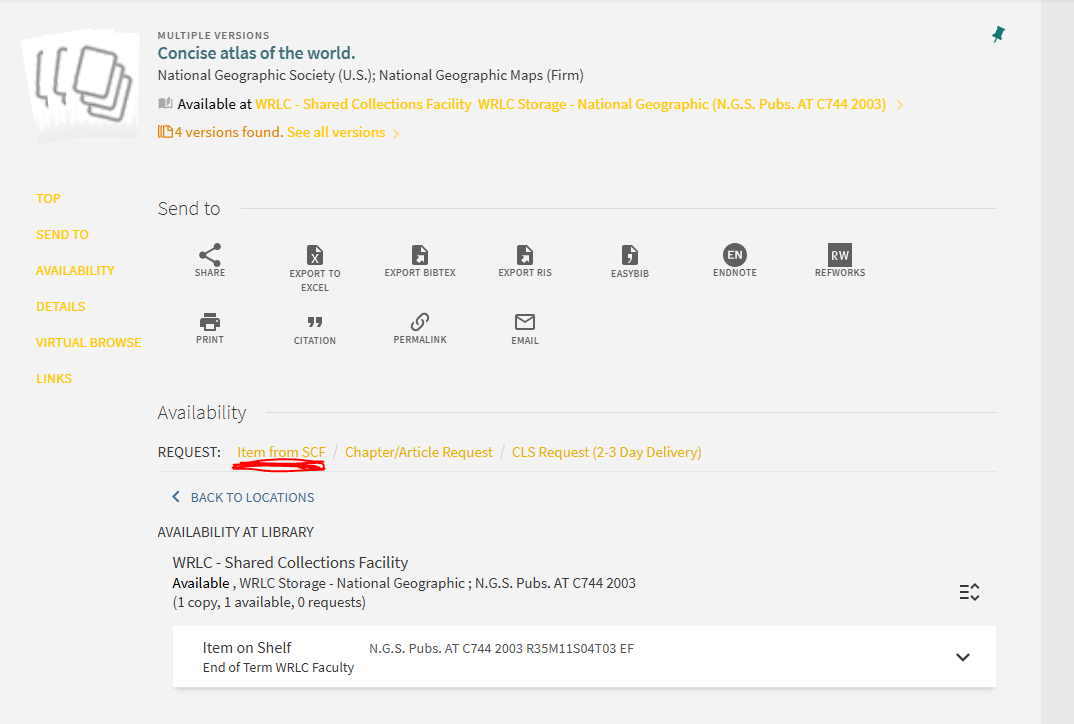
- In the Request form, choose Work Address for the Pickup Location
- Choose Send Request
- The item will then arrive at your library in 1-2 business days
Requesting in the Shared Collections Facility Alma
- Once you find the item you wish to request, click the ellipsis (...) button, then choose Request

- Then select the following values for your request
- Request Type = Patron Physical Item Request
- Requester = search and select your name
- Pickup Institution = Shared Collections Facility
- Pickup At = Personal Delivery > Office Delivery
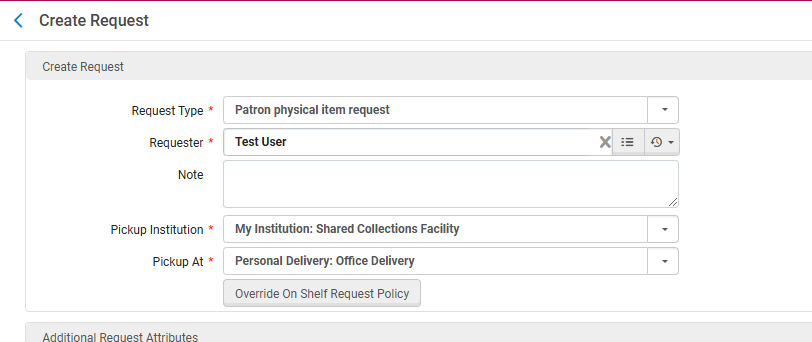
- Then click Submit
- The item will then arrive at your library in 1-2 business days