Peer to Peer Resource Sharing
Instructions and information on how to set up peer-to-peer resource sharing in Alma.
- Configuring Peer to Peer Resource Sharing in the IZ
- Moving P2P partner profiles from the NZ to the IZ (Cancelled)
- SUNY P2P partners Stony Brook, Binghamton, Albany, and Buffalo
- Adding P2P Partners from the Resource Sharing Directory
Configuring Peer to Peer Resource Sharing in the IZ
To fully configure peer to peer resource sharing, you will need to configure the following:
- Temporary Resource Sharing Locations
- Resource Sharing Library
- Resource Sharing Jobs
- Other Resource Sharing Settings
- Workflow Profiles
- Resource Sharing Partner
- Item Policy
- Temporary Item Creation Rule
- Fulfillment Policies
- Loan and Lending Resource Sharing TOUs
- Fulfillment Unit Rules
- Rota Template
- Rota Assignment Rule
- Sending Borrowing Request Rule
All names and descriptions listed in this document are merely suggestions. You may use whatever names and descriptions work best for your library.
You will need the Fulfillment Administrator and Resource Sharing Partners Manager roles to do this configuration work. All configuration work should be done at the institution level.
Temporary Resource Sharing Locations
Temporary item records for items borrowed from other libraries will be housed in your temporary borrowing location, and items loaned to other libraries will be temporarily moved to your temporary lending location.
As a frame of reference, WRLC's AFN / CLS process uses CLSBORR and CLSLEND as your Institution's temporary resource sharing locations.
1. Go to Configuration, select the library you’ve designated as your resource sharing library, and then go to Fulfillment | Locations | Physical Locations.
2. Click the Add Location link, enter the values in the first row of the table below into the window that opens, and then click the Add Location button. Repeat that process using the values in the second row of the table.
|
Code |
Name |
External Name |
Type |
Remote Storage |
Fulfillment Unit |
Call Number Type |
Map |
|
BORROWING |
Borrowing |
Borrowing |
Open |
leave blank |
Select value ending in “_FU” |
leave blank |
leave blank |
|
LENDING |
Lending |
Lending |
Open |
leave blank |
Select value ending in “_FU” |
leave blank |
leave blank |
3. Go to Fulfillment | Locations | Physical Locations, click the ellipsis next to your Borrowing location, scroll down to the Physical Location Circulation Desk List section, click the Attach Existing Circulation Desk link, select your resource sharing library’s circulation desk, make sure the Check In, Check Out, and Reshelve boxes are checked, click Attach Existing Circulation Desk, and then click the Save button. Repeat this process for your Lending location.
Resource Sharing Library
Your resource sharing library is the library where your temporary borrowing and lending locations are housed. It is possible to use your main library as your resource sharing library, or you can use the stand-alone resource sharing library that was created by Ex Libris. If you use the stand-alone resource sharing library, there will be a transit step between your main library and the resource sharing library whenever you receive or return a resource sharing item. If you use your main library as your resource sharing library, there is no transit step.
As a frame of reference, WRLC's AFN / CLS process uses your institution's Main Library , NOT the resource sharing library created by Ex Libris.
1. Go to Configuration, select the library you want to be your resource sharing library from the Configuring dropdown, and then go to Fulfillment | Library Management | Library Details.
2. Scroll down to the Resource Sharing Information section and make sure the Is Resource Sharing Library box is checked. Also, make sure your OCLC symbol is listed in the Symbol field.
3. Scroll down to the Borrowing Information section and check the following :
- Cancel Request on Locate Failure
- Automatically Activate Locate Profile
Next, select your temporary borrowing location from the Default Location dropdown (the one you created in the Temporary Resource Sharing Locations section). Lastly, select the library that you would like to serve as your default pickup location from the Default Pickup Location dropdown.
For libraries participating in WRLC's AFN, please note that the location configured as the default Borrowing location is already set to a CLS location. In order to use a different location for items borrowed from P2P partners, do not change the location in the Borrowing Information section (leave as is), and instead create a Temporary Item Creation rule.
4. Scroll down to the Lending Information section and check the following boxes :
- Automatically Locate Resource
- Reject Request When No Available Items
- Reject Request When No Requestable Items
- Reject Request When Only Electronic Available
- Ignore Electronic Resources
- Automatic Creation boxes
Next, select your temporary lending location from the Default Location dropdown (the one you created in the Temporary Resource Sharing Locations section).
For libraries participating in WRLC's AFN, please note that location configured as the default Lending location is NEVER used for AFN requests. Lending requests in the AFN are regular hold requests instead. For more information, see the Lending Setup section of the AFN Institution Zone Configurations page.
5. Scroll down to the bottom of the page, check the Locate By Fields box, click the No button, and then check the Title, Author, ISBN/ISSN, System Control Number, and LCCN (010) boxes.
6. Click the Save button.
Resource Sharing Jobs
This job must be running in order for resource sharing requests to automatically move on to the next lender if they’re not filled within the expiry days value listed in the resource sharing partner.
1. Go to Configuration | Fulfillment | General | Fulfillment Jobs Configuration, switch the status of the Expired Resource Sharing Requests job to Active, select Every Day at 02:00 from the Schedule dropdown, and then click the Save button.
Other Resource Sharing Settings
Because the setting below are NOT library specific, they apply to all libraries within an institution. When working with multi-resource sharing libraries in a single institution zone, leave the location and library code information blank, and instead 1) assign specific library and locations via the Lending and Borrowing sections of the Library Information page, and 2) assign a resource sharing library in the patron record.
|
Setting |
Value |
|
ill_item_creation_lib_code |
the code for your resource sharing library |
|
ill_item_creation_location_code |
the code for your temporary borrowing location |
|
rs_allow_actions_on_scan_in |
true |
|
rs_auto_request_lending |
true |
|
rs_disable_borrowing_auto_assign |
true |
|
rs_disable_lending_auto_assign |
true |
Workflow profiles
Workflow profiles help determine how resource sharing requests behave.
1. Go to Configuration | Fulfillment | Resource Sharing | Workflow Profiles.
2. Click the Add Workflow Profile link, enter “Peer to Peer Borrowing” into the Workflow Profile field, leave the Type dropdown set to Borrowing, check the boxes listed below, and then click the Add and Close button.
· Automatic renew, Cancelled By Patron, Cancelled by partner, Cancelled by staff, Conditional, Lender check in, Manual renew, Reject, Renew requested, Request accepted, Will supply
3. Click the Add Workflow Profile link again, enter “Peer to Peer Lending” into the Workflow Profile field, switch the Type dropdown to Lending, check the boxes listed below, and then click the Add and Close button.
· Borrower recall, Cancel reply, Conditional, Lender check in, Patron renewal, Staff renewal
Resource Sharing Partners
Resource sharing partners allow Alma institutions to send resource sharing requests to each other.
1. From the main Alma screen, go to Fulfillment | Resource Sharing | Partners, click the Community tab, change the search dropdown from Description to Name, and search for the partner, click the ellipsis next to their name, and then click Copy.
2. Click on the Institution tab, click the ellipsis next to the partner's name, and click Edit.
3. Select the workflow profiles you configured from the Borrowing Workflow and Lending Workflow dropdowns.
4. Click the Parameters tab, change the Expiry Time (Days) setting to the appropriate number, and then click the Save button.
Item Policy
This Item Policy will be added to the temporary records Alma will create for the items you borrow from SUNY. This configuration work must be done at the resource sharing library level.
1. Go to Configuration, select your resource sharing library from the Configuring dropdown, and then go to Fulfillment | Physical Fulfillment | Item Policy.
2. Click the Add Row button. The Item Policy configuration window will open.
3. Configure the Item Policy as shown in the image below and then click Add Row. Once the Item Policy configuration window closes, click the Save button.
Temporary Item Creation Rule
This Temporary Item Creation Rule will add the Item Policy you previously configured to the temporary item records Alma will create for the items you borrow from your peer-to-peer lending institutions. It will also determine the temporary item record’s location. This configuration work must be done at the resource sharing library level.
1. Go to Configuration, select your resource sharing library from the Configuring dropdown, and then go to Fulfillment | Library Management | Temporary Item Creation Rules
2. Click the Add Rule button
3. Configure the Temporary Item Creation Rule to have the following input parameters
Name = Resource Sharing Partner
Operator = InList
Value = [List of Resource Sharing Partners]
4. Make sure this rule is positioned at the top of your Temporary Item Creation rules list.
Fulfillment Policies
These fulfillment policies will be used in the Loan and Lending Resource Sharing TOUs you will configure for items borrowed from and loaned to your peer-to-peer lenders. This configuration work should be done at the institution level.
Please contact your lending partners to determine the values necessary for your fulfillment policies.
1. Go to Configuration, select your institution from the Configuring dropdown, and then go to Fulfillment | Physical Fulfillment | Advanced Policy Configuration.
2. Click the Add Fulfillment Policy button, select the type of policy you would like to configure, configure the relevant policies, and then click the Save button.
Note: If you already have policies configured for these resource sharing partnerships, there’s no need to configure additional policies. You can use the policies you’ve already configured.
Loan, Borrowing, Resource Sharing, and Lending Resource Sharing TOU's
These TOUs will determine the loan and renewal periods for the items you borrow from and loan to your peer-to-peer partners. They will also determine which user groups are allowed to submit borrowing requests in Primo. This configuration work should be done at the institution level.
Please contact your lending partners to determine the values necessary for your fulfillment policies.
1. Go to Configuration, select your institution from the Configuring dropdown, and then go to Fulfillment | Physical Fulfillment | Terms of Use and Policies.
2. Click the Add a Terms of Use button.
3. Click the Loan button and then click the Next button.
4. Select the relevant policies in the table below, click the Next button, and then click the Save button.
5. Click the Add a Terms of Use button again.
6. Click the Lending Resource Sharing button and then click the Next button.
7. Select the relevant policies in the table below, click the Next button, and then click the Save button.
8. Click the Add a Terms of Use button again.
9. Click the Borrowing Resource Sharing button and then click the Next button.
10. Select the relevant policies in the table below, click the Next button, and then click the Save button.
Fulfillment Unit Rules
These fulfillment unit rules will determine which Loan and Lending Resource Sharing TOUs are assigned to the items you borrow from and lend to your peer-to-peer partners. This configuration work must be done at the resource sharing library level.
1. Go to Configuration, select your resource sharing library from the Configuring dropdown, and then go to Fulfillment | Physical Fulfillment | Fulfillment Units
2. Click the ellipsis next to your resource sharing fulfillment unit and then click Edit.
3. Click the Fulfillment Unit Rules tab, select “Loan” from the Rule Type dropdown, and then click the Add Rule button.
4. Configure the Loan fulfillment unit rule to use your newly created Item Policy, then click the Save button.
5. Make sure the Loan fulfillment unit rule you’ve configured is positioned above any other Loan fulfillment unit rules that could potentially be applied to items borrowed from your peer-to-peer partners and then click the Save button.
6. Click the ellipsis next to your resource sharing fulfillment unit and then click Edit.
7. Click the Fulfillment Unit Rules tab, select “Lending Resource Sharing” from the Rule Type dropdown, and then click the Add Rule button.
8. Configure the Lending Resource Sharing fulfillment unit rule similar to the image below; in the list, add all of your P2P partners. Then click the Save button.
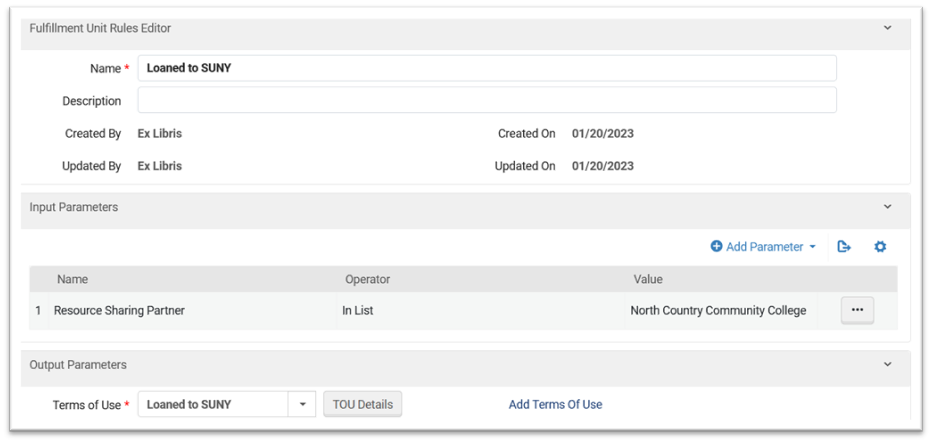
9. Make sure the Lending Resource Sharing fulfillment unit rule you’ve configured is positioned above any other Lending Resource Sharing fulfillment unit rules that could potentially be applied to items loaned to your peer-to-peer partners and then click the Save button.
10. Click the ellipsis next to your resource sharing fulfillment unit and then click Edit.
11. Click the Fulfillment Unit Rules tab, select “Borrowing Resource Sharing” from the Rule Type dropdown, and then click the Add Rule button.
12. Configure the Borrowing Resource Sharing fulfillment unit rule similar to the image below (when configuring the input parameter, select the user groups you want to be able to submit borrowing requests) and then click the Save button.
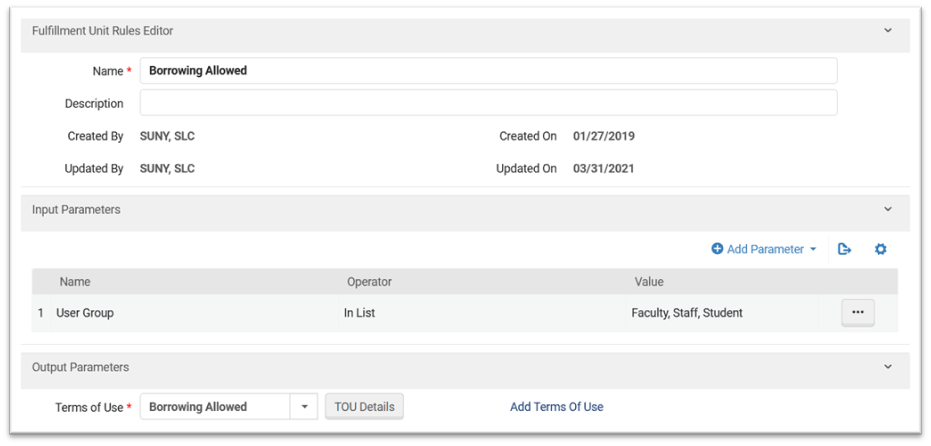
13. Make sure the Borrowing Resource Sharing fulfillment unit rule you’ve configured is positioned above any other Borrowing Resource Sharing fulfillment unit rules that could potentially prevent users from submitting borrowing requests.
Rota Template
This Rota Template will determine which peer-to-peer libraries are added to your request rotas. This configuration work must be done from the main Alma page, not the Configuration page.
1. Go to Fulfillment | Resource Sharing | Rota Templates
2. Click the Add Template button.
3. Configure the Rota Template and then click the Save and Add Members button.
4. Click the Add Partners button, select your peer-to-peer partners, and then click the Save Button.
Rota Assignment Rule
This Rota Assignment Rule will determine where peer-to-peer libraries will be positioned in your request rotas. This configuration work should be done at the institution level.
1. Go to Configuration, select your institution from the Configuring dropdown, and then go to Fulfillment | Resource Sharing | Rota Assignment Rules.
2. Click the Add Rule button.
3. Configure the Rota Assignment Rule according to the terms of your lending agreement, and then click the Save button.
4. Make sure the Rota Assignment Rule is positioned at the top of your rota assignment rules list.
Sending Borrowing Request Rule
This rule will make sure borrowing requests assigned to your peer-to-peer libraries are sent automatically. This configuration work may not be necessary given how your other Sending Borrowing Request rules are configured. This configuration work should be done at the institution level.
1. Go to Configuration, select your institution from the Configuring dropdown, and then go to Fulfillment | Resource Sharing | Sending Borrowing Request Rules.
2. Click the Add Rule button.
3. Configure the Sending Borrowing Request rule according to the terms of your lending agreement, and then click the Save button.
Moving P2P partner profiles from the NZ to the IZ (Cancelled)
NOTE: Ex Libris has changed their original assessment of the issue; after some testing, they now believe there is no way to move NZ partner profiles to an individual IZ without disruption of services to patrons. For that reason, WRLC is cancelling this project.
Phase One
Configuration in the Network Zone
-
Create the new Replacement Partners in the NZ
- As I mentioned, the only data that needs to be unique is the Code; make this unique in whatever way you like, as long as it doesn't match the Directory. But all other details within the partners can be identical to the current NZ partners.
-
Once they have been created, distribute these Replacement partners to the IZs by running the "Distribute Resource Sharing Configuration" job in the NZ
-
After which, the IZs should update any/all Rota Templates, replacing the Original NZ partners with the Replacement partners
-
When the IZs are fully configured to use the Replacement partners, return to the NZ and mark the Original partners as Inactive,
-
Then Distribute the changes again by running the "Distribute Resource Sharing Configuration" job in the NZ
- This is just an extra step to ensure that no new requests are created with these Original partners
Initial Network Zone Cleanup
6. Once you have confirmed that Replacement partners are all working as expected (and I see no reason why they wouldn't), delete the Original partners from the NZ
- This will remove the Original partners from some but not all IZs, but this is expected
7. Then distribute the deletion of the original partners by running the "Distribute Resource Sharing Configuration" job in the NZ
8. Wait 24 hours for these changes to be visible in Alma Analytics, then run a Lending and a Borrowing Analytics report (see image below) in the Network Zone; send to participants.
Partner Borrowing & Lending Request Cleanup
It is recommended to go one partner at a time. For example: start by removing SUNYBUF from American, and once that is done move on to SUNYALB, and so on*
A. Clean up Lending Requests
- For Lending Requests with the following statuses, nothing needs to be done. We will let the lending workflow run its course until the request finally has a status of Completed
- Being processed
- Received by partner
- Returned by partner
- Shipped physically
- Overdue request
- Lending Requests with the statuses below still have an "active" status according to Alma. Their status needs to be changed to one that Alma considers Inactive: Request Completed, Deleted, or any of the various Cancelled statuses
- Expired
- Locate failed
- Rejected the borrower request
To change a status manually, follow the steps below in the Lending Requests Task List. Filter your results appropriately, expand the results to show 50 at a time, and you will be able to update requests in batches of 50 (there is no job that can do this in Alma)
B. Cleaning up Borrowing Requests
- For Borrowing Requests that A) have the following statuses, and B) the active partner is one of the 4 SUNY schools, nothing needs to be done. We will let the lending workflow run its course until the request finally has a status of Complete
- Loaned item to patron
- Physically received by library
- Ready to be sent
- Renewed by partner
- Returned by patron
- Returned item to partner
- Shipped physically
- For all other borrowing requests, you can complete one of the following workflows:
- For Borrowing Requests that A) have the following statuses, and B) the active partner is NOT one of the 4 SUNY schools, we will need to remove the Original SUNY partners from each BR's Rota. Active partners cannot be removed; only Pending and Rejected. This method, though, can only be one manually one request at a time, but allows you to cleanup the SUNY partners from any active BRs
- Loaned item to patron
- Lost communicated
- Physically received by library
- Ready to be sent
- Renewed by partner
- Returned by patron
- Returned item to partner
- Shipped physically
- For borrowing requests with a status listed below, you can follow the workflow outlined in Cleaning up Lending Requests to change the status of these borrowing requests
- Expired
- Exported to third party
- Rejected by partner
- For Borrowing Requests that A) have the following statuses, and B) the active partner is NOT one of the 4 SUNY schools, we will need to remove the Original SUNY partners from each BR's Rota. Active partners cannot be removed; only Pending and Rejected. This method, though, can only be one manually one request at a time, but allows you to cleanup the SUNY partners from any active BRs
C. Wait until all active lending and borrowing requests (those with items checked out to patrons) have a status of Completed
13. Once one (or more) of the Original partners have been cleaned up from an IZ, run the Distribute job in the NZ once again
-
- If all of the requests were cleaned up, that partner will be removed
- If not, you'll see the same error message indicating if any Borrowing and/or Lending requests remain
Phase Two Cleanup
-
Once you're ready to begin, this is where you'll finally create the IZ-managed partners, as desired. Since the Original NZ partners are now deleted, each IZ can download the SUNY partners from the Directory, as desired
-
And in doing so, any Rotas and Rules can be updated to use these Directory partners
-
Once the IZs have fully switched to using Directory partners, the Replacement partners can now be deleted. The replacement partners will be marked as Inactive
-
Then distribute these Replacement partners to the IZs by running the "Distribute Resource Sharing Configuration" job in the NZ
Then you will follow the remaining steps in Phase One, Initial Network Zone Cleanup and Partner Borrowing & Lending Request Cleanup, this time slowly removing requests associated with the temporary profiles.
-
Like we discussed, this is going to be a long process. This is mostly due to having to wait on some requests to finish organically before partners can be deleted. But the advantage to all of the extra steps means that there will be functionally no disruptions of service to any/all patrons. And your RS staff will see little-to-no difference in their day-to-day work.
-
Some requests might be troublesome - you can't find them when searching in Alma, they won't let you update their status, etc.
-
If these pop up, Ex Libris has methods to find and correct them, or just outright delete them if they are not needed
-
-
Lastly, I would not recommend bothering with this process in your PSBs.
-
If you don't need the PSBs for active Resource Sharing testing, it would be best to just wait for the August refresh, which will automatically copy Production settings to the PSBs
-
SUNY P2P partners Stony Brook, Binghamton, Albany, and Buffalo
Although the policy is for all Peer to Peer configuration to exist in the Institution Zone only, the following partner profiles are configured and managed in the WRLC Network Zone:
- Stony Brook University, SUNY
- Binghamton University, SUNY
- University at Albany, SUNY
- University at Buffalo, SUNY
If any WRLC institution wishes to make changes to the partner profiles above, please send in a Service Desk ticket at servicedesk@wrlc.org
Background
When the WRLC first started peer to peer lending in Alma, all of the configurations for this workflow were set in the Alma Network Zone; our four original partners were the schools listed above. The policy changed in 2025 to move P2P to be IZ-only, but the only part of configuration we were unable to move were the partner profiles.
This is because partner profiles need a unique code and a unique ISO symbol; our NZ profiles shared an ISO symbol with the partner profiles in the Community tab, so the Community profiles cannot be copied to the IZ. And if the NZ partner profiles were to have different ISO symbols, none of the requests attached to that particular partner profile would work. Moving the partner profiles to the IZ would result in service disruption for patrons.
More information on this issue can be found in Salesforce case #07877638
Adding P2P Partners from the Resource Sharing Directory
Downloading a P2P Partner from the Resource Sharing Directory
To download a new P2P partner and add them to the rota template, follow the instructions below:
- In Alma, go to Fulfillment > Resource Sharing > Partners
- Choose the Community tab
- Search for the relevant partner. In this view, you can search for the partner by Description, Name, Pods I'm Part Of, or Symbol
- Once you've found the correct institution, click on the box next to their name to checkmark the profile. Then click Copy on the top right-hand corner OR click on the ellipsis button (...) next to their name, then choose Copy. By copying them to your instance of Alma, you have downloaded both the institution's Partner Profile and Locate Profile.
- To add them to the rota, go to Fulfillment > Resource Sharing > Rota Templates
- Find the appropriate Rota from the list. Click on the ellipsis button (...), then choose Edit
- Choose the Template Members tab
- Click + Add Partners on the top right-hand corner. Then search for the relevant partner, and click Add Partners
- Then choose the Save button at the top right-hand corner to save the rota template
Add Partner to the Temporary Item Creation Rule
The Temporary Item Creation Rule assigns a specific location and item policy to item records borrowed by your patrons from your P2P libraries. Adding the new partner to the list in the Temporary Item Creation Rule guarantees that items borrowed from your new P2P library will be given the correct location and item policy.
- In Alma go to Configuration. Choose your designated Resource Sharing Library (for most WRLC institutions, it is your main library) from the drop down menu, then Fulfillment > Library Management > Temporary Item Creation Rules
- Choose the temporary item creation rule that your Library uses for P2P partners. Click on the ellipsis button (...), then choose Edit
- Under Input Parameters, edit the Parameter Resource Sharing Partner | In List
- Add your new P2P institution to the list, then click Save to save the input parameter
- Click Save again to save the entire temporary item creation rule
Add Partner to your P2P Terms of Use (TOU)
- In Alma go to Configuration. Choose your designated Resource Sharing Library (for most WRLC institutions, it is your main library) from the drop down menu, then Fulfillment > Physical Location > Fulfillment Units
- Choose the Fulfillment Unit your Library uses for P2P from the list. Click on the ellipsis button (...), then choose Edit
- Choose the Fulfillment Unit Rules tab. Then choose the Rule Type of Lending Resource Sharing from the drop down menu.
- Edit the appropriate rule from the Institution Rules List (for the original participants of the SUNY pilot project, it will be called SUNY Lending
- Under Input Parameters, edit the Parameter Resource Sharing Partner | In List
- Add your new P2P institution to the list, then click Save to save the input parameter
- Click Save again to save the entire fulfillment unit rule
- Then click Save again to save the entire fulfillment unit
Review the Partner Profile
It is always best practice to review the information in a recently downloaded partner profile, just to make sure that the correct configurations are in place. Workflows and Expiry times will vary depending on the set agreements between borrowing institutions; you will want to find out what these settings should be before making changes to partner profiles.
- In Alma, go to Fulfillment > Resource Sharing > Partners
- Find the relevant institution under the Institution tab (this is the tab that automatically appears when first opening this page). Click on the ellipsis button (...), then choose Edit
- Under the General Information tab, choose the appropriate Borrowing and Lending Workflows from the drop-down menu. These settings will vary depending on your agreement with the institution.
- Under the Parameters tab, make sure the Request Expiry option is correct, as well as the Expiry Time. These settings will vary depending on your agreement with the institution.
A partner's Expiry Time setting determines how long the partner school has to respond to your school's borrowing requests. If your borrowing request isn't updated to shipped within the expiry period, the request will be automatically rejected the next time the Expired Resource Sharing Requests job runs in the partner school's IZ (it runs daily at 2:00am).
5. Then choose the Save button at the top right-hand corner to save the edited partner profile
Review the Locate Profile
It is also best practice to review the information in a recently downloaded locate profile, just to make sure that the correct configurations are in place. These settings will vary depending on the set agreements between borrowing institutions; you will want to find out what these settings should be before making changes to locate profiles.
- In Alma, go to Configuration > Fulfillment > Resource Sharing > Locate Profiles
- Find the relevant institution in the list. Click on the ellipsis button (...), then choose Edit
- Choose the Locate Profile Parameters tab
- Check the settings (for example, Ignore Electronic and Digital Resources) to make sure these are correct. These settings will vary depending on your agreement with the institution.
- Then choose the Save button at the top right-hand corner to save the edited locate profile
Check other relevant configurations
- Make sure the Expired Resource Sharing Requests job is running daily (especially if you have configured Expiry Time)
- Go to Configuration > Fulfillment > General > Fulfillment Jobs Configuration
- Check to see that the Expired Resource Sharing Requests is Active and running everyday.
- Make sure the Resource Sharing Working Days list includes the days your staff do not process ILL
- Go to Configuration > Fulfillment > Resource Sharing > Resource Sharing Working Days
- Add the days of the week your staff do NOT process ILL to the list
- Then click Save