Discovery - Primo VE Configuration
- Secondary Resource Types
- Resource Types Configuration
- How to hide / change / add MARC fields for display in Primo (Primo VE Display Rules, and DEI - List of terms to exclude)
- Recommended WRLC Primo Display Norm Rules
- Deduplication / FRBR
- Resource Sharing Form (Delivery Fields)
Secondary Resource Types
In August of 2022, Ex Libris introduced a new feature for Primo VE - secondary resource types. This feature allows records to have at least two resource types. The main resource type will continue to appear in the record view in Primo. The secondary resource type allows records to be found using filters and search pre-filters.
WRLC configured secondary resource types for records of government documents in the WRLC Network Zone. The secondary resource type of Government Document is applied to the following main resource types:
- Audios
- Books
- Computer Files
- Images
- Journals
- Maps
- Video/Film
The mapping for government document uses the 008 code for government documents (position 28) with the following regular expression string:
^.{28}[acfilmos].*Because this is configured in the Network Zone, it is only applicable to Network Zone records. If your institution would like to recreate these configurations for Institution Zone records, the settings would need to be configured in your Institution Zone.
Once saved, the secondary resource type is automatically added to new records. In order to apply the label to pre-existing records in the catalog, a Recalculate Local Resource Type job must be run on the pertinent records; this job re-indexes the records for Primo VE, thereby updating their labels.
Institution Zone Instructions :
Use the following instructions below if you wish to recreate the NZ settings in your own IZ
User Roles Needed :
- Discovery - Administrator
- Catalog Administrator OR Catalog Manager
Instructions :
-
Configure secondary resource types
- Go to Configuration > Discovery > Search Configuration > Secondary Resource Type
- Follow the steps below for each of the Main Resource Types listed in the summary section above:
- Select Add Secondary Resource Type
- Choose the Main Resource Types from the list in the summary above
- Choose the Secondary Resource Type of Government Documents
- Under Mapping from MARC Records, select Add Condition
- For the MARC Field and Subfield, type 008
- For the Value in MARC Field, copy and paste the regular expression :
^.{28}[acfilmos].* - For Use Regular Expression, click the checkmark
- Select Add Condition
- Select Save at the top right-hand side of the screen to save the Secondary Resource Type rule
- Repeat these steps for each of the Main Resource Types listed in the Summary portion of this document.
-
Create an indication rule to find Institution Zone records cataloged as government documents
- Go to the Metadata Editor
- In the upper left-hand corner, select Rules and then select Indication to view all Indication Rules
- Search for the Indication Rule titled Government Documents. Right-click on the name of the rule, then choose Duplicate
- A Duplicate Rule save page will appear. Click Save.
- The new indication rule is saved to the Institution Zone, and can be used on Institution Zone records.
-
Filter all Institution Zone records by the Government Documents indication rule
- Perform an Advanced Search in Alma by clicking the magnifying glass icon in the top left-hand corner of the Alma homepage
- Select an All Titles search
- Choose the parameters Is Linked Equals No, then click Search
- Once the results are listed, select Save and Filter Query
- Type in a Set Name
- Select Save and Filter
- Choose the Indication Rule created earlier, then select Filter Set
- Select Confirm to filter the set
-
Run the Recalculate local resource types job on the above filtered set
- Once the filtered set has been created, go to Admin > Run a Job
- Select the Recalculate Local Resource Types job from the Job List, then select Next
- Select the filtered set created earlier, then select Next
- Select Submit


Alma Resources :
- Primo VE 2022 Release Notes
- Configuring Secondary Resource Types for Primo VE
- MARC21 008 field
- Working with Indication Rules
- Managing Search Queries and Sets
- Manual Jobs
Posted 09/19/2022 by Jackie Saavedra (WRLC Network Zone Manager)
Resource Types Configuration
Below is a list of all custom resource types currently configured in the WRLC NZ.
Please note that the rules below only affect records linked to the Network Zone. In order to apply new resource types to IZ-only records and to IZ-linked CZ records, you will need to create and save Resource Type rules in your own Institution Zone.
- Audio LP's
- Code : AUDIOLP
- Display Singular Label : Audio LP
- Display Plural Label : Audio LPs
- RIS Type : Sound recording
- Genre : Unknown
- Metadata format : Book
- Logic
- MARC field and subfield : 007
- Value in MARC subfield (regular expression):
^s.{2}b.*
- Journals (the rules below are added to the out-of-the-box configuration for Journals)
- Replace existing rules : No
- Logic
- MARC field and subfield : LDR
- Value in MARC subfield (regular expression):
^.{6}a[bis].*
AND
-
-
- MARC field and subfield : 008
- Value in MARC subfield (regular expression):
^.{21}m.*
-
3. Book Chapters (the rules below replace the out-of-the-box configuration for Book Chapters)
-
- Replace existing rules : Yes
- Logic
- MARC field and subfield : LDR
- Value in MARC subfield (regular expression):
^.{6}aa.*
4. Books (the rules below replace the out-of-the-box configuration for Books)
-
- Replace existing rules : Yes
- Logic
- MARC field and subfield : LDR
- Value in MARC subfield (regular expression):
^.{6}a[cdm].*
Resources
How to hide / change / add MARC fields for display in Primo (Primo VE Display Rules, and DEI - List of terms to exclude)
Editing Primo VE Display Fields
This workflow is for editing the display of specific MARC fields that are already configured in Primo to be displayed to patrons. For a full list of the MARC fields associated with each pre-configured display field, please see this Primo Knowledge Center page.
- Go to Configuration > Discovery > Display Configuration > Manage display and local fields
- Choose + Add Field > Add Display Field
- Under Field to edit, choose the field you wish to edit from the dropdown menu.
- To see which MARC fields are associated with which display field, please see this Primo Knowledge Center page.
- If you do not see the specific field you are looking for, it could be because your IZ already has a localized display rule for this field. If that's the case, go back to the previous screen and Edit the correct display field.
- Under MARC21 Normalization Rules, click on the ellipsis button, then choose Edit.
- From here, make the necessary changes to the display normalization rules, then click Save.
- Suggested display rules for WRLC Subject Headings can be found on the following page: https://alma.wrlc.org/books/discovery-primo-ve/page/recommended-wrlc-primo-display-norm-rules#bkmrk-subjects
- To configure this local field to appear in Primo to patrons, see the section below, Adding a display of local field to a Primo VE View
Suggested MARC21 Primo norm rules for WRLC Institutions can be found on the following page:
For more information on Normalization Rule Syntax, see the following Primo Knowledge Center page:
Configuring a Primo VE Local Field
This workflow is for adding MARC fields for display that are NOT already part of one of the pre-configured Primo display fields. If the field you wish to add is not in the list found on this Primo Knowledge Center page, then you need to follow the steps below to configure the MARC field for Primo as a local field. Only 009, 09X, 490, 5XX, 69X, and 9XX fields are allowed to be added as local fields
- Go to Configuration > Discovery > Display Configuration > Manage display and local fields
- Choose + Add Field > Add Local Field
- Under Field to edit, select the local field you wish to use (Alma allows an institution to configure up to 100 local fields)
- To see which MARC fields are associated with which display field, please see this Primo Knowledge Center page.
- If you do not see the specific field you are looking for, it could be because your IZ already has a localized display rule for this field. If that's the case, go back to the previous screen and Edit the correct display field.
- Choose a Display label
- Add one or more MARC fields under MARC21 Fields
- Only 009, 09X, 490, 5XX, 69X, and 9XX fields are allowed to be added as local fields
- Under MARC21 Normalization Rules, click on the ellipsis button, then choose Edit.
- From here, make the necessary changes to the display normalization rules, then click Save.
- Suggested display rules for WRLC local NZ fields can be found on the following page: https://alma.wrlc.org/books/discovery-primo-ve/page/recommended-wrlc-primo-display-norm-rules#bkmrk-local-field-rules
- To configure this local field to appear in Primo to patrons, see the section below, Adding a display of local field to a Primo VE View
Suggested MARC21 Primo norm rules for WRLC local NZ fields can be found on the following page:
For more information on Normalization Rule Syntax, see the following Primo Knowledge Center page:
Adding a display or local field to a Primo VE View
Once you have configured a display or local field, you can follow this workflow to add the field to a Primo VE View, specifically under the Full Display details of a resource.
- Go to Configuration > Discovery > Display Configuration > Configure Views
- Find the view you would like to edit from the list. Click on the ellipsis button for that view, then choose Edit.
- Choose the Full Record Services tab
- Click on the ellipsis button for Record Details, then choose Configure.
- Here you will see a list of all display and local fields that are displayed to a patron in this Primo view; to add a new field, click + Add Field and choose the correct one from the drop down menu.
- You can change the order of the fields by using the up and down arrow buttons
- Once you've added the field(s), the view will automatically be saved. Now the field(s) should appear to the patron in Primo VE under the Details section of the record view.
DEI - List of Terms to exclude from heading
- Go to Configuration > Discovery > Other > DEI - List of terms to exclude
- Enter list of terms you wish to exclude in the Content box, then press Save.

Although much easier than editing display rules, it is not as precise simply because subjects containing only the word listed will not display, but subjects that contain the word as part of a phrase WILL continue to display. If you want to be thorough, you will have to list the problematic terms AND all possible variations and subfields.
Recommended WRLC Primo Display Norm Rules
The following are various Primo VE display normalization rules that can be used by WRLC institutions to display local WRLC Network Zone fields (for a full list, see the Local Network Zone MARC Fields wiki page). It is not a requirement to have these configured in a WRLC Institution Zone, but they can be helpful, depending on your institution's policies.
For instructions on how to configure new display and local fields for Primo VE, see the following Wiki page:
Display Field MARC21 Norm Rules
See this page on the workflow for editing Primo VE display fields : https://alma.wrlc.org/books/discovery-primo-ve/page/how-to-hide-change-add-marc-fields-for-display-in-primo-primo-ve-display-rules-and-dei-list-of-terms-to-exclude#bkmrk-editing-primo-ve-dis
Subjects
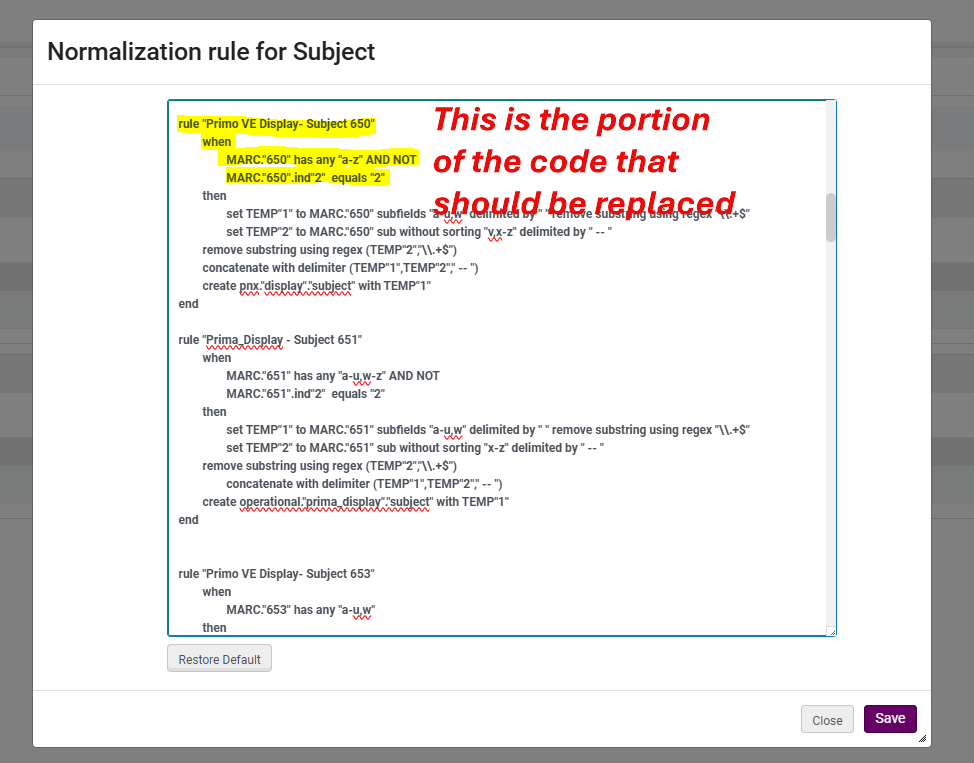
For all of the Subjects display norm rules below, first delete the pre-existing code for the specific field (in this case, either 650 or 651) before the "then" portion of the code in the out-of-the-box Primo norm rules, then replace it with the appropriate block of code below.
Hide "America, Gulf of" in a 650 subfield $$z
rule "Primo VE Display - Subject 650 (hide 650 $$z Gulf of America LCSH heading)"
	when
		MARC."650" has any "a-u,w-z" AND NOT
		MARC."650"."z" match "America, Gulf of*" AND NOT
		MARC."650".ind"2"  equals "2"
Hide "Illegal aliens" and other related LCSH in a 650 subfield $$a
rule "Primo VE Display - Subject 650 (hide 650 $$a Illegal aliens and related LCSH headings)"
	when
		MARC."650" has any "a-u,w-z" AND NOT
		MARC."650"."a" match "Illegal alien.*" AND NOT
		MARC."650"."a" match "Alien criminals" AND NOT
		MARC."650"."a" match "Alien detention centers" AND NOT
		MARC."650"."a" match "Alien property" AND NOT
		MARC."650"."a" match "Church work with aliens" AND NOT
		MARC."650".ind"2"  equals "2"
All 650 field rules listed above combined
rule "Primo VE Display - Subject 650 (display 650 local supplement WRLC headings and hide 650 $$z Gulf of America, $$a Illegal aliens, and related LCSH headings)"
	when
		MARC."650" has any "a-u,w-z" AND NOT
		MARC."650"."z" match "America, Gulf of*" AND NOT
		MARC."650"."a" match "Illegal alien.*" AND NOT
		MARC."650"."a" match "Alien criminals" AND NOT
		MARC."650"."a" match "Alien detention centers" AND NOT
		MARC."650"."a" match "Alien property" AND NOT
		MARC."650"."a" match "Church work with aliens" AND NOT
		MARC."650".ind"2"  equals "2"
Hide "Gulf of America", "America, Gulf of", and "McKinley, Mount (Alaska)"in a 651 subfield $$a
rule "Prima_Display - Subject 651 (hide 651 $$a Gulf of America and Mount McKinley LCSH headings)"
	when
		MARC."651" has any "a-z" AND NOT
        MARC."651"."a" match "America, Gulf of*" AND NOT
        MARC."651"."a" match "Gulf of America*" AND NOT
        MARC."651"."a" match "McKinley, Mount (Alaska)*" AND NOT
		MARC."651".ind"2"  equals "2"
Local Field MARC21 Norm Rules
See this page on the workflow to configuring a Primo VE local fields : https://alma.wrlc.org/books/discovery-primo-ve/page/how-to-hide-change-add-marc-fields-for-display-in-primo-primo-ve-display-rules-and-dei-list-of-terms-to-exclude#bkmrk-configuring-a-primo-
Display local WRLC subject headings in a 690 field (these are added to CZ records)
First delete the entire pre-existing code for the local field in the out-of-the-box Primo norm rules, then replace it with the block of code below.
rule "Primo VE - display local WRLC subject headings in CZ records, 690 field"
	when
		MARC "XXX" has any "a-z"
	then
		set TEMP"1" to MARC."XXX" subfields "a-w" delimited by " " remove substring using regex "\\.+$"
		set TEMP"2" to MARC."XXX" subfields "x-z" delimited by " -- " remove substring using regex "\\.+$"
		concatenate with delimiter (TEMP"1",TEMP"2"," -- ")
        create pnx."display"."subject" with TEMP"1"
end
Resources
For more information on Normalization Rule Syntax, see the following Primo Knowledge Center page:
For instructions on how to configure new display and local fields for Primo VE, see the following Wiki page:
Deduplication / FRBR
Primo uses Deduplication and FRBR (Functional Requirements for Bibliographic Records) processes to combine or group redundant records in the brief search results.
Dedup and FRBR settings are configured per view under Alma Configuration > Discovery > Display Configuration > Configure Views > Edit the View > Brief Results tab
More information can be found in the following Primo Knowledgebase pages :
- Understanding the Dedup and FRBR Processes (Primo VE)
- Configuring FRBR/Dedup Display Options
- Configuring the Dedup and FRBR Complete Keys in Primo VE
- Dedup and FRBR Analysis Tool for Primo VE
Prevent FRBR and/or Dedup in Discovery
Alma gives you the ability to prevent dedup/FRBR on specific records. This can be done in one of two ways : create a rule, or run a job on a set of records (the Prevent FRBR and/or Dedup in Discovery job). More information can be found in the following Primo Knowledgebase pages :
- Suppressing Groups of Records from Dedup/FRBR for Primo VE
- Manual Jobs and Their Relevant Parameters (look for Prevent FRBR and/or Dedup in Discovery under the list of jobs)
For both workflows, dedup/ FRBR suppression completed in the IZ are applied to local records only. If local records are linked in the NZ, they cannot be suppressed in the NZ unless you also create the same suppression rules in the NZ.
If there are specific NZ records for which you need Dedup or FRBR suppressed, please send an email to servicedesk@wrlc.org
In the WRLC NZ, we have two Suppress Dedup/FRBR Rules configured for the NZ-linked records in our shared catalog:
- Uniform title Bible
- IF Uniform Title (field 130 in the MARC record) contains "Bible", then suppress Dedup and FRBR
- Journal of applied behavior analysis
- IF Title contains "Journal of applied behavior analysis", then suppress Dedup
- This was configured for Salesforce case #00833444 with George Mason University
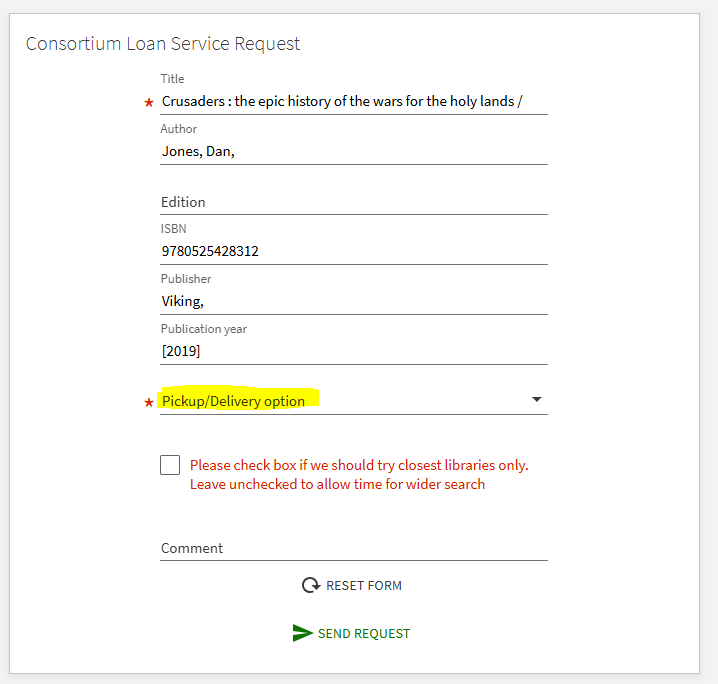
Resource Sharing Form (Delivery Fields)
The Delivery Fields section of the Resource Sharing Form configuration determines which (if any) pickup locations are displayed to patrons when they request items in Primo VE.
The following are the recommended configurations for WRLC institutions participating in our AFN network.
Keep in mind that our NZ Terms of Use for requesting are configured to be Pick up Anywhere. This allows staff members to choose any pickup location for patrons when they request items in Alma. Our consortia uses the Discovery configuration below to only show IZ-only locations for patrons when they request items in Primo.
1. Go to Configuration > Discovery > GetIt Configuration > Resource Sharing Request. Scroll down to the Delivery Fields section
IF your institution only has only one pickup location, then you can configure the following:
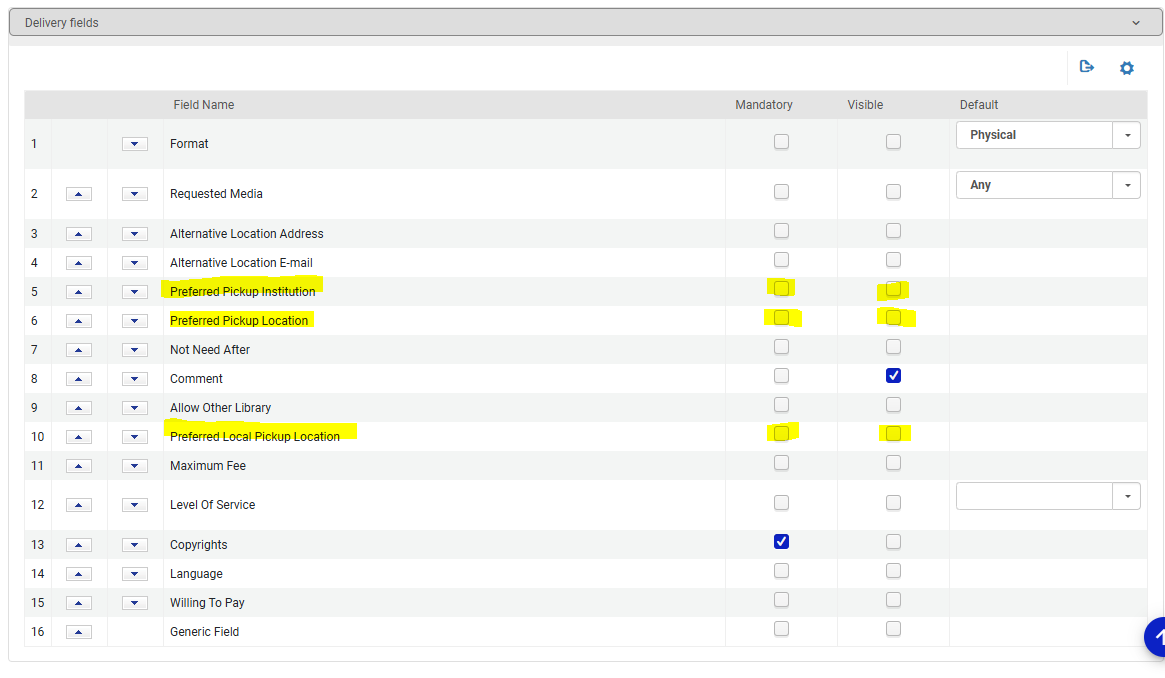
Leave the following options blank (no checkmarks):
- Preferred Pickup Institution (if checked, this will list all institutions in our NZ)
- Preferred Pickup Location (if checked this will list all libraries in our NZ)
- Preferred Local Pickup Location
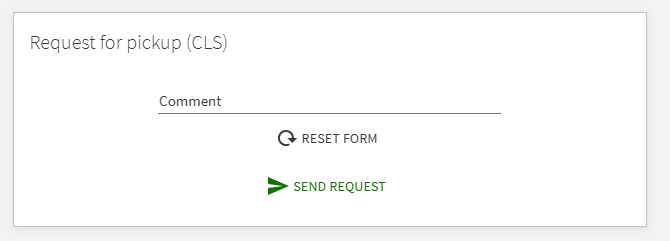
The Primo request form will then not display a pickup location option for patrons.
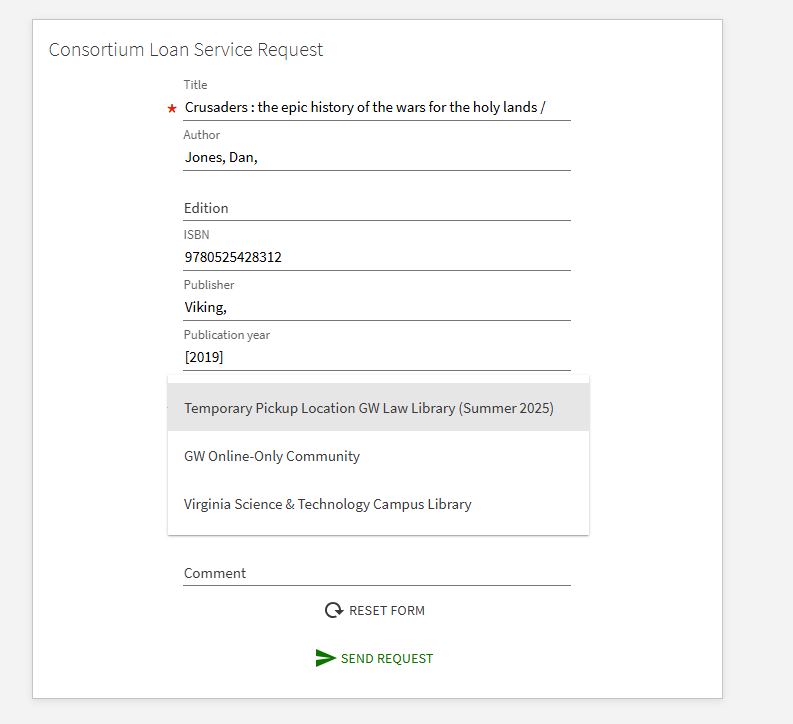
IF your institution has multiple pickup locations for patrons, you can configure the following:
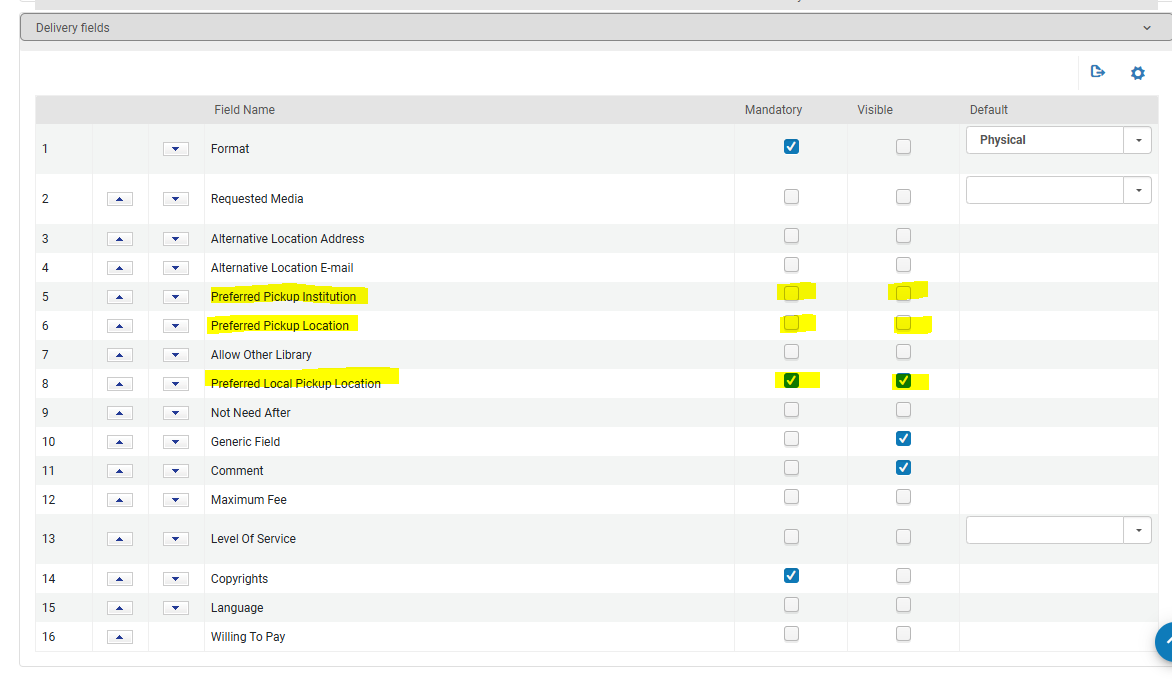
Leave the following options blank (no checkmarks):
- Preferred Pickup Institution (if checked, this will list all institutions in our NZ)
- Preferred Pickup Location (if checked this will list all libraries in our NZ)
Check Mandatory and Visible for the following option:
- Preferred Local Pickup Location
The Primo request form will then display a drop down menu of all pickup locations in your Institution Zone